

What Can You Do With 3ds Custom Firmware
DO Not Use THIS GUIDE
[
]
DO Non FOLLOW THIS GUIDE. It is extremely outdated and should not exist used. Instead, follow the guide on 3ds.hacks.guide
WORK IN PROGRESS BEWARE ON USE AS MAY Exist INCORRECT
Please notation that this page is a piece of work in progress, as I am a noob much of what is written hither may be incorrect, ruin your *DS, make you cheat on your significant other, etc; I take no responsibleness if you do any of the following, and don’t expect anyone to do it. (It is being rewritten to a simpler version with text versions without flow charts to be more descriptive and updated. This will include every exploit made as of vii/7/17) (Also, employ 3ds.guide for reference if help is needed) loool
Introduction and Basics
[
]
*DS:
Means both 3DS(Xl) or 2DS
Northward*DS:
Ways both New 3DS(40) or New 2DS XL
Sysnand vs emunand:
Your firmware and what runs your *DS is typically placed on your system through your sysnand. When you typically boot upward your *ds your sysnand is what unremarkably runs. Emunand on the other hand is an emulated version of your sysnand. When y’all first create it, it starts off every bit a copy of your sysnand Just placed on your SD card. This is great as you lot can update, modify and do things on your emunand, while keeping your sysnand condom.
CFW (Custom Firmware):
Essentially many different CFW exists, ranging from rxTools, Cakes FW etc. Some accept different compatibility with others, besides as including more or less settings and changes. rxTools is a really proficient ane for people starting off and are new to CFW for the *DS.
Basic Overview of CFW:
Basically your *DS typically runs the firmware on your sysnand, but many people want to run a firmware to do varying things such equally installing things, booting alternative things, making things region free. So nosotros would unremarkably practice this by utilising CFW to patch the system in a fashion. This is great but *DS CFW usually goes further then that, and utilise CFW to kick into emunand, and this gives you access to run emunand equally if it was your sysnand every bit needed just also include the patches or changes a person would like, such as CIA installing, region gratuitous, etc while however working similar to the sysnand.
Getting Started: Finding Your Exploit
[
]
First thing we demand to do is detect what exploit works best for your *DS or N*DS. Use the tabular array below to discover the correct exploit for your Firmware (Click System Settings on home menu then expect at the bottom-right corner of your height screen to see Firmware.)
| From | To | Name |
|---|---|---|
| 2.i.0 | ii.ane.0 | Installing Boot9Strap (2xrsa) |
| ix.0.0 | 11.three.0 | Homebrew Launcher (Soundhax) |
| 11.iv.0 | 11.4.0 | Installing Boot9Strap (DSiWare) |
2xrsa
What yous will demand:
- The latest release of SafeB9SInstaller
https://github.com/d0k3/SafeB9SInstaller/releases/latest - The latest release of Boot9Strap
https://github.com/SciresM/boot9strap/releases/latest - The latest release of Luma3DS
https://github.com/AuroraWright/Luma3DS/releases/latest
- The Homebrew Starter Kit
http://smealum.github.io/ninjhax2/starter.zip
Let’s Offset!
- Turn off your 3ds if it’due south on
- Put your sd card into your computer
- In the Luma3DS .7z file, copy kicking.house to the root of your sd card
- Create a folder with the name ‘boot9strap’ (no caps)
- From the boot9strap.zip file, copy boot9strap.business firm and boot9strap.firm.sha to the boot9strap folder
- From the SafeB9SInstaller.zip file, copy arm9.bin and arm11.bin to the root of your sd card
- Copy everything in starter.zip (the homebrew starter kit you downloaded) to the root of your sd card
- Squirt your sd card and put it into your system
- Plough on your system
Installing boot9strap
- Enter the internet browser
- Go to
http://2xrsa.3ds.guide - You should have booted into safeb9sinstaller
- Input the given key combo
- Printing a to reboot your device when told to
- In the Luma3DS Configuration Bill of fare, enable ‘Show NAND or user cord in System Settings
- Follow our guide on installing essentials you lot’ll desire after installing cfw:
http://3dshacks.wikia.com/wiki/What_to_do_after_you_installed_boot9strap
Homebrew Launcher (Soundhax)
What yous will need:
- The Homebrew Starter Kit
http://smealum.github.io/ninjhax2/starter.nada
- Soundhax
http://soundhax.com/
- The otherapp payload for your version/region
https://smealum.github.io/3ds/#otherapp
- The latest release of SafeB9SInstaller
https://github.com/d0k3/SafeB9SInstaller/releases/latest
- The latest release of Boot9Strap
https://github.com/SciresM/boot9strap/releases/latest
- The latest release of safehax
https://github.com/TiniVi/safehax/releases/latest
- The latest release of UDSploit
https://github.com/smealum/udsploit/releases/latest
- The latest release of Luma3DS
https://github.com/AuroraWright/Luma3DS/releases/latest
Let’s start!
- Power off your 3DS and insert the SD card into your computer
- Copy everything in starter.zip to the root of your sd bill of fare
- Copy the .m4a file you got from the soundhax website to the root of your sd card
- Copy the otherapp payload you downloaded to the root of your sd card and rename information technology to otherapp.bin
- Create a folder named ‘boot9strap’ (no caps) on the root of your sd card
- From the boot9strap.zip, copy boot9strap.business firm and boot9strap.firm.sha to the boot9strap folder
- Copy safehax.3dsx to the root of your sd card
- Copy udsploit.3dsx to the root of your sd card
- From the luma3ds .7z file, copy boot.firm to the root of your sd card
- From the safeb9sinstaller .zip file, copy SafeB9SInstaller.bin to the root of your sd card and rename information technology ‘safehaxpayload.bin’.
- Eject your sd carte du jour, put it into your 3ds, and turn it on
- Launch the 3ds sound app
- Go to ‘/SDCARD’ and play ‘<iii nedwill 2016’
You should now be in the homebrew launcher.
- Launch UDSploit and press showtime when information technology directs you to practice so
- Launch safehax- you should now be in SafeB9SInstaller
- Input the key philharmonic when directed to do so
- Press a to reboot
- In the Luma3DS Configuration screen, enable ‘Show NAND or user string in Arrangement Settings’
- Follow our guide on installing essentials you lot’ll want afterwards installing cfw:
http://3dshacks.wikia.com/wiki/What_to_do_after_you_installed_boot9strap
Creating emunand on SD Carte du jour
[
]
You lot can create your emunand using Godmode9 once you have your CFW Installed
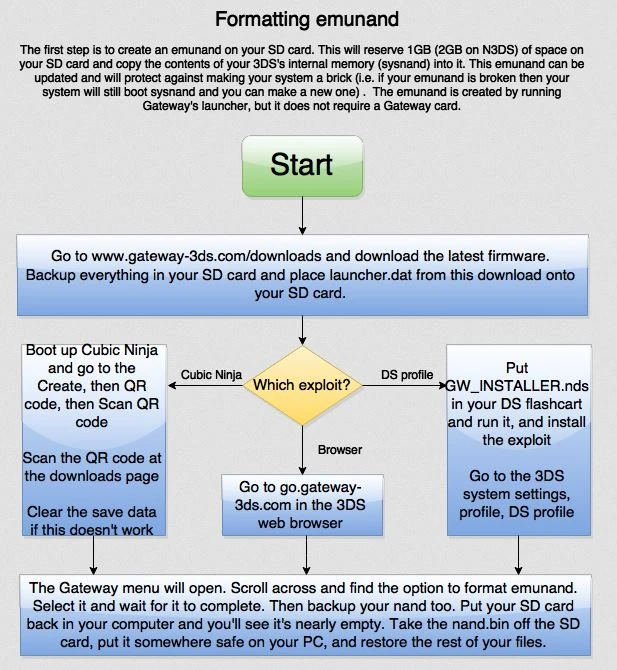
Gateway download: www.gateway-3ds.com/downloads
All-time thing to do hither is to follow the period chart again based on the exploit yous figured out earlier that would work on your device. You should find everything you need to download including the QR code on the Gateway download page.
Nand.bin file:
The Nand.bin file you obtain will let you lot to make a backup of your electric current sysnand. That fashion if you accidentally update or ruin your current sysnand yous at to the lowest degree have a mode to replace it with a known working version. Ensure to keep this file safe.
Setting Upwards rxTools
[
]
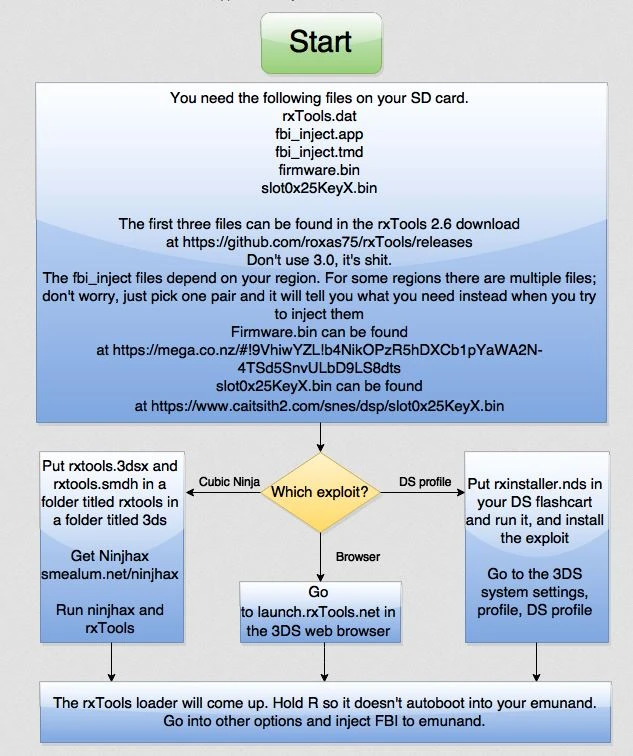
You can download the required files as specified using the links in the menses nautical chart to obtain
- rxTools.dat
- fimware.bin
- slot0x25KeyX.bin
- fbi_inject.app
- fbi_inject.tmd
Alternatively you can get the required file through rxTools 2.6 at
http://world wide web.rxtools.net/#!downloads, this will requite you the rxTools.dat.
In the Tools folder you should find a program called cdn_firm.py. If you double click this a window should appear and and so download your firmware.bin file in the same Tools binder. (Python is needed to download the file which can be found here if yous don’t already accept it:
https://www.python.org/ftp/python/2.7.11/python-2.seven.xi.amd64.msi).
Lastly the FBI Inject files tin be found in “fbi_injection” folder, personally I don’t add any FBI files in there now since you will probable have to set this injection upward later.
**Note: According to the rxTools site: “You volition need slot0x25KeyX.bin aswell on your device if you’re using emunand version newer or equal to version 7.0.”
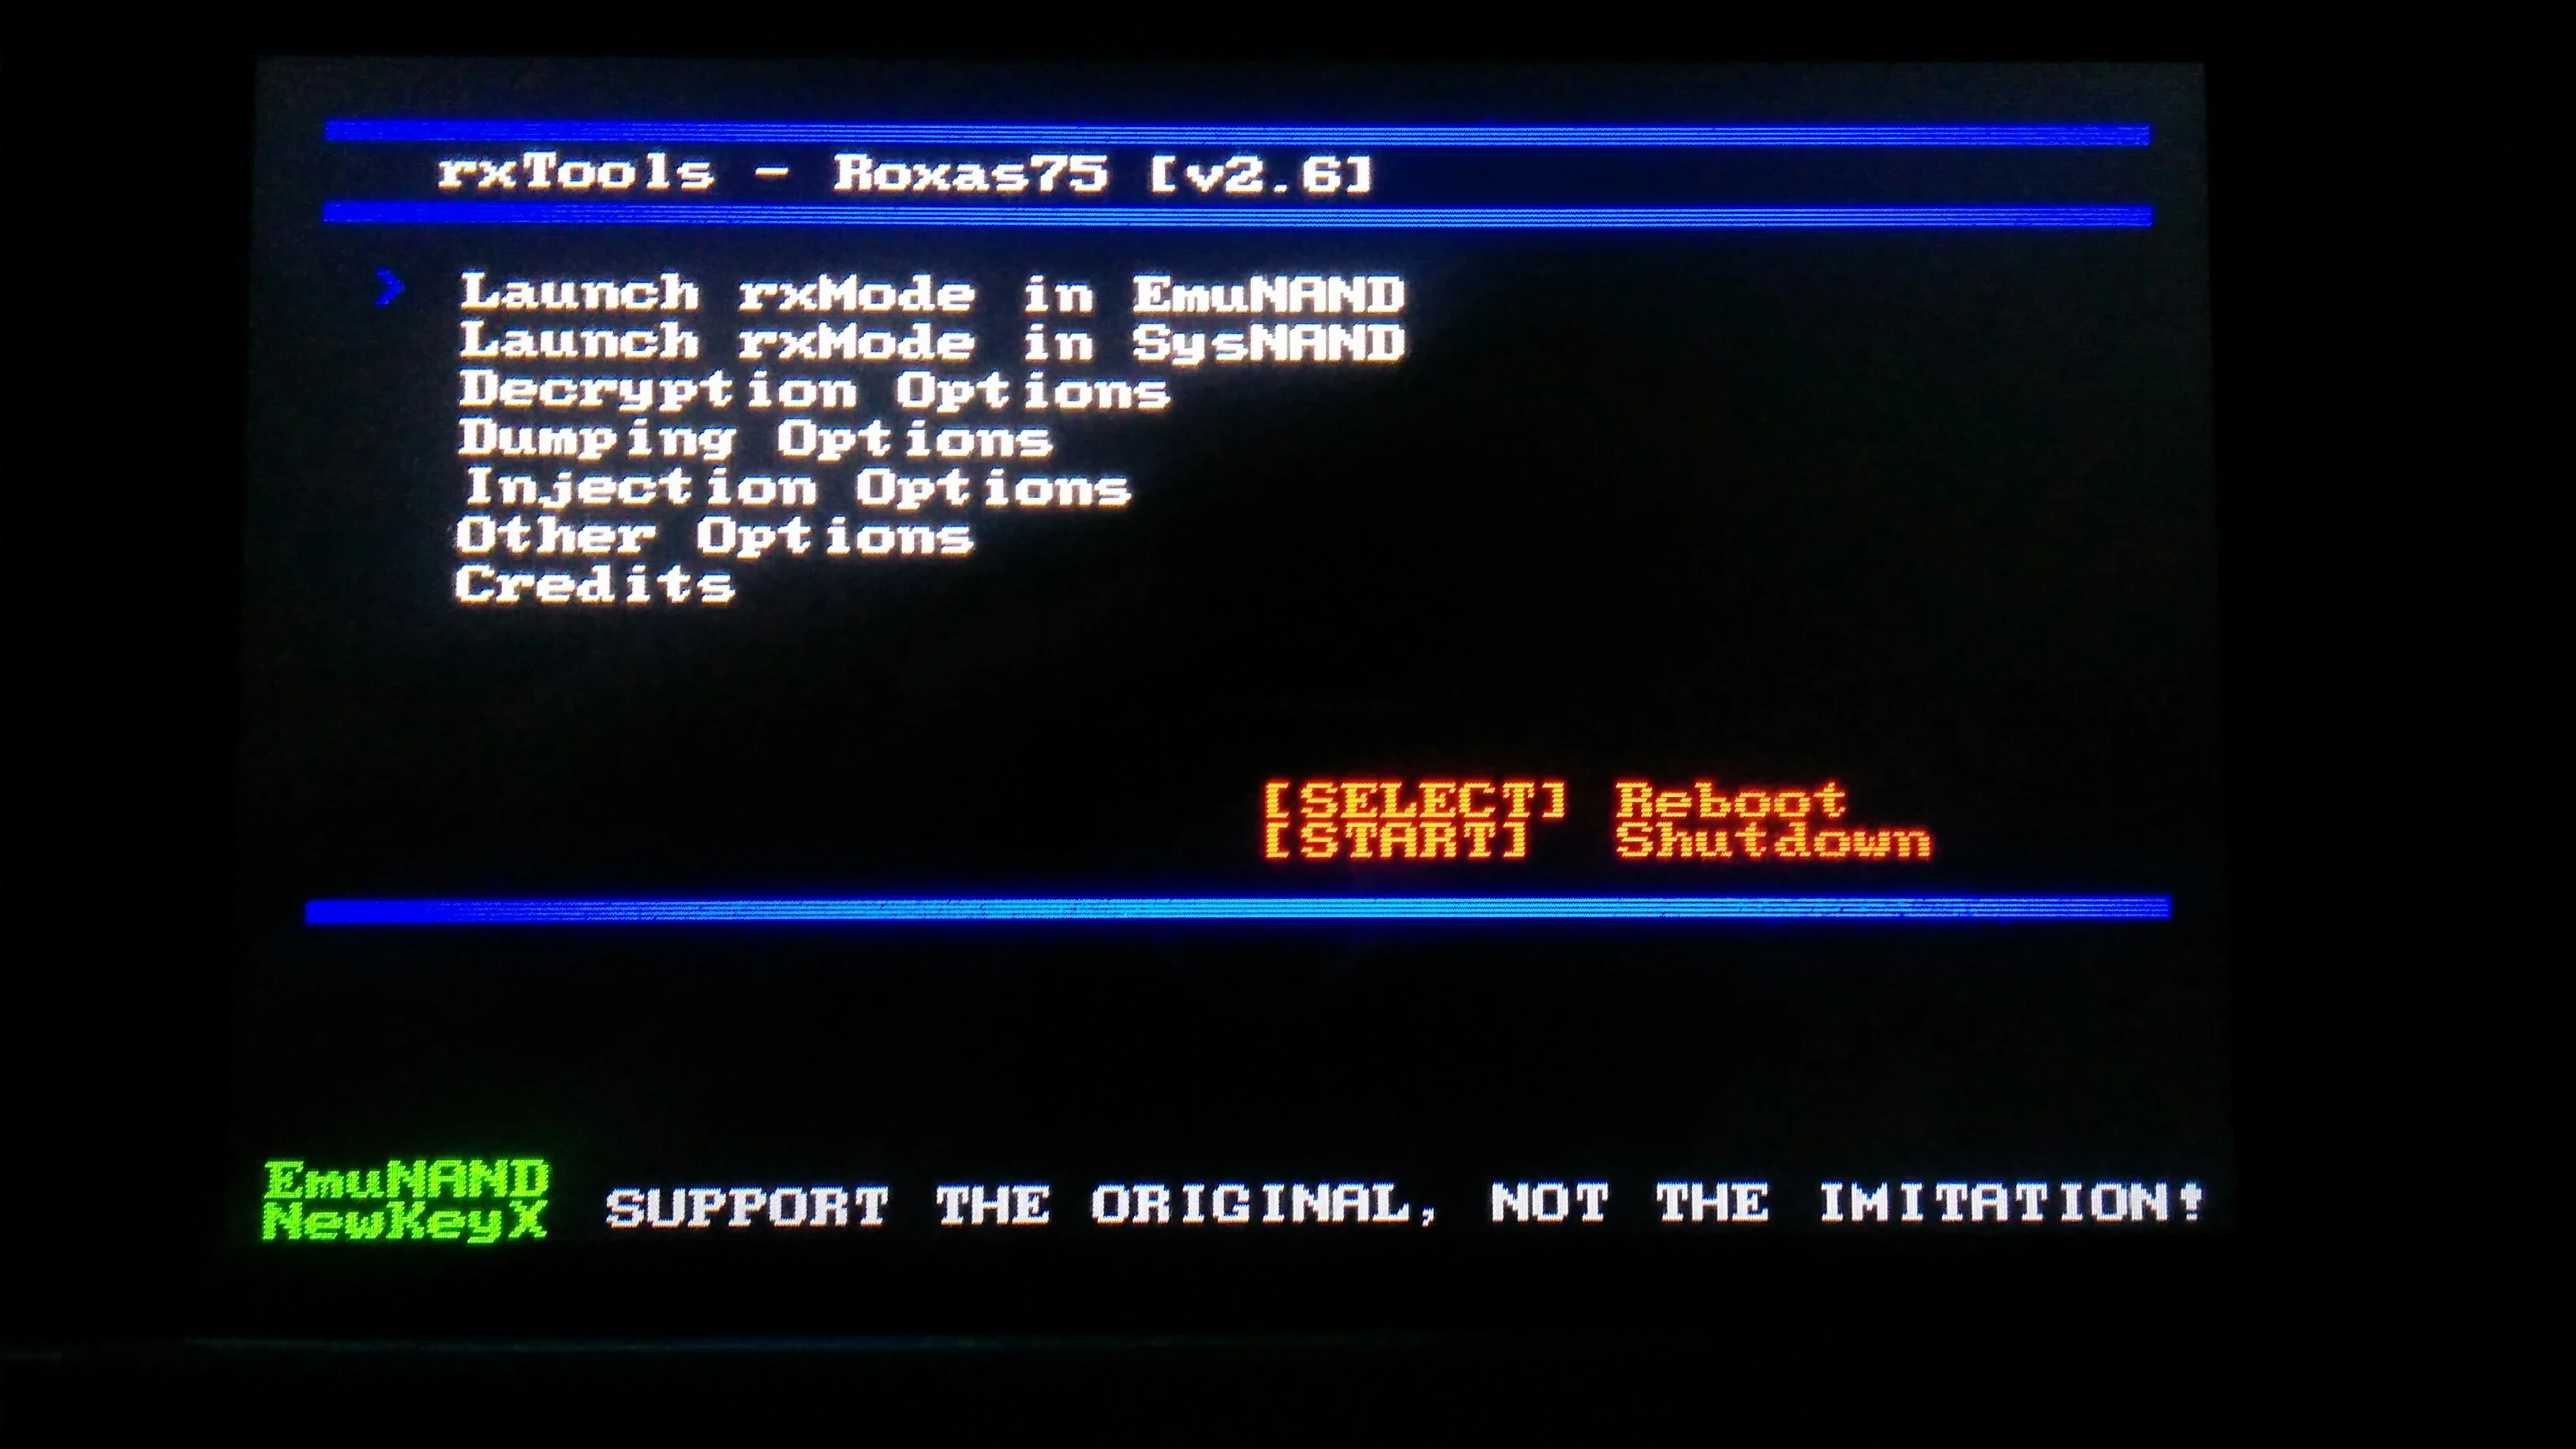
Following the flow chart y’all should kicking you into rxTools if you did everything correctly and will requite you the following view after the Installation Data Suite has finished installing. (recollect to press “a” after install and then press R to get into the settings menu):

Once booted into rxTools menu, you should see a green emuNAND on the bottom left, this means that emuNAND should exist done properly. A green NewKeyX means the slot0x25KeyX.bin was placed in properly as seen below:
Injecting FBI Installer
[
]
I figured I would expand on the FBI Injection in instance some people nonetheless become a scrap dislocated virtually information technology. Basically when yous get to “Other Options” in the rxTools bill of fare (you get to the card by pressing R when information technology boots). You should meet an area that states “Install FBI over Wellness&Safey App”.
Click on that and information technology will ask you to choose between your sysnand or emunand to install FBI over, I would suggest installing it on your emunand to be safety (Printing Y) you will likely gain an error similar to equally follows with varying region and TMD versions:
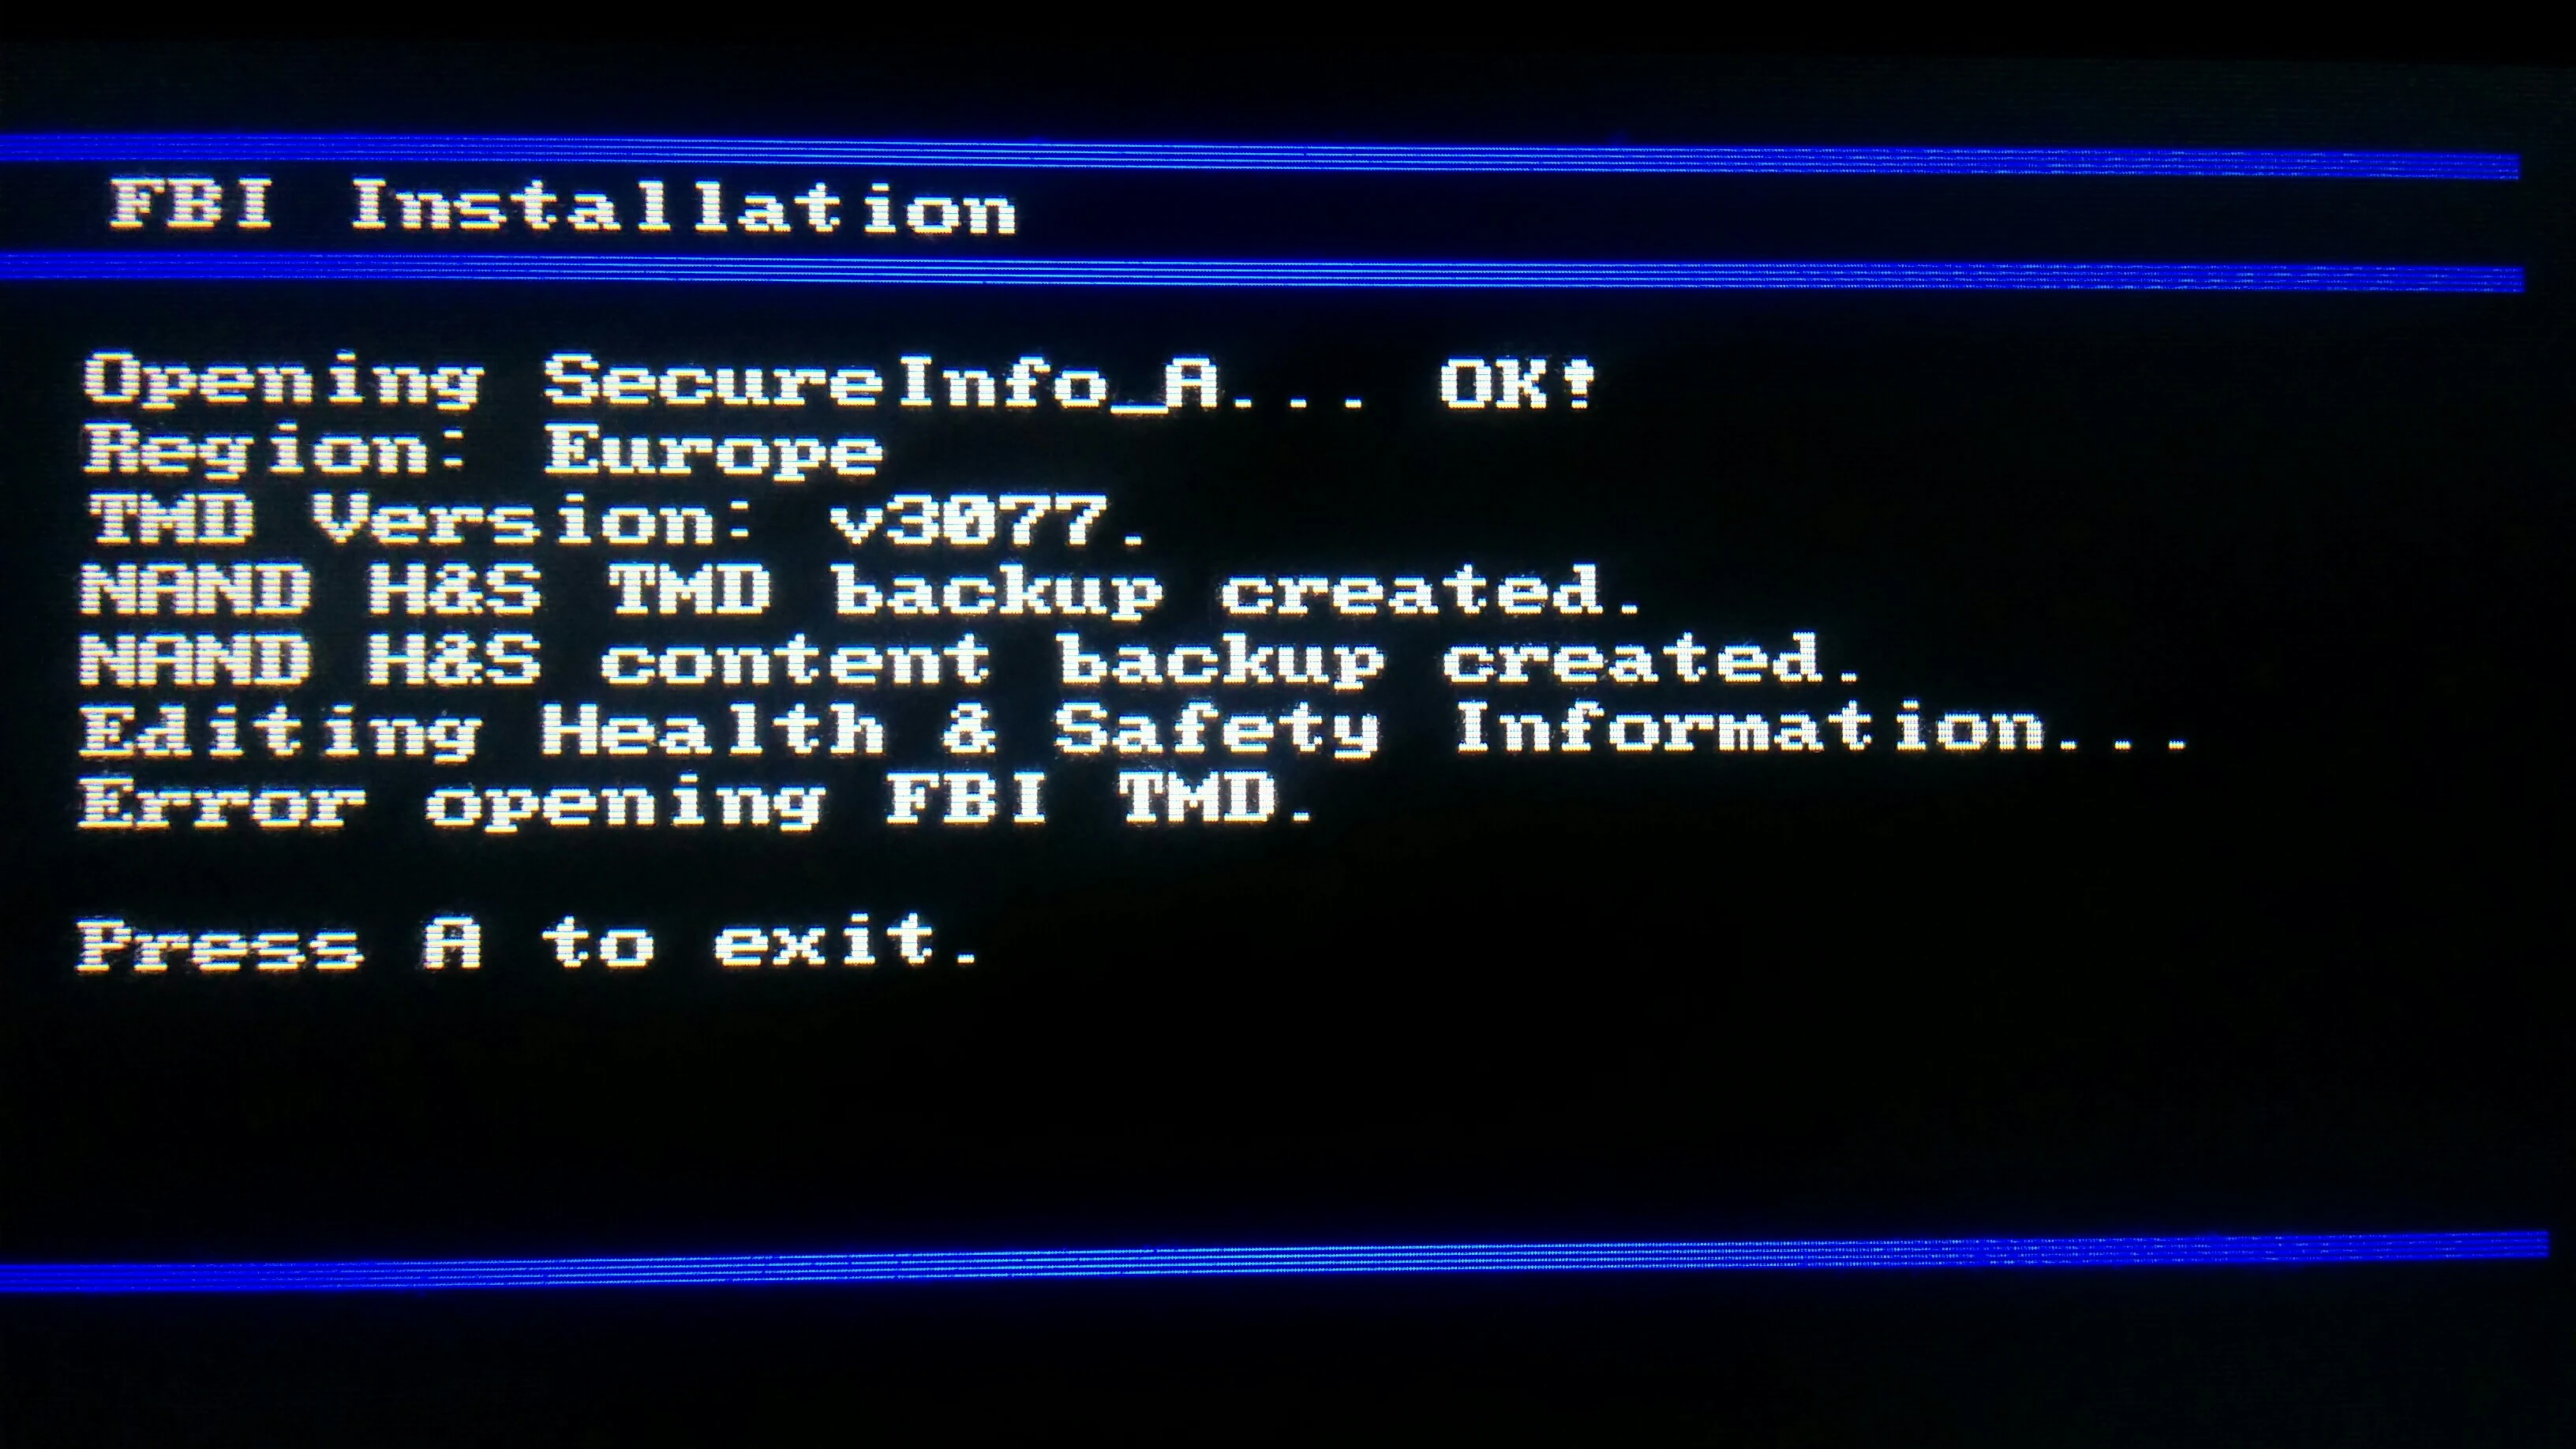
Using the Region and TMD version given hither, you can and then obtain the proper fbi_inject.app and fbi_inject.tmd files from the rxTools fbi_injection folder.
You will now need to exit out of rxTools, plow off your *DS, remove your SD Card, add together these files to the root directory of the card so replace the SD Card back into your *DS. Become back over booting into rxTools utilising the exploit you did previously, and retry installing the FBI install. This time it should work perfectly without any errors.
(Optional) Un-linking Your Nand
[
]
Unlinking NANDS is largely described in the prototype below and the original major flow chart merely the TLDR version can be seen below:
TLDR version:
Your when you created your emunand, information technology is exactly the aforementioned as the sysnand which can cause bugs for some systems. Since they are linked together it means things such every bit themes changed in one nand, will too alter in the other among other settings.
**Note: DO NOT FORMAT SYSNAND IF Yous DOWNGRADED MSET ON A 2DS** DON’T Practise It.
To unlink them and take them run as an individual the easiest way is to:
i) Turn off your *DS.
ii) Remove SD bill of fare from your *DS
3) Turn on *DS
4) Go to Organisation Settings>Other Settings>4>Format Organisation Retentiveness
5) This will wipe your *DS, plow it back off, identify your SD Card dorsum into your *DS and turn it back on again and it should run through the outset run process.
Your SD card should have 2 folders within the “Nintendo 3DS” folder with a large amount of values (an id) for the two nands.
The original information can exist seen below:

(Optional) Installing MenuHax for “Cold-boot” of emuNAND
[
]
This requires you to accept unlinked NANDs to work as expected
To do this, yous need to take a Homebrew entrypoint (e.m. browserhax, ninjhax, OOT3Dhax/powersaves) and the menuhax_manager from the 3DS Homebrew starter kit. You want to enter the Homebrew Launcher with sysNAND, open menuhax_manager and click “Install” (You will lose any theme practical). In one case yous take done this, go to the “Button config” push button and press “A”. Choose type2, hold R while tapping the touch screen. Afterwards yous’ve done all these steps, download ctrBootManager, and rename the ctrBM boot.3dsx to ctrB.3dsx. Once you’ve done this, edit your menuhax file on the root of your SD card (It should end with .bin and start with menuhax) with Notepad++ or HxD (or a similar software) and notice a string with “boot.3dsx”. Change that text to ctrB.3dsx and save the file. Next edit your boot.cfg file and set up the options to your liking. Of course keeping the rxTools entry at the get-go. Put the SD carte back into your 3DS and voilá, direct booting into emuNAND (with a ~60% bootrate). To boot back into sysNAND, concur R upon starting up your system. (I would advise yous to plow wireless off when in sysNAND to forbid accidental updates or Nintendo’s potential sneaky antics)
(Optional) Updating Emunand
[
]
Following the description given by the picture show below is the easiest style in updating emunand based on your *DS type.
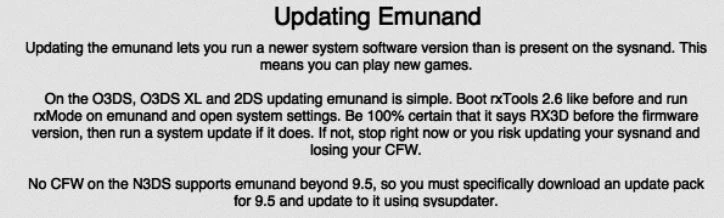
As it states, y’all need to MAKE Certain you are in RX3D mode before updating on your *DS, otherwise you lot may accidentally update your sysnand instead.
*Notation: N3DS CFW is NOT Supported laissez passer 9.v and needs to exist updated as described in the previous flick.
**Annotation: If you exit out of the settings awarding on your *DS you will be booted back into sysnand and Not emunand, and so be VERY careful you don’t update in the wrong one.
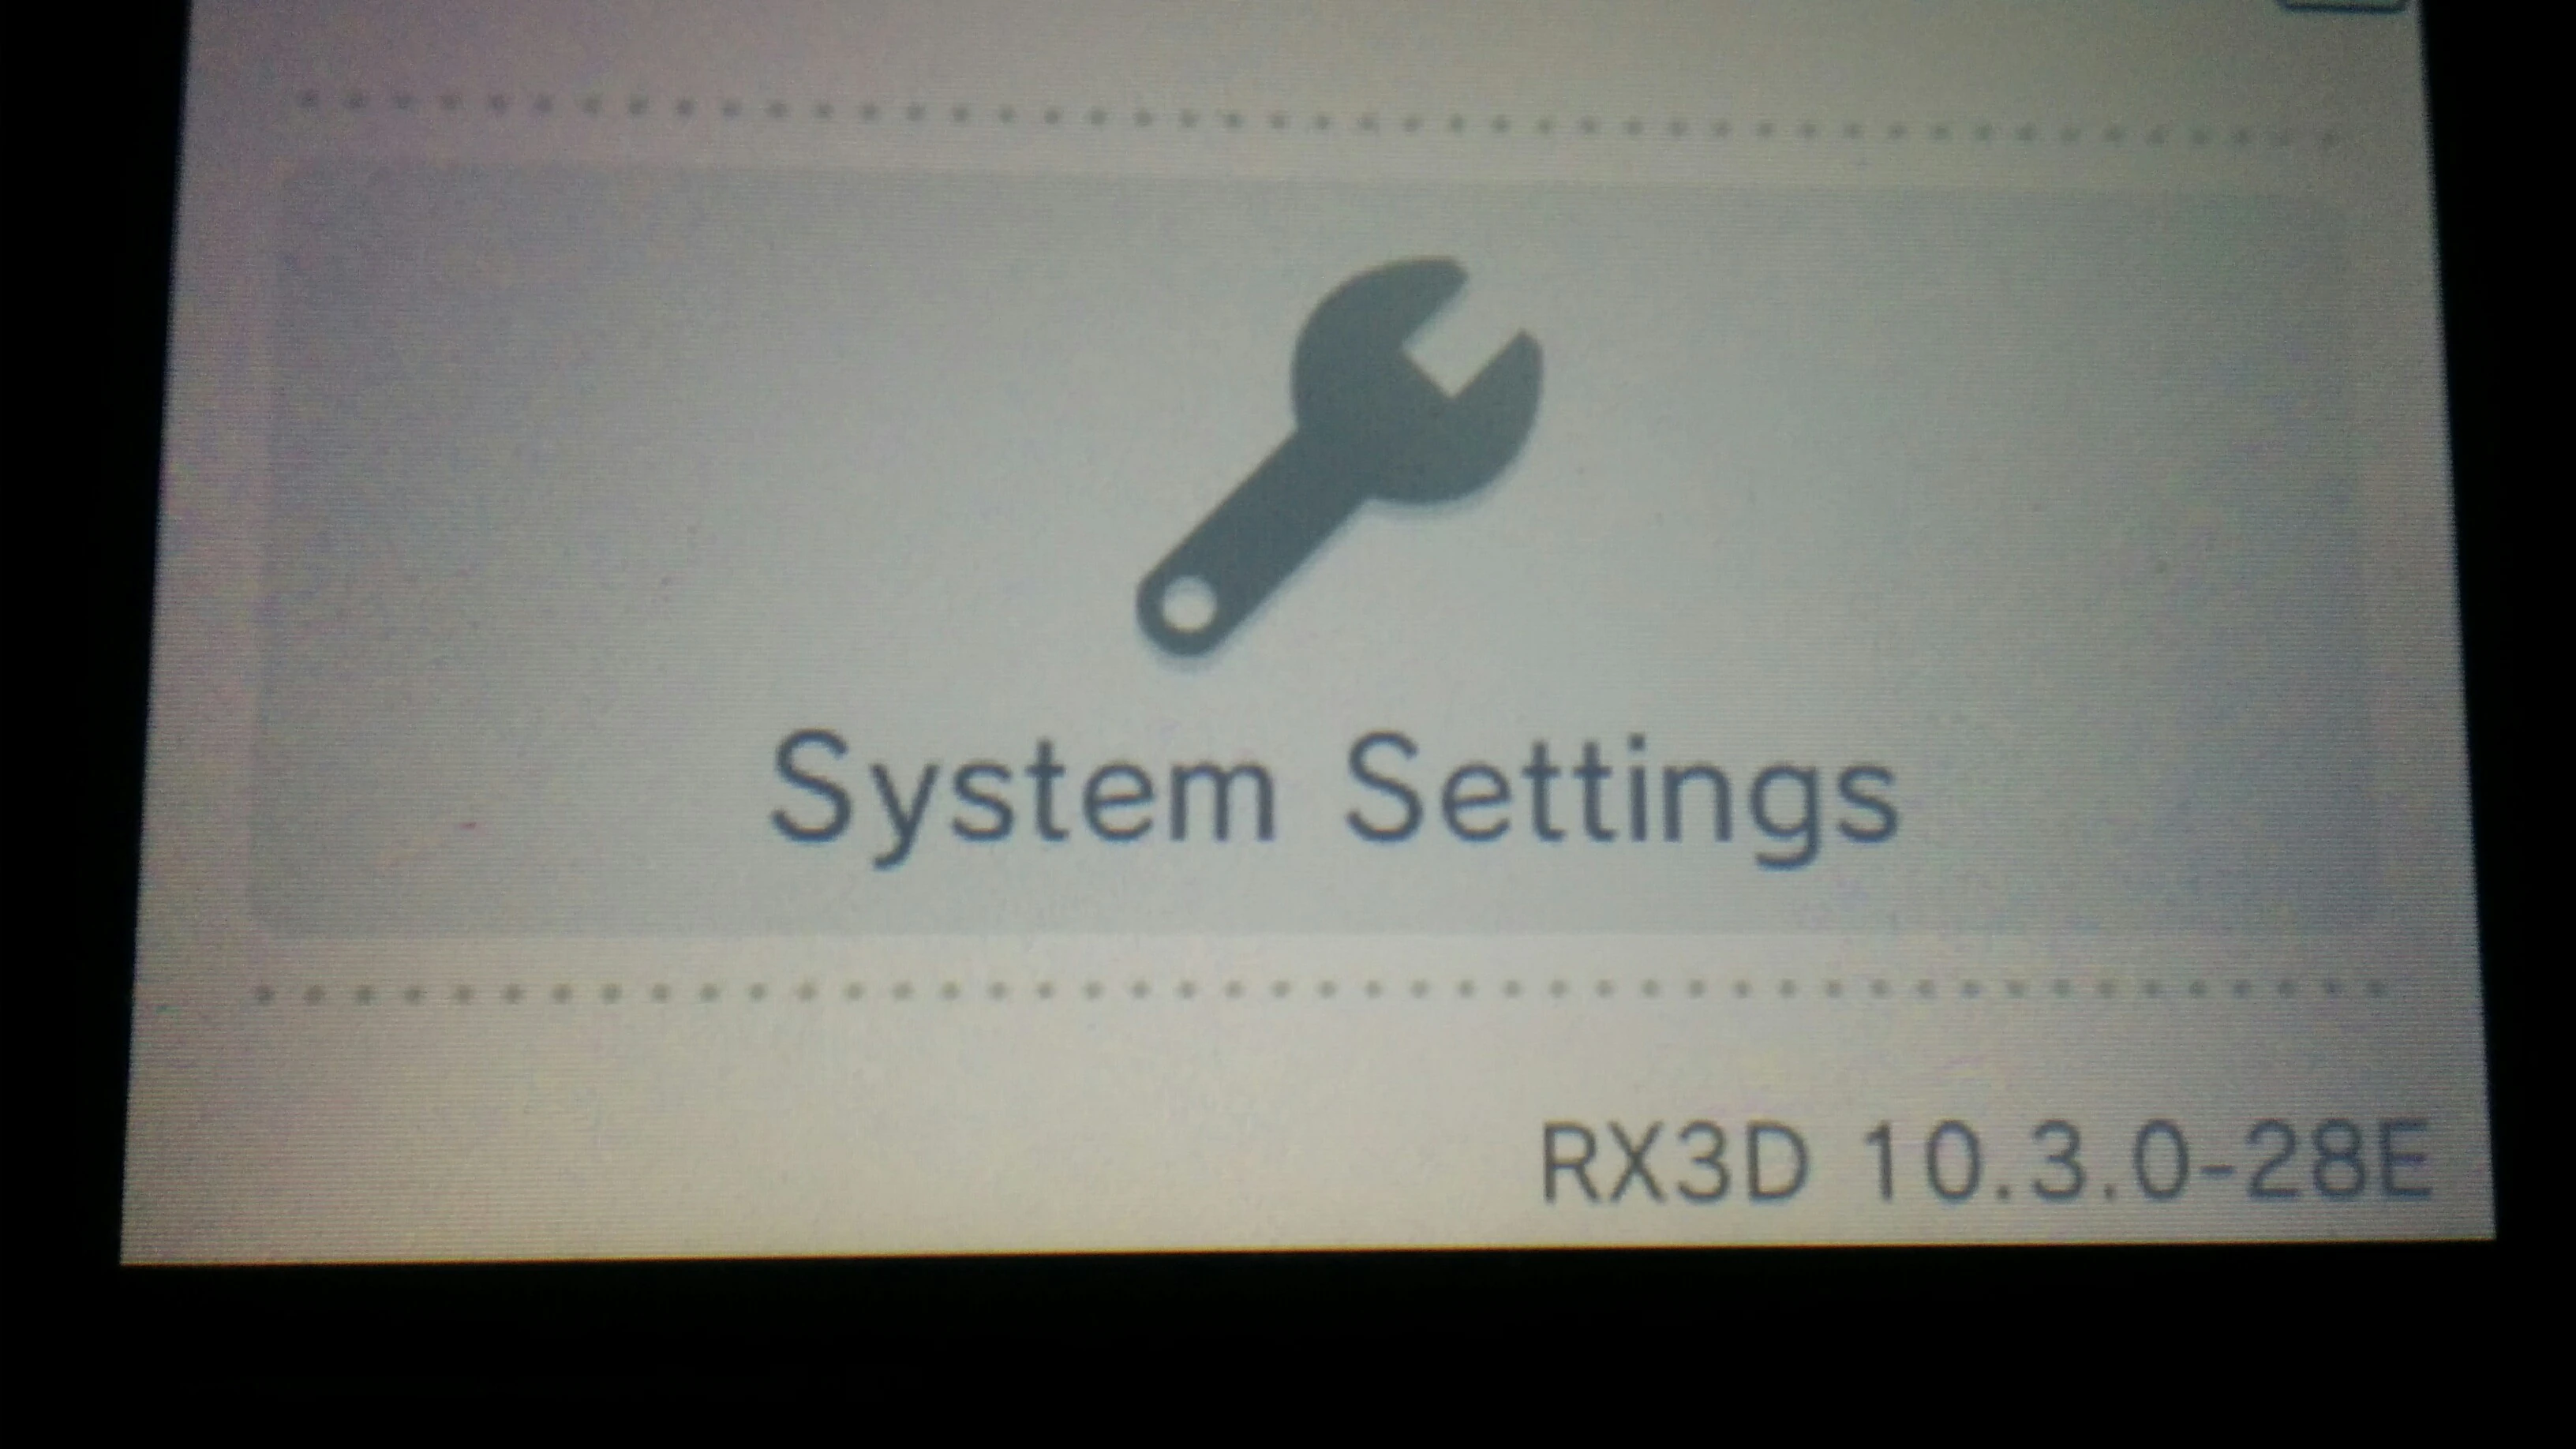
The easiest way to make sure y’all don’t is by going to “System Settings” Cheque it states RX3D as pictured beneath, so get to Other Settings>four>System Update.
Finished
[
]
From hither your *DS should be proficient to become, hopefully you have CFW now installed and tin become find out what awesome things you tin can do with it.
