

Is K9504 and K9504w the Same Firmware
Employ the principal menu to admission all of the full features of the NVR. The following chapter will explain how to navigate and perform the features through the carte.
Full general Settings
Apply the Full general Settings bill of fare to manage accounts, change the date & time, change the alive-video streaming options and settings, view the organisation events log, view hd information, view and upgrade your firmware and restore your device to factory settings.
Account Management
This NVR supports multiple user profiles with unlike permissions, which allow yous to share video surveillance without worrying almost unpermitted tampering with the arrangement settings, playback files, etc.
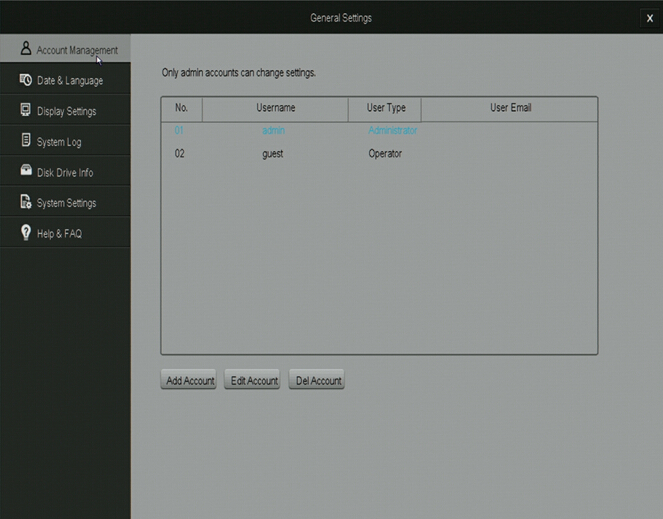
The system can back up upward to 16 accounts, with two different account types:
Administrator: Has full access to all features of the NVR and full permission to modify all settings.
Operator: Can only view the live-video stream.
Managing your user accounts by simply highlighting a user account from the bill of fare and selecting a function to perform.
Date & Language
Apply this menu to change the date & time settings and the language settings of your NVR.
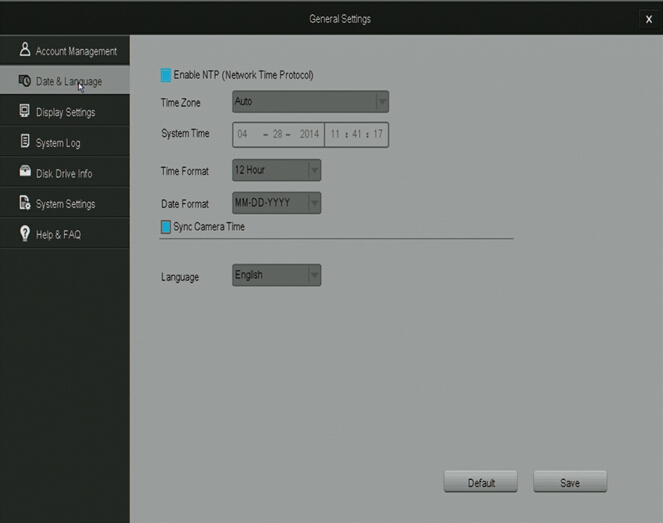
NTP Enabling the Network Fourth dimension Protocol (NTP) allows the system to automatically set the date and time of your system. This requires an cyberspace connection.
Sync Photographic camera Time The NVR will automatically update your photographic camera’s date and time settings to match that of your NVR.
Language Choose a unlike linguistic communication for your NVR arrangement to brandish.
Display Settings
The NVR offers several options to best customize the content displayed on the abode-screen of your NVR.
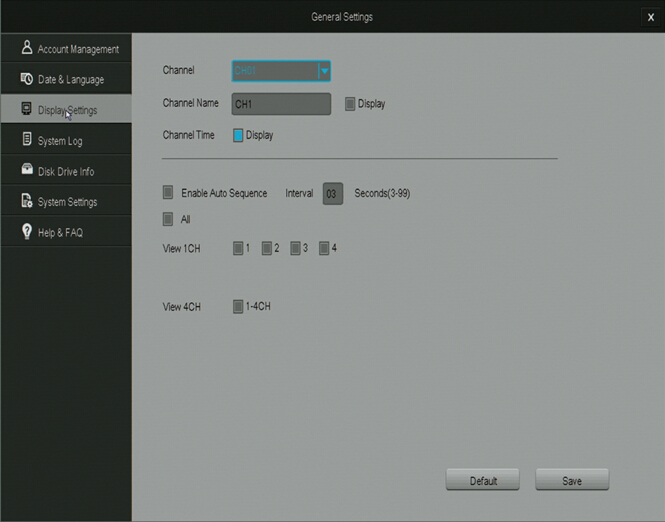
Channel Select a channel display to customize. Each aqueduct can brandish a specific aqueduct proper noun and the current fourth dimension.
Of import: When irresolute the settings on a channel, press [Relieve] before editing some other channel or exiting the page otherwise all changes will exist lost.
Channel Name You may gear up a name to describe the camera feed on your NVR. For case, if you have set up upward a camera in the front yard on channel 1, you could proper noun it “Front end Yard”.
Channel Time Select this option to display the current date and fourth dimension on the channel feed.
Enable Machine Sequence Selecting this option will activate sequential viewing. In sequential viewing, the NVR volition automatically bike between certain channel feeds. Yous may modify the duration of each sequence and select which feeds to cycle through under this bill of fare.
System Log
The NVR will provide notifications when certain events occur. Such events could be, merely are not express to: a missing hard drive or difficult drive failure, activated movement sensors, activated alarms, etc. Utilize this carte du jour to review the system log of all event notifications.
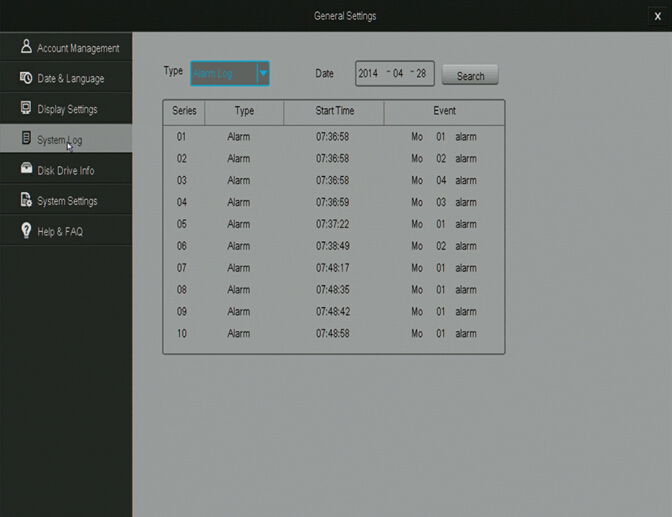
Series Numbers the events in sequence
Type Describes the type of notification (Alarm / Arrangement)
Get-go Fourth dimension The time when the outcome occurred.
Consequence Gives detailed description of the notification, e.g. Mo = Movement; 02 = motion captured on channel ii; warning = type of notification.
Disk Drive Info
This bill of fare allows you to review of import HDD information, format HDD’s and alter it’s settings.
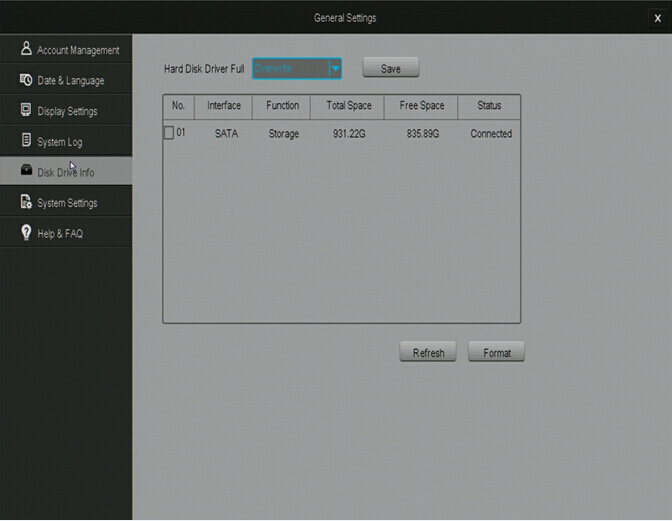
Hard disk drive Full Defines how the NVR will bear when the HDD is full. When the HDD has reached its storage chapters, the NVR will either finish recording or overwrite the older playback files. The overwrite feature is by and large recommended.
Refresh Update the HDD data shown on the page.
Full Space The total available storage infinite on the HDD in the NVR.
Free Space The amount of storage space left on the HDD in the NVR.
Format In order to format a drive, select information technology from the menu and press [Format]. The system will automatically format the HDD.
System Settings
Employ this carte du jour to view and alter basic settings and data of the NVR. From this menu, you may enable the startup guide, change the display resolution, view organization information, upgrade the NVR firmware and reset the organisation to factory default settings.

Startup Guide Check this box to enable the startup guide to announced (refer to 3.iii NVR First-time Startup). The startup guide will appear the next time the system is powered on.
Please refer to the post-obit instructions to upgrade the firmware from the system (required: a USB drive).
1. Download the updated firmware from the website on your estimator.
2. Place the file onto the root directory of a USB bulldoze.
3. Connect the USB bulldoze to the USB port on your NVR.
iv. Get to the [General Settings] menu in the Main Card and access the [Organisation Settings] page.
5. Select [Upgrade] and wait 5-10 minutes.
Aid&FAQ
Funlux offers comprehensive support for our users. This page provides links to some of our resources that will aid guide y’all to a maximal experience of our products. For support , please visit http://www.funlux.com/support.html
Device Management
Use the Device Direction bill of fare to manage the IP cameras connected to the NVR.
Add Device
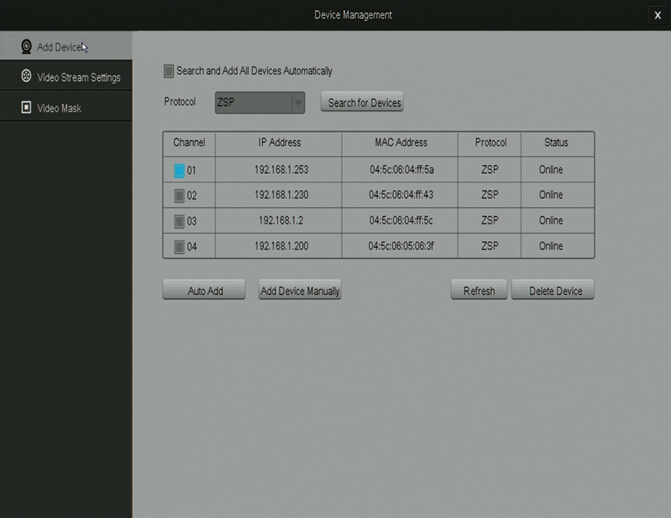
Search and Add All Devices Automatically Check this box to enable the automated search and add functions of the NVR. If there are empty channels, the NVR will automatically search and add nearby cameras.
Please wait iii-5 minutes for this process to be completed.
Search for Devices Select to search for devices with the aforementioned protocol. A pull upwardly card will appear for you to manually select the devices to add together.
Auto Add Will prompt the system to automatically search for and add devices.
Add together Device Manually Allows you lot to add a specific device by inputting the MAC address and port information.
Refresh Refresh the folio to update camera information.
Delete Device Select a channel and press [Delete Device] to remove the camera assigned to the corresponding channel.
Adding a device:
Yous will have four options unlike methods to add a device:
i) The system will automatically search for and add together devices if you lot leave the [Search and Add All Devices Automatically] option selected.
2) Prompt the system to automatically search for and add devices by selecting [Machine Add].
3) Press [Search for Devices] to open a list of available cameras and manually select the desired cameras to add to the organization.
4) Printing [Add Device Manually] to add the device past inputting the specific MAC address of the connected camera.
Video Stream Settings
Adjusts the video quality, frame rate, resolution and streaming bit rate
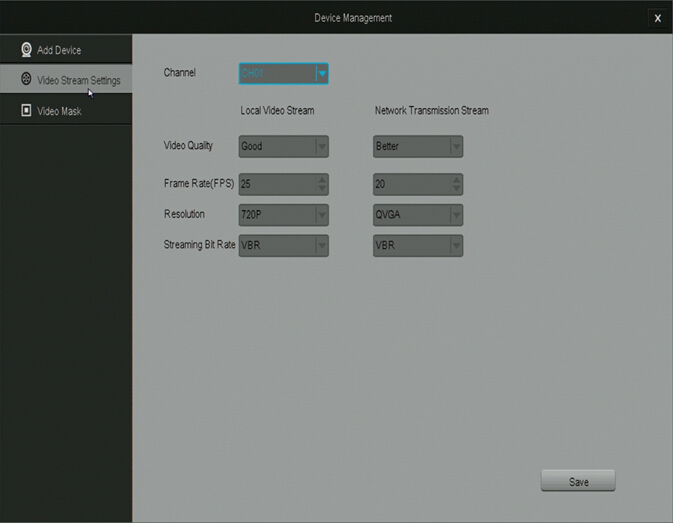
Channel Choose the channel that you would similar to change the settings for.
IMPORTANT: When changing the settings on a aqueduct, press [Save] before editing another channel or exiting the folio otherwise all changes will exist lost.
Local Video Stream Changes the video streaming settings for devices that are connected to the NVR locally (devices that are connected to the same internet connection every bit the NVR).
Network Transmission Stream Changes the video streaming settings for devices that are connected to the NVR remotely (devices that are connected through 3G/4G or a different internet connection than the NVR).
Video Quality Change the overall quality of the video. Increasing the quality besides increases the bandwidth used.
Frame Rate (FPS) This changes the number of pictures (frames) per second that make up the video stream. The college this value, the smoother and better the video quality is, however increasing this value also increases the bandwidth.
Resolution Change the resolution of the video stream. QVGA=320×240.
Streaming Scrap Rate This is the type of flake rate that the NVR uses to view video from the photographic camera. VBR stands for the variable flake rate, and CBR stands for the abiding bit rate—CBR is higher quality than variable, however information technology uses more bandwidth.
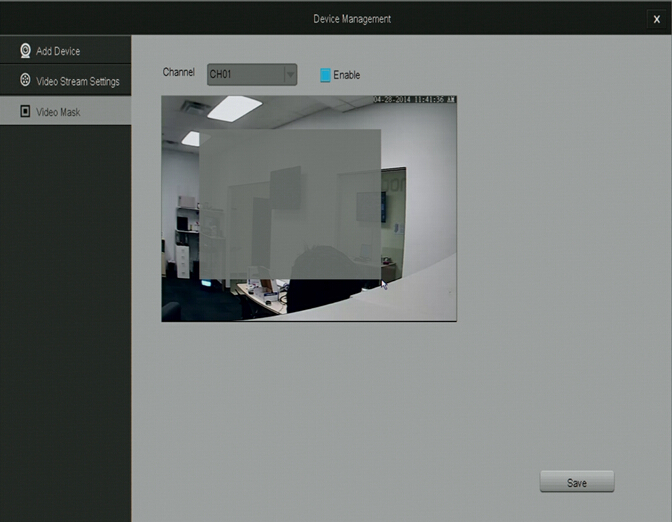
Video Mask
The NVR allows y’all to mask / hide sure areas of your camera feed from recording and monitoring.
To create an area to mask you must first select the aqueduct to edit and check [Enable]. Select an area by clicking and dragging down and to the right with your cursor. A gray box will appear. Remove the selected areas by right-clicking on the box. Subsequently you are washed, printing [Save] and proceed to other channels or return to the dwelling house-screen.
Network Settings
Basic Settings
Selecting DHCP will permit the NVR to manually configure the IP address and network parameters.
The settings on this page enable admission to the NVR over the internet. Unless you are an avant-garde user, we do not recommend that you modify these settings. These definitions are not sufficient for manual networking and configuration.

Web Port This designates the port used when accessing the NVR through a spider web browser.
Video Port This designates the port that the video feed is transmitted over.
Mobile Port This designates the port used when accessing the NVR through a smart phone or mobile device.
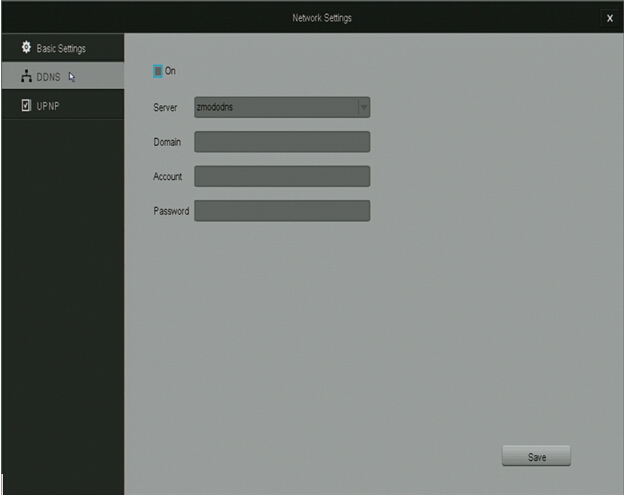
DDNS
NOTE: For avant-garde users only. Router port-forwarding is required. Utilise this page to set up upwardly a DDNS (Dynamic DNS Server) for remote surveillance, please refer to the knowledge base of operations for total instructions.
UPNP
UPNP (Universal Plug and Play) is a protocol used to establish network connectivity and interaction between devices. Enabling this feature will let easier network connectivity.
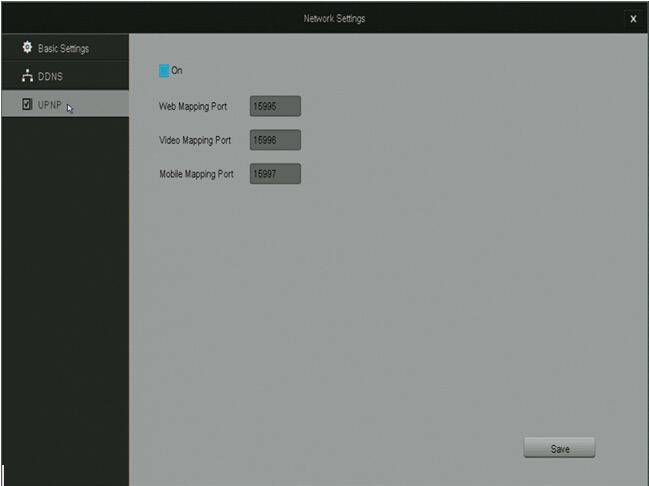
NOTE: The UPNP settings for the device are non the same every bit the UPNP settings on your router and exercise non pose the aforementioned security risks.
Note*: For avant-garde users only. We do not recommend that you lot change whatever settings under this folio without prior networking knowledge. Event Management
This NVR system is specialized for 24/7 continuous recording, and will automatically mark recordings that are triggered past “disquisitional events” (motion detection and alarms) in the playback menu. Use this carte du jour to ascertain “critical events” and best optimize recording and storage on the system.
Tape Style
The system has two available recording modes:

The bones recording contour will record continuously at full frames. This means that all recorded video files will exist loftier quality, and the HDD will be able to shop less footage at once.
The intelligent recording contour will automatically manage the recording to optimize storage capacity. During scenes of interest when “critical events” are triggered, the NVR will automatically record in total frames to ensure higher quality. During stationary scenes, the NVR will record at a lower framerate to optimize storage capacity.
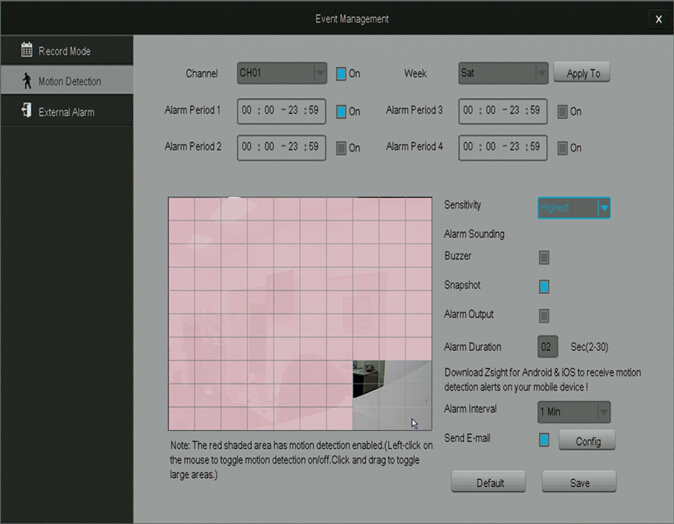
Motion Detection
This NVR supports advanced motility detection features for bolstered security. Please follow the following instructions in order to properly configure and setup the motion detection functions.
IMPORTANT: When changing the settings on a channel, press [Save] before editing some other aqueduct or exiting the folio otherwise all changes volition be lost.
1. Choose a channel to edit. Select a channel nether the dropdown menu next to [Channel] and select the box adjacent to the channel in order to turn on movement detection.
2. Customize schedules for motion detection. The NVR allows you lot to fix upwards to 4 different time periods for motility detection. To activate a time menstruation, input the desired values and select the box to the correct of the corresponding fourth dimension menstruation.
a. You can either manually configure a schedule for each day past selecting the day in the [Week] dropdown menu, or y’all can utilise the schedule to multiple days at in one case by selecting [Apply to].
b. In one case changes take been made, always press [Save] before navigating to another page or editing schedules for another day otherwise the changes will lost.
3. Select the motion detection surface area. Using the motion detection grid, define a motion detection area by left-clicking on a square. Click-and-elevate to toggle big areas. You may adjust the sensitivity of the movement detection with the [Sensitivity] drop-downward menu.
4. Define how the system responds when motion is detected. There are iv different responses that the arrangement can have when motion is detected. Annotation: The system volition automatically record video when motion is detected.
a. “Alarm Sounding Cablegram” The NVR’s built-in cablegram volition sound.
b. “Alarm Output” The NVR volition activate any external alarms that take been connected to the back panel (see: three.1 NVR Installation – Connecting an External Alarm).
c. “Warning Duration” will adjust how long both the buzzer and the alarm output will sound after motility is detected. Notation: The alarm will sound continuously while motion is being detected.
d. “Snapshot” The NVR volition take a snapshot and transport it to your mobile device and email accost (when configured).
e. “Send Email” The NVR volition send an email notification. The NVR comes with predefined server settings for mutual service providers, however you lot may need to specify your own settings if your provider is not included. Choose an e-mail address using the specified service provider to send the email and input the corresponding password to the existing e-mail accost.
f. “Alarm Interval” This setting defines the interval between motion detection notifications. For example, when set to 1 infinitesimal, the NVR will send an email notification every minute when motion is detected.
5. Save and then select another channel to configure. If you practise not save prior to selecting another aqueduct, all changes will be lost. Yous may also restore setting defaults by pressing [Default].
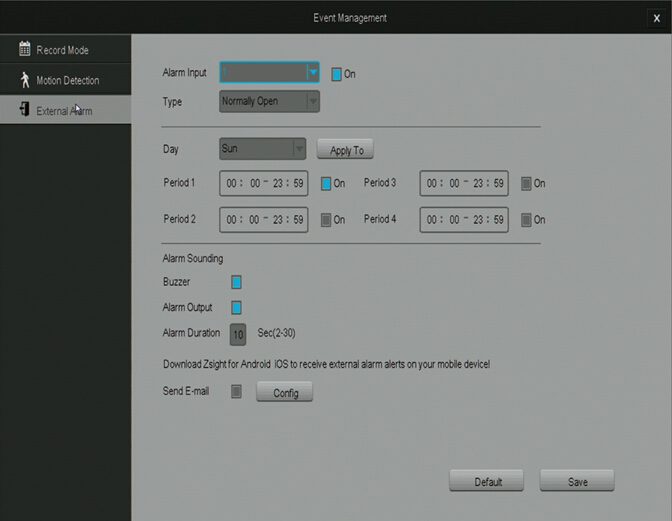
External Warning
The NVR supports upward to four external alarm inputs and one external alarm output. External alarm inputs may include, simply are non limited to move detectors, trip wires, door sensors, etc. External alert outputs may include, only are not express to sirens, visual alarms, silent alarms, etc.
Please follow the following instructions to properly configure the external alarm features.
IMPORTANT: When changing the settings on a channel, printing [Save] before editing another channel or exiting the page otherwise all changes will be lost.
1. Cull an alert to edit. In the dropdown carte du jour, choose an alert and select [On] to enable the warning input. Choose the type (normally open or normally airtight) that describes your specific alarm.
two. Customize the active period for your alarm. The NVR allows y’all to set up to 4 different time periods in which your alarm will be considered active. To activate a time menses, input the desired values and select the box to the correct of the corresponding time flow.
a. You can either manually configure a schedule for each day by selecting the day in the [Week] dropdown menu, or you lot can employ the schedule to multiple days at in one case by choosing the [Utilise to].
b. In one case changes accept been made, ever press [Relieve] before navigating to another page or editing schedules for some other day otherwise the changes volition lost.
3. Define how the system responds when an alert is triggered. There are three possible responses when an alert is triggered. Choose an option by selecting the box next to it. Notation: The system will automatically record video when an alarm is triggered.
a. “Buzzer” The NVR’south built-in buzzer will sound.
b. “Alarm Output” The NVR will activate any external alarms that take been connected to the dorsum console (come across: 3.1 NVR Installation – Connecting an External Warning).
c. “Alert Duration” will adjust how long both the buzzer and the alarm output will audio after motion is detected.
d. “Send E-mail” The NVR will send an e-mail notification. The NVR comes with predefined server settings for mutual service providers, withal you may need to specify your ain settings if your provider is non included. Choose an electronic mail address using the specified service provider to transport the email and input the respective password to the existing email accost.
Warning Input Select the channel of the input warning that you would like to edit. Select “On” to enable this alarm.
Type Select the type of alarm that you lot are using. Delight refer to your warning’s manual if yous are unsure of this.
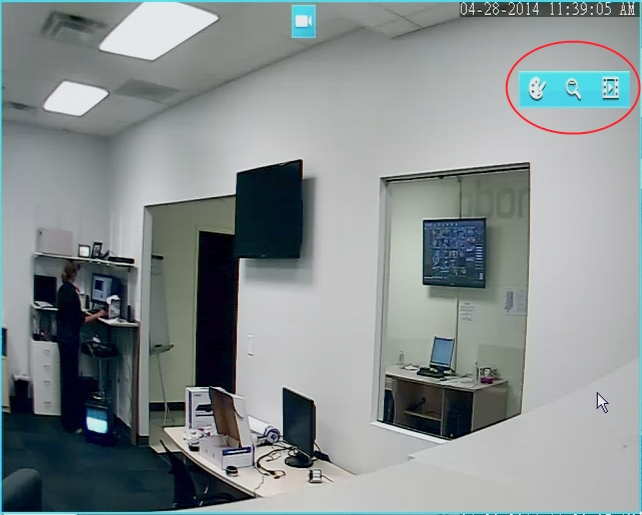
WWhen on the dwelling screen, you lot can access the NVR’s camera controls by double-clicking on the desired channel feed and a blue menu volition announced as shown. The icons represent the iii control features: paradigm settings, zoom, and playback.
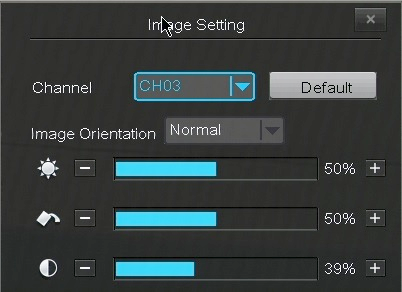
Epitome Setting
This will adjust the image settings of the camera from the NVR. Notation: This will affect everyone connected to the NVR.
Image Orientation: Change the image orientation.”Flip” will flip the image vertically, “Mirror” will flip the epitome horizontally, and “Flip and Mirror” will utilize both functions.
Beginning Icon: Adjust the brightness settings of the camera.
2nd Icon: Adjust the color saturation of the photographic camera.
3rd Icon: Adjust the dissimilarity settings of the camera.
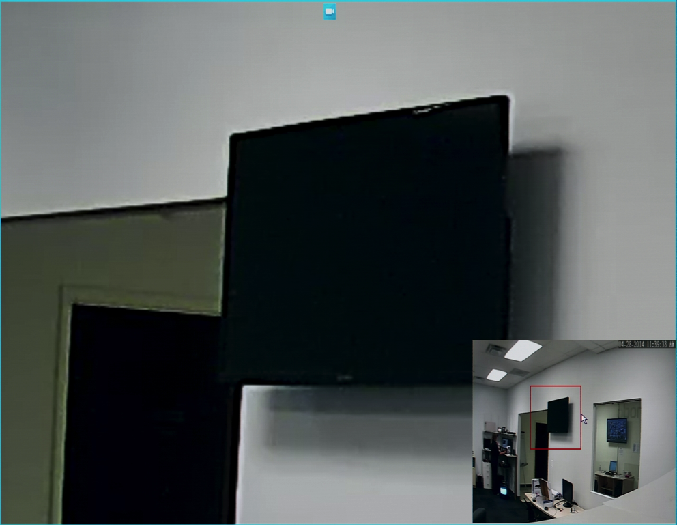
Zoom
Selecting this will bring you into the zoom-in mode. Use the roll cycle to zoom in and out, and click on areas of the screen in the bottom correct corner to select viewing areas. Right click to exit out of the view.
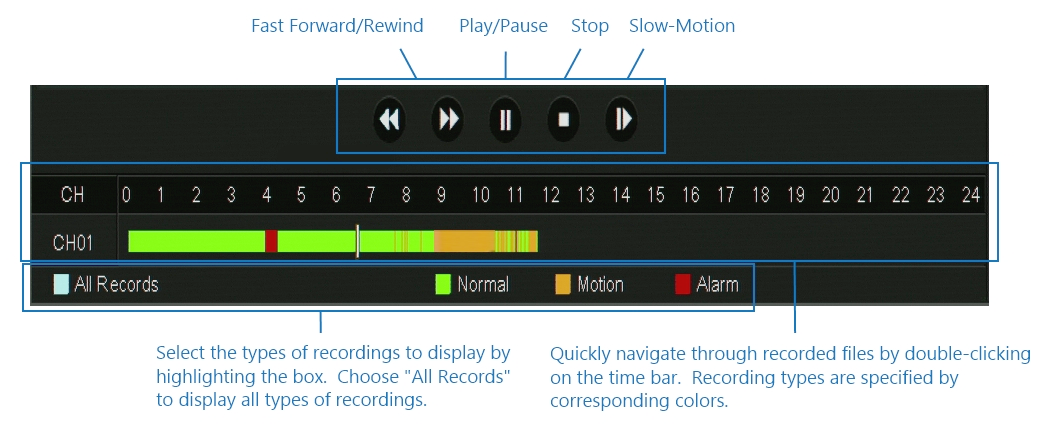
Playback
Access and review your surveillance footage from this menu.
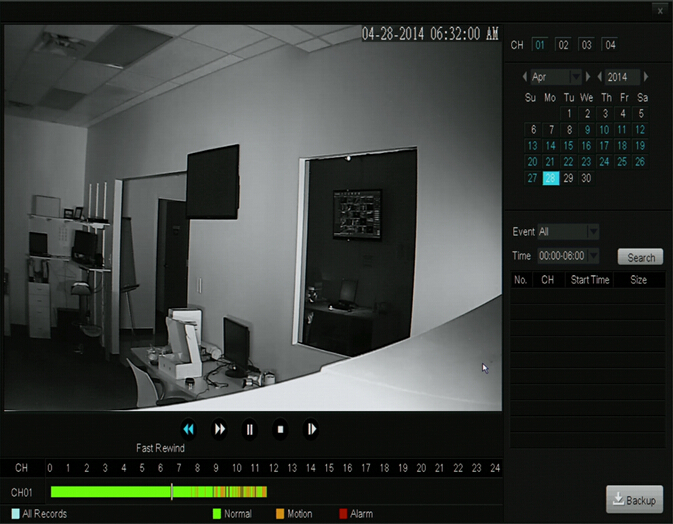
Video Playback
1. Select the channel of your recording on the right console under “Channel”. When you select a aqueduct, it will be highlighted in blue.
2. Select the month and yr on the calendar in the correct panel. The days that are highlighted in blue will take recordings available. Select 1 of the days.
3. Apply the Playback Controls to playback video.
Backup
The system allows y’all to backup specific files from your machine onto an external USB drive. The following instructions volition prove you how to detect specific files on your arrangement to backup.
ane. Select the aqueduct of your recording on the right panel nether “Channel”. When yous select a channel, it will be highlighted in blueish.
two. In one case a channel is selected, select a month and year on the calendar. The days that are highlighted in blue will have available recordings. Select one of the days.
3. Under “Effect” choose which type of recording that you desire to search for. Yous tin can choose normal, alarm triggered or move triggered recordings only, or you lot tin cull all recordings.
iv. Cull the time frame that your recording volition fall under. For example, if yous are looking for a video file that was recorded at iii:00 a.m. y’all will specify the time frame 0:00-6:00.
5. Press [Search]. If your NVR has saved any recordings during this fourth dimension frame, they will appear in the card.
6. Select all of the videos that you would similar to dorsum upwards, and press [Back up]. Wait for the progress bar to complete for each video file.
7. Echo steps 1-7 for video files under unlike channels, days, events, time frames, etc.
