

How to Install Posiflex Pp 8800 Printer
Reply ID:32513
This back up note takes yous through the steps required to become your Posiflex PP 8000 USB printer working with your Retail software.
For this printer to work successfully, settings need to be configured in the printer, in Windows and in your Retail software.

Mismatched settings between the printer – Windows – MYOB Retail software volition cause printing to fail.
OK, let’due south take you through the required tasks.
2. Configure printer hardware settings
The Serial Interface of the printer needs to be configured correctly for employ with Retail Managing director or Retail Nuts.
- Turn off the printer and unplug it from the calculator.
- Hold downwards the
Feed
button and plough the printer on. This volition trigger the printer to output a Cocky-Test. - Turn the printer off.
On the Printer Self-test locate the department Serial Interface Settings.
The required settings for Retail ManagerBaud Rate=115200 bps Parity=None Bits=8 Stop Bits=one Handshaking=Hardware |
|

The required settings for Retail NutsBaud Charge per unit=19200 bps Parity=None Bits=8 End $.25=ane Handshaking=Hardware |
|

If these settings are correct, skip to
Task 3: Install the Windows USB Commuter
beneath.
If these settings are NOT correct, modify the printer settings as follows.
The Posiflex PP-8000 Docket Printer settings are configured through switches nether a panel on the base of the printer. You will need a Philips caput screwdriver to open the panel on the base of the unit.
Earlier opening the console
- Plow off the printer and unplug the power.
- Remove the newspaper from the printer.
- Turn over the printer and remove the screw and metallic plate.
|
For 115000 BPS: Switch 1 Off | Switch ii On
|
For 19000 BPS: Switch 1 Off | Switch 2 Off
|


After setting the switches:
- Replace the cover.
- Plug the printer dorsum in.
- Replace the paper.
- Turn the printer on and confirm the paper is inserted correctly.
- Turn the printer off and reprint the Self-Test.
Confirm from the self-exam that the settings are now correct.
Once the settings are press correctly, continue to
Chore three: Install the Windows USB Driver
beneath
.
three. Install the Windows USB Driver
This task has 4 sections:
iii.1 Download latest drivers
3.ii Plug in the printer
three.3 (Optional) Identifying unknown devices
iii.iv Hardware Installation Wizards (XP, VISTA/7, 8/10)
Job 3.i Download latest drivers
It is recommended to download the latest version of the drivers rather than utilize the drivers on the CD. Every bit the drivers tin can be hard to find, MYOB collates the latest drivers into this zip file
Posiflex PP-8000 Printer Driver.nothing.
The zip file contains the following contents
|
Folder |
Folder Contents |
|
WinXP_x32bit |
32-bit simply drivers for Windows XP |
|
WinVista_x32bit |
32-flake only drivers for Windows Vista |
|
Win7_Win8_Win10_x32bit |
32-bit only drivers for Windows vii/8/10 |
|
Win7_Win8_Win10_x64bit |
64-flake only drivers for Windows seven/8/10 |
For piece of cake access nosotros recommend creating a folder on your desktop called “Posiflex Driver” and extract merely the files y’all need to this location.
Correct-click this Naught file and save it to the new Posiflex Drivers folder:
Posiflex PP-8000 Printer Driver.null
Job 3.2 Plug in the printer
When
outset
plugging in your docket printer, it should trigger the commuter installation sorcerer. If the Hardware Installation Wizard starts, skip to the appropriate
Installation Sorcerer department
below.
If the hardware sorcerer does not start, use the next optional section to place the device and install the software.
Tasks 3.3 Identify unknown devices
If the initial hardware detection failed, it may not prompt the hardware installation wizard when the device is adjacent plugged in.
To find the device:
- Open up the Control Panel.
- Open up
Administrative Tools
. - Select
Calculator Management
. - Click on
Device Manager
in the sidebar. - Expand the groups
Other Devices
and
Ports (COM & LPT).
The device may be listed every bit
Unknown Device
or another generic name such as
USB Serial Device.
Examples:


If from the listed devices you cannot identify the right device to update:
Option 1: Unplug the device take note of what devices are listed. Plug the device back in and the new device that appears is the printer.
Options 2: If in that location are multiple ‘Unknown devices’ all with the same proper noun it can be tricky to identify the correct device.
- Double click on the device to open the
Backdrop
window. - Click the
Details
tab - Select from the
Property List:
Hardware Ids. - Check the value, the value of the printer should listing USBVID_0D3A&PID_0330 The device found with this ID is the Posiflex printer and the correct device to install the driver against.
- Close the
Properties
window - Right-click the device to trigger the hardware setup wizard.
Task 3.4 – Hardware Installation Wizards
When the Hardware Installation Wizard displays, complete the steps below for your Windows version.
|
Wizard Step |
Instructions |
|
1 |
Click |
|
2 |
Click |
|
iii |
Navigate to the binder where the drivers were saved to and click |
|
4 |
Click |
|
v |
If prompted, click |
|
6 |
Click |
|
Wizard Pace |
Instructions |
|
1 |
Click |
|
two |
Click |
|
3 |
Click |
|
iv |
Click |
|
Wizard Step |
Instructions |
|
1 |
Select the option Press |
|
two |
Select the option Press |
|
3 |
Select the choice Tick the box Click Browse. Navigate to the folder where the driver was extracted to and press Click |
|
4 |
At the Windows Logo Verification screen, click the button |
|
5 |
When the install completes click |
5. Configure the MYOB Retail software
In RetailManager
- Get-go RetailManager by correct-clicking the shortcut and choosing
Run as ambassador
. - Log into RetailManager as a file administrator.
- Go to the
Setup
bill of fare and choose
Hardware. - Click the
Docket Printer
tab. - Select the choice
Utilise Docket Printer
and select
Serial/Parallel Printer. - In
Model, select
Posiflex PP-7000
. - Click
Settings
and complete the settings equally per the settings shown in the printer Cocky-Examination.

- Click
Apply. - Click
Apply
again. - Click
Examination. The test button should impress out a small-scale slip with the following info:

Second Colour On / Off lines may not impress if the
2nd Color On / Off
fields have no information.
Anything else printed is going to be caused by a mismatch in the settings between the printer, the windows driver and RetailManager.
If you ostend that these settings match in all places. Restart the computer and effort once more. If it yet yous volition need aid from an IT professional.
In RetailBasics
- From the
Sales
screen, press
Alt+A
or click
Admin. - Click
Setup and Maintenance. - Click
Hardware Maintenance. - Click
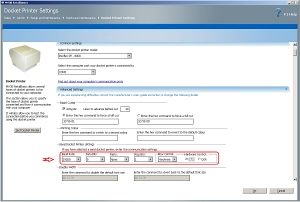
Docket Printer. - In the
Select the docket printer model
field, select
Posiflex PP – 8000. - In the
Select the computer port your docket printer is connected to
field, select
COM1,
COM2,
COM3
or
COM4
(as applicable). College port numbers volition non work. - ClickAdvanced Settings.
- Consummate the settings as per the settings shown in the printer Cocky-Test:
-
Baud Rate
= 19200 -
Data Bits
= 8 -
Parity
= None -
End Bits
= 1 -
Menses Control
= Hardware -
Hardware Control
= CTS
-
Baud Rate
- Click
Test Docket Printer. When correctly configured, this will be printed:

