

Add a Local Printer or Network Printer With Manual Settings
Out-of-the-box
Windows ten
does a pretty skillful job detecting and installing wireless also equally locally connected printers automatically. However, there are still times when y’all may encounter problems if you’re trying to add together an old printer. This is not but because the device may not be supported anymore, but as well because the Os at present lacks basic drivers for printers and scanners.
If yous or your company is still dealing with an old dot matrix, inkjet, or laser printer (from HP, Canon, Epson, Brother, etc.), which Windows 10 refuses to find automatically, in that location are a number of ways to continue using the device if you’re up to the challenge to use the avant-garde setup options or workaround to install non-compatible drivers.
In this
Windows 10 guide, we’ll walk y’all through several scenarios to help install an older printer that isn’t getting detected, refuses to install, or information technology’s no longer compatible.
- How to install an older printer using avant-garde setup
- How to install an older printer using incompatible drivers
How to install an older printer using advanced setup
When the system isn’t detecting your old printer automatically, you tin still add together the device manually depending on the connection type and age of the printer.
Of import:
Before proceeding, make sure that your calculator is continued to the internet to allow Windows Update to download boosted drivers.
Installing printer automatically
If y’all’re trying to add an older printer locally using a USB cable or wireless connection, use these steps:
- Open
Settings. - Click on
Devices. - Click on
Printers & scanners. -
Click the
Add together a printer or scanner
button.
- Wait a few moments.
-
Click
The printer that I want isn’t listed
option.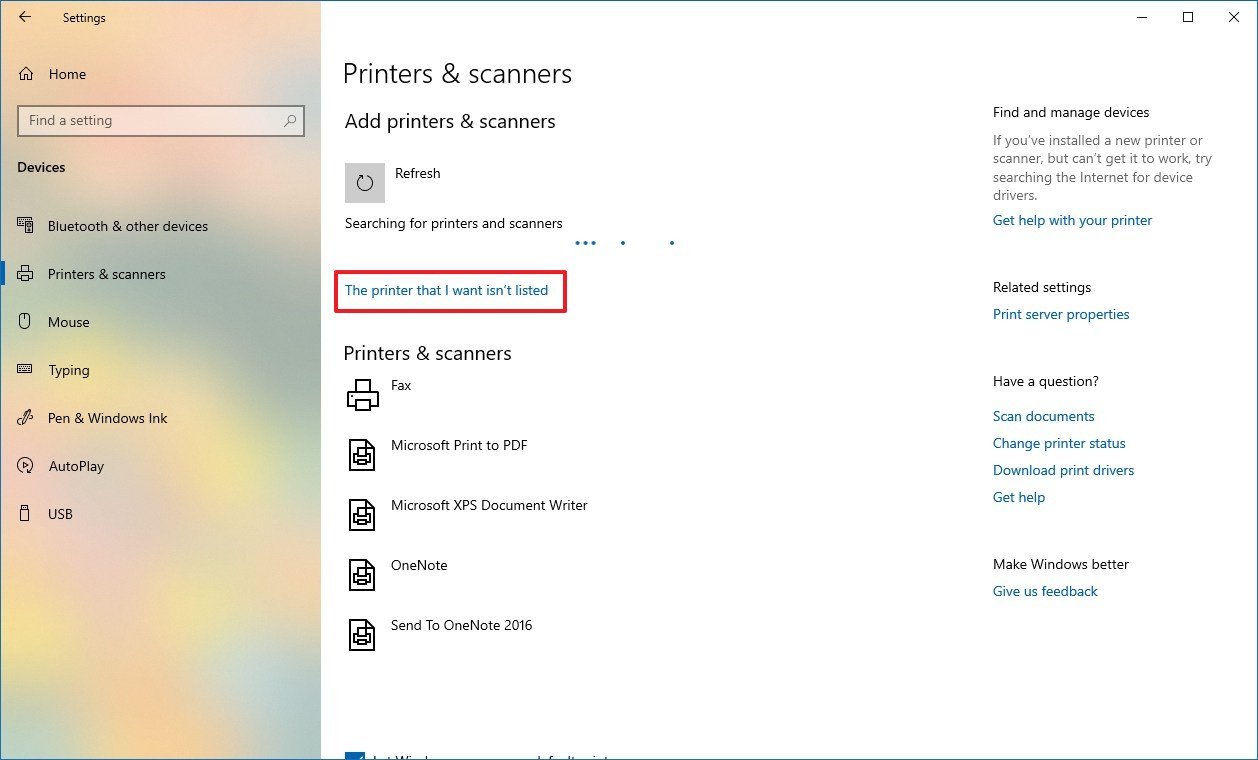
-
Select the
My printer is a piddling older. Help me find it.
option.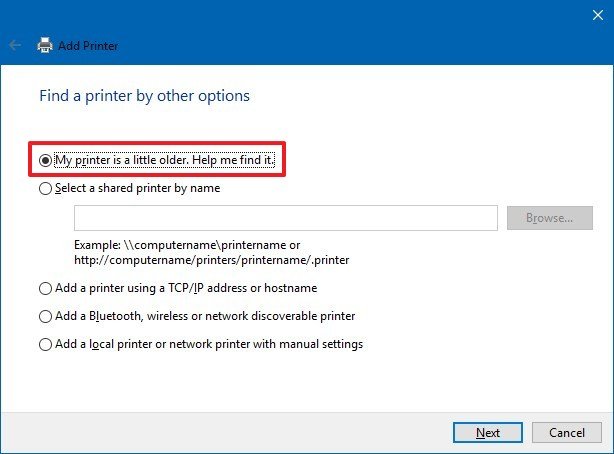
- Select your printer from the listing.
-
Click the
Next
button.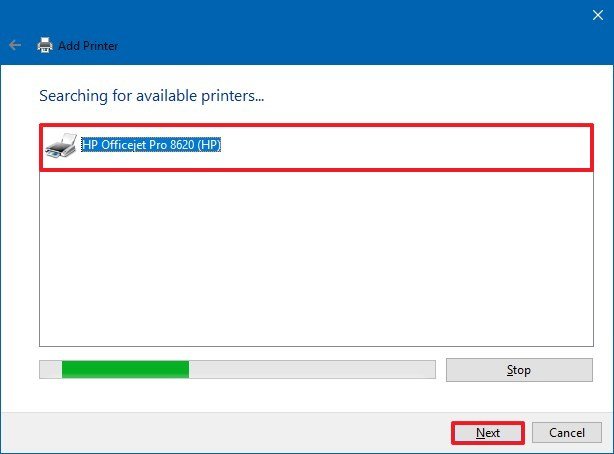
- Type a proper name for the printer.
-
Click the
Next
button.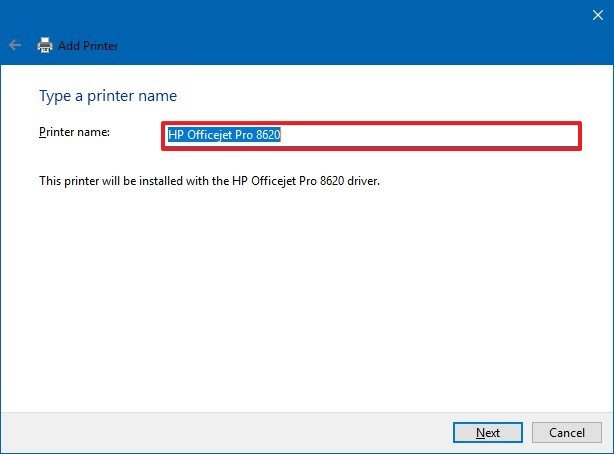
- Select the
Do not share this printer
option. -
Click the
Next
button.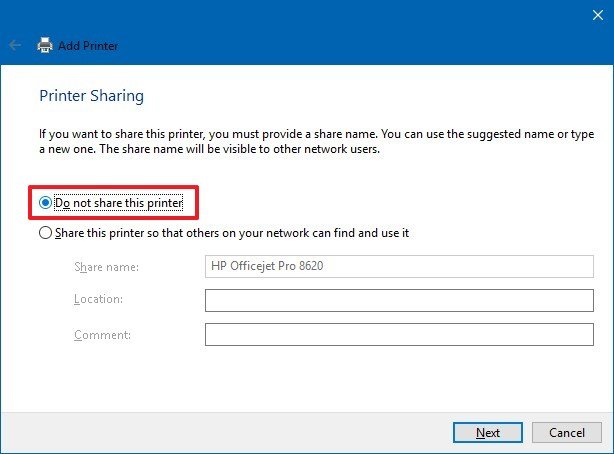
-
Click the
Print a test page
option to confirm that the device is working.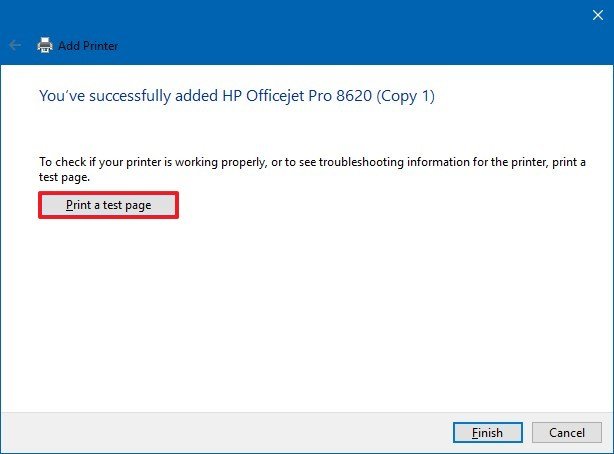
- Click the
Finish
button.


Once yous’ve completed the steps, you should be able to start press to the device.
Installing a network printer manually
In the case that y’all’re dealing with a network printer, y’all can try to create a manual connection using the device IP accost with these steps:
- Open
Settings. - Click on
Devices. - Click on
Printers & scanners. -
Click the
Add a printer or scanner
button.
- Expect a few moments.
-
Click
The printer that I desire isn’t listed
selection.
-
Select the
Add together a printer using TCP/IP address or hostname
choice.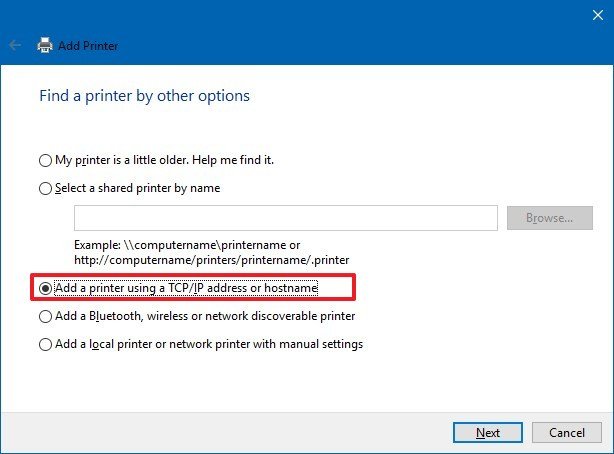
- Click the
Side by side
push. - Utilise the “Device blazon” drop-down carte and select the
TCP/IP Device
option. -
In the “Hostname or IP accost” field, blazon the IP address of the printer. For case, 10.i.2.175.
Note:
If you lot don’t know the TCP/IP configuration of your printer, you will be able to find this information using the device built-in screen. Yet, not all printers are created equal, which means that you’ll need to check your manufacturer support website for more than details. -
In the “Port proper noun” field, go out the default name (recommended) or type a new name.
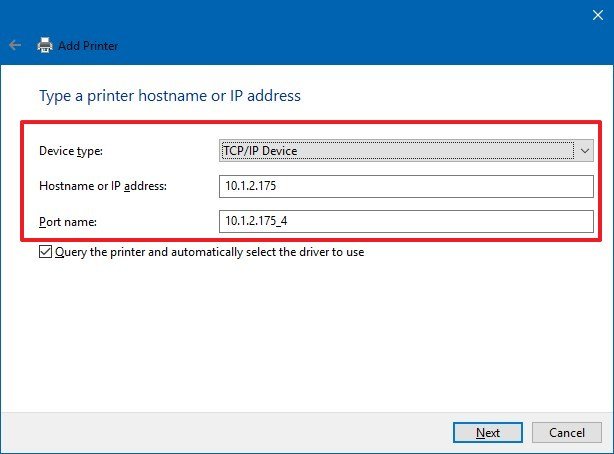
- Bank check the
Query the printer and automatically select the driver to employ
option (recommended). - Click the
Next
button. -
Type a proper name for the printer.
- Click the
Side by side
push button. -
Select the
Do not share this printer
option.
- Click the
Next
push button. -
Click the
Print a test page
option to ostend that the device is working.
- Click the
Finish
button.


After completing the steps, the network printer should now be ready for any application.
Installing a local printer manually
Alternatively, if the previous steps didn’t work, and you’re trying to connect an old printer using a parallel or serial (USB) cable that the OS refuses to detect, then utilize these steps:
- Open
Settings. - Click on
Devices. - Click on
Printers & scanners. -
Click the
Add a printer or scanner
push button.
- Wait a few moments.
-
Click
The printer that I want isn’t listed
option.
-
Select the
Add a local printer or network printer
option.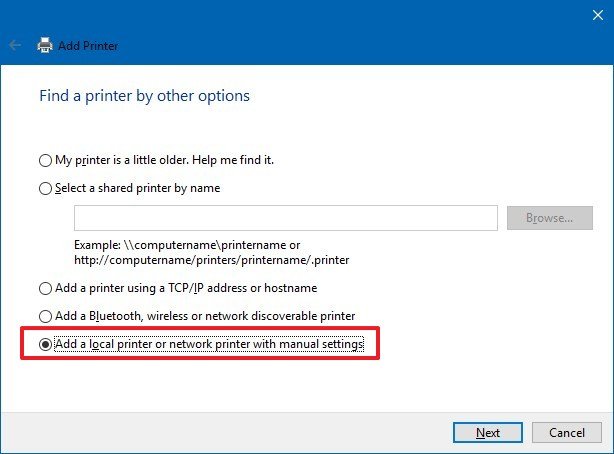
- Click the
Next
button. -
Select the port (interface) that you lot’re currently using with the “Use an existing port drop-downward card. For instance, if yous’re using a USB cablevision, and so select the
USB
option. If you’re using a parallel cable with a DB-25 adapter, and so select the
LPT1
port.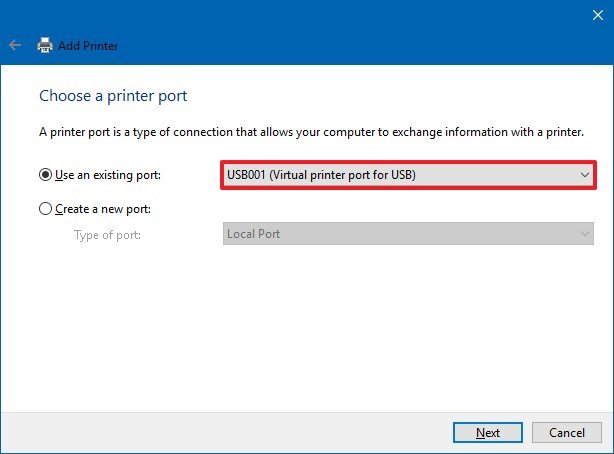
- Click the
Side by side
button. -
Click the
Windows Update
choice.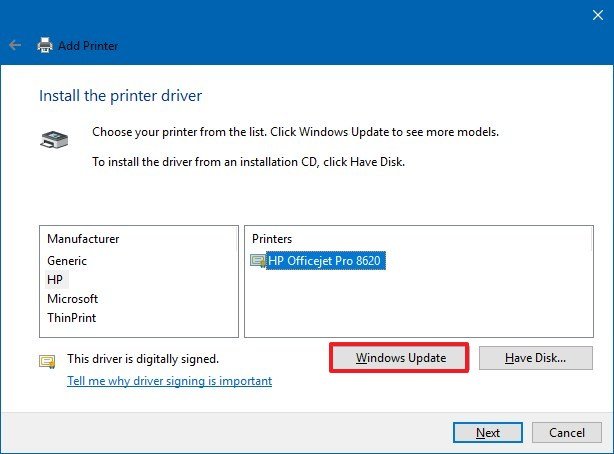
Note:
Windows x no longer ships with the basic printer and scanner drivers, so when you click the
Windows Update
push button, it’ll take a while to populate the drivers from the cloud. - On the left, select the printer manufacturer.
-
On the right, select the printer model.

Quick Tip:
If the model of your printer isn’t listed and you don’t have the controller, y’all can try selecting the closest driver available. Alternatively, y’all tin click the
Have Disk
push button to supply inf printer driver. - Click the
Side by side
button. -
Type a name for the printer.
- Click the
Next
button. -
Select the
Exercise not share this printer
option.
- Click the
Next
push button. -
Click the
Print a test page
selection to ostend that the device is working.
- Click the
Cease
button.


Once you’ve completed the steps, if the test printed successfully, the device should now be available from all applications.
How to install an older printer using incompatible drivers
Alternatively, if you take a printer, but information technology’due south no longer supported on Windows 10, you tin use these steps to install information technology on your computer:
- Open
File Explorer. - Scan to the folder with the non-compatible commuter.
-
Right-click the driver file and select the
Troubleshoot compatibility
choice.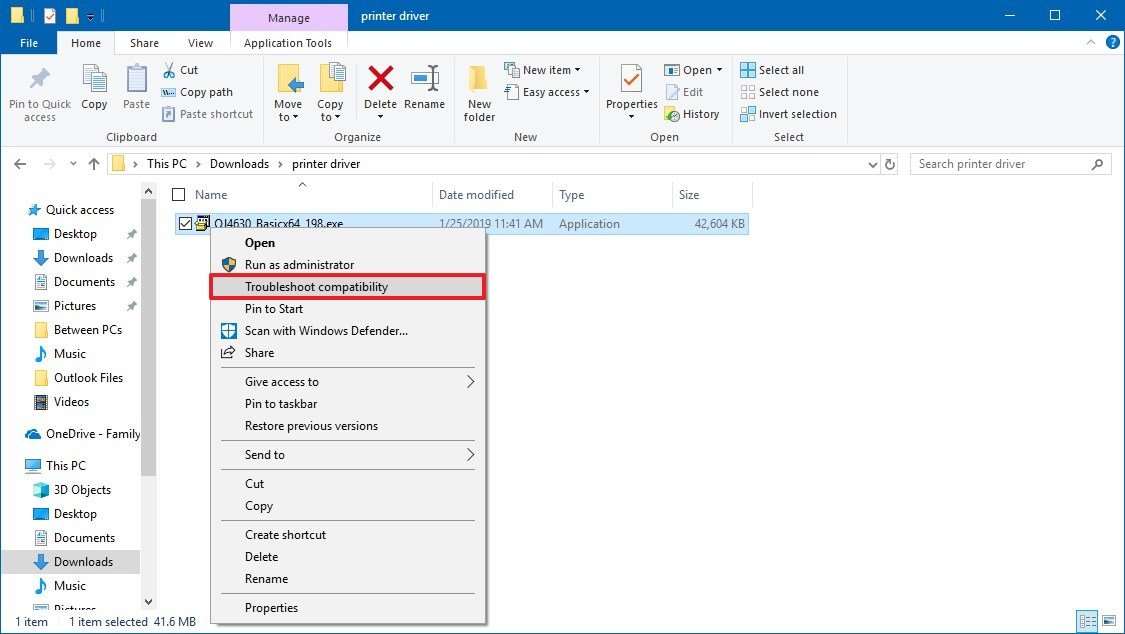
-
Click the
Troubleshoot program
push.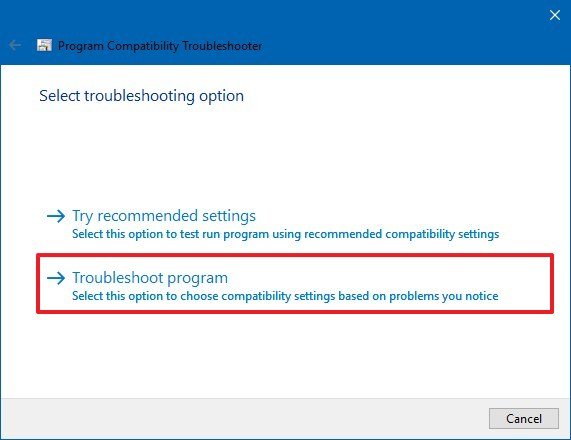
-
Bank check
The plan worked in earlier version of Windows but won’t install or run now
option.
- Click the
Adjacent
button. -
Select the version of Windows compatible with the printer.
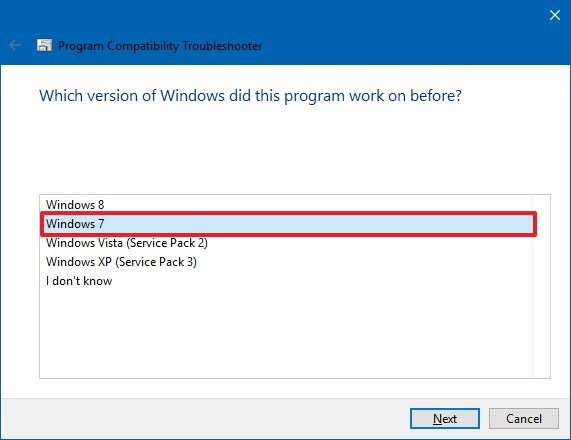
- Click the
Next
button. -
Click the
Test the plan
button.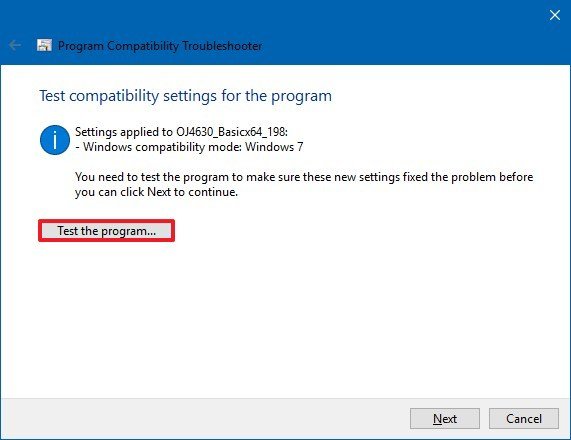
- Continue with the on-screen directions to add the print driver to your reckoner.


Afterwards completing the steps, the old printer should install automatically, and it should piece of work without bug even with the non-uniform commuter installed.
If the old printer still not working, so it may merely be the fourth dimension to move on and get a replacement. You lot can check out this guide to find the
best All-in-Ane options, or
this guide, if you’re on a upkeep.
More than Windows 10 resources
For more helpful articles, coverage, and answers to common questions nigh Windows 10, visit the following resources:
- Windows 10 on Windows Central – All you need to know
- Windows 10 help, tips, and tricks
- Windows 10 forums on Windows Central

Information technology doesn’t count until Apple does it
Apple wins patent to basically make a Surface Book
In a new patent awarded to Apple, the company continues its march to remaking Microsoft’south Surface Volume and Surface Pro PCs, an idea one time mocked by Apple tree’s CEO in 2012.
