

Which Router Firmware Is Best With Apu2c4
APU2 APU3 APU4 BIOS upgrade instructions
This folio has been updated on
March 20, 2021
PC Engines publishes a new BIOS for APU, every 4-8 weeks. Some recent BIOS versions added ameliorate support for ECC Ram, and CPU boost to 1.4Ghz therefore it’s worth upgrading.
Download the latest BIOS versions here:
https://pcengines.github.io/
There are many different ways of flashing a new BIOS on APU routers. Below I’ll show how to do it chop-chop on a few popular operating systems.
- Method ane: using pfSense
- Method two: using IPFire
- Method 3: using OPNSense
- Method iv: Generic method, non dependent on the operating organisation you use.
Method ane: wink bios from pfSense
If you accept pfSense installed on your router, this is the easier method to use.
Stride i: install flashrom utility
In pfSense web UI, go to
Diagnostics -> Command Prompt
Nether “Execute Beat Command” type
pkg install -y flashrom
and click Execute. The output should expect simialr to this:

Pace two: Download bios your file to your estimator.
Get bios file from hither:https://pcengines.github.io/
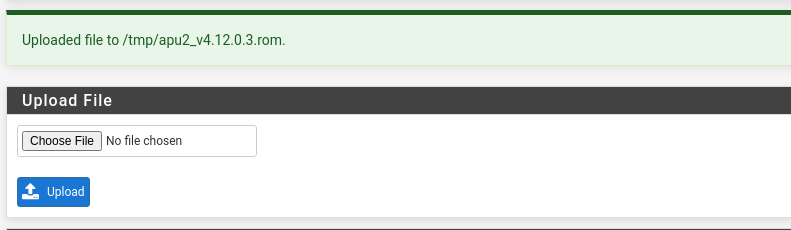
Now upload the file from your figurer to the pfsense using “Upload File” nether
Diagnostics -> Command Prompt
Notice your file will be uploaded to
/tmp/
The output should await similar to this:
Step three: unpack the file
Some
BIOS files come packaged in .tar.gz. some come direct equally .rom
If you accept a .tar.gz file, you lot will have to extract the .rom start.
To unpack your file upshot the post-obit command nether “Execute Vanquish Control”.
tar -xvf /tmp/apu2_v4.12.0.3.rom.tar.gz
You will see something like this
Shell Output - tar -xvf /tmp/apu2_v4.12.0.3.rom.tar.gz tar: Failed to set default locale x apu2_v4.12.0.3.rom x apu2_v4.12.0.three.rom.md5
Step 4: Flash bios
At present Under “Execute Trounce Command” type
flashrom -w /tmp/apu2_v4.12.0.iii.rom -p internal:boardmismatch=force
You lot volition meet something like this
flashrom v1.1 on FreeBSD eleven.3-STABLE (amd64) flashrom is complimentary software, get the source code at https://flashrom.org Using clock_gettime for filibuster loops (clk_id: iv, resolution: 2ns). coreboot table found at 0xdffae000. Found chipset "AMD FCH". Enabling flash write... OK. Plant Winbond flash chip "W25Q64.V" (8192 kB, SPI) mapped at physical address 0x00000000ff800000. This coreboot image (PC Engines:apu2) does not announced to be correct for the detected mainboard (PC Engines:PCEngines apu2). Proceeding anyway because user forced u.s.a. to. Reading old flash fleck contents... done. Erasing and writing flash bit... Erase/write washed. Verifying flash... VERIFIED.

Power off the router and so power information technology back on to load the new BIOS. Hot reboot may not load the new BIOS payload.
Method 2: Flash BIOS from IPFire
IPFire operating arrangement has a
pcengines-apu-firmware
package that automates the process of installing a new BIOS.
Footstep 1: SSH to the router or use a serial cable to gain access to the command line.
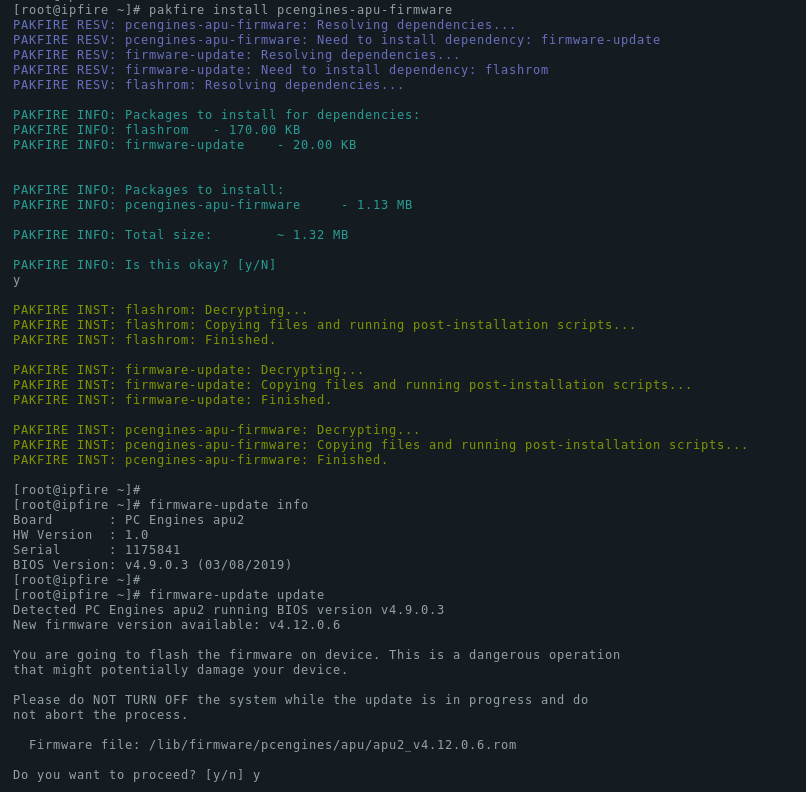
Footstep two: Install pcengines-apu-firmware package
Step three: Run the update command.
The consequence should await like to this:
Method 3: OPNSense BIOS upgrade
If you take OPNSense installed, this is the quickest method.
Step 1: Proceeds access to command line
Either utilise ssh or a serial cable. If you decide to employ serial cable, y’all can observe putty instructions for Windowshere and for macOShere.
Step 2: Install flashrom utility
Execute the following control to install “flashrom”. This utility is needed to write a new BIOS to the flake.
pkg install -y flashrom
Pace 3: Download the latest BIOS file
Observe the latest BIOS version for your motherboard herehttps://pcengines.github.io/
Copy the link to the “.rom” file and utilize wget to download it onto the router. In my case Information technology’south APU2 and the latest BIOS is v4.13.0.4. The command I used for downloading the rom file is:
roll -o apu2_v4.13.0.iv.rom https://3mdeb.com/open-source-firmware/pcengines/apu2/apu2_v4.xiii.0.4.rom
Step 4: write the new BIOS to the chip
Use the beneath command. Make sure you lot replace the image proper name with the image y’all downloaded.
flashrom -w apu2_v4.thirteen.0.4.rom -p internal:boardmismatch=force
Here’s how it should look like, if you have done it correctly.
root@OPNsense:~ # flashrom -west apu2_v4.13.0.4.rom -p internal:boardmismatch=forcefulness flashrom v1.ii on FreeBSD 12.ane-RELEASE-p12-HBSD (amd64) flashrom is free software, get the source code at https://flashrom.org Using clock_gettime for delay loops (clk_id: 4, resolution: 2ns). coreboot table constitute at 0x7eec2000. Found chipset "AMD FCH". Enabling wink write... OK. Found Winbond flash flake "W25Q64.V" (8192 kB, SPI) mapped at physical address 0x00000000ff800000. Reading old flash fleck contents... done. Erasing and writing flash scrap... Erase/write done. Verifying flash... VERIFIED.
Method 4: Generic method using Debian Live USB drive
If you don’t have pfSense, IPFire or OPNSense installed, use this method.
Stride 1: create a bootable USB stick
This method requires you to prepare a bootable USB stick with Debian live distribution.
Download a “standard” Debian ISO image from herehttps://cdimage.debian.org/debian-cd/current-alive/amd64/iso-hybrid/.
At the time of writing, I’m usingdebian-live-10.8.0-amd64-standard.iso file. Y’all may come across a more recent version, only make certain you download the “-standard.iso” file.
If y’all are using Windows, flash the image using Rufus:https://rufus.akeo.ie/ if you are using Linux, use dd.
Connect a Serial cable to APU, and a LAN cablevision to the start NIC port (closest to serial), insert the newly flashed USB and kicking the system.
Use putty to connect to the serial port. Putty instructions for Windows are availablehere and for macOShither.
Connect power to APU to kick the organisation. Your Debian Live USB should now boot and display a boot menu equally shown on the screenshot below.
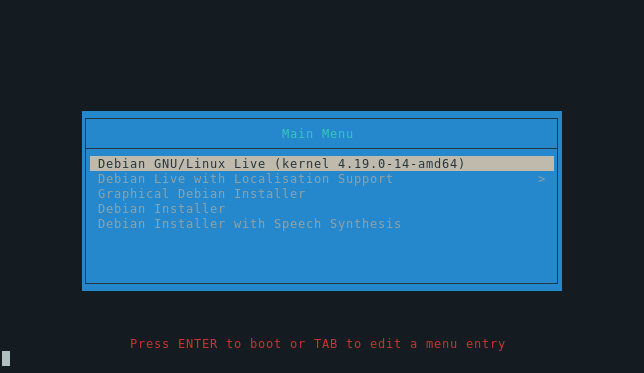
Select the kickoff option and printing Tab. Add “panel=ttyS0,115200n8” to the end of the control to brand the serial connection usable. It should look like to this:

The password and username to the live Debian USB are
 username: user

          password: live
After logging in, type “sudo su” to become root.

Stride 2: install flashrom
You tin can simply install flashrom from the repository
apt update apt install flashrom
Footstep 3: download BIOS version for your board
Download the latest BIOS version from here:
https://pcengines.github.io/
Make sure y’all download the correct version. If you have APU3, make sure you download APU3 image.
wget https://3mdeb.com/open-source-firmware/pcengines/apu3/apu3_v4.9.0.3.rom ls -fifty apu3_v4.9.0.3.rom
You lot need a file with
.rom
extension.
Step four: write the new BIOS to the chip
Use the below control, make sure you replace the image name with the image you lot downloaded.
flashrom -due west apu3_v4.eight.0.5.rom -p internal:boardmismatch=forcefulness
Here’southward how it should expect like, if you have done information technology correctly.
root@debian:~# flashrom -westward apu3_v4.8.0.5.rom -p internal:boardmismatch=forcefulness flashrom v0.9.9-r1954 on Linux four.nine.0-vi-amd64 (x86_64) flashrom is free software, get the source code at https://flashrom.org Calibrating delay loop... OK. coreboot table found at 0xcfed1000. Found chipset "AMD FCH". Enabling flash write... OK. Found Winbond wink scrap "W25Q64.V" (8192 kB, SPI) mapped at concrete address 0x00000000ff800000. Reading old flash chip contents... done. Erasing and writing flash scrap... Erase/write done. Verifying flash... VERIFIED.

All set! Power off the router and ability it back on.
BIOS troubleshooting
If you managed to write a wrong BIOS to the board, or you lost electricity during the upgrade, you can recover with the
BIOS flash recovery module.
We accept flashed hundreds of BIOSes on these boards and never needed this module. Don’t buy it ahead of fourth dimension 🙂
