What Should You Do (if Possible) Before Updating the Uefi Firmware?
Windows 11 has brought excellent new features to the table, and every update is a gamble to start fresh. Merely, even though Microsoft has made upgrading to a new Bone easier, it’s essential to do some background checks to ensure a clean installation.
In this guide, nosotros’ll look at viii things you need to do before upgrading to Windows 11. The goal is to brand certain your PC fulfills Microsoft’s requirements and that y’all have a full backup in instance things go south.
Let’southward get started.
one. Ensure Compatibility
First by checking if your PC tin can even run Windows eleven properly. Officially,
Microsoft’s new OS has the following minimum system requirements:
| CPU | 1Ghz or faster on a compatible 64-chip processor or System on a Fleck |
| GPU | DirectX 12-compatible with WDDM two.0 driver |
| RAM | 4GB or higher |
| Storage | 64GB or college |
| Firmware | UEFI, Secure Boot capable |
| TPM | Version ane.two or 2.0 |
| Display | Hard disk drive (720p) display greater than ix” diagonally, 8 bits per color channel |
| Net | Stable connection for Windows eleven Home edition |
You tin bank check your arrangement’s specifications from
Settings
>
Organization
>
Near. However, using Microsoft’s new
PC Wellness Bank check App
(direct download link) is recommended equally information technology specifies whether your PC is compatible or not. Once installed, click the bluish
Check Now
button and this would give yous a full report:
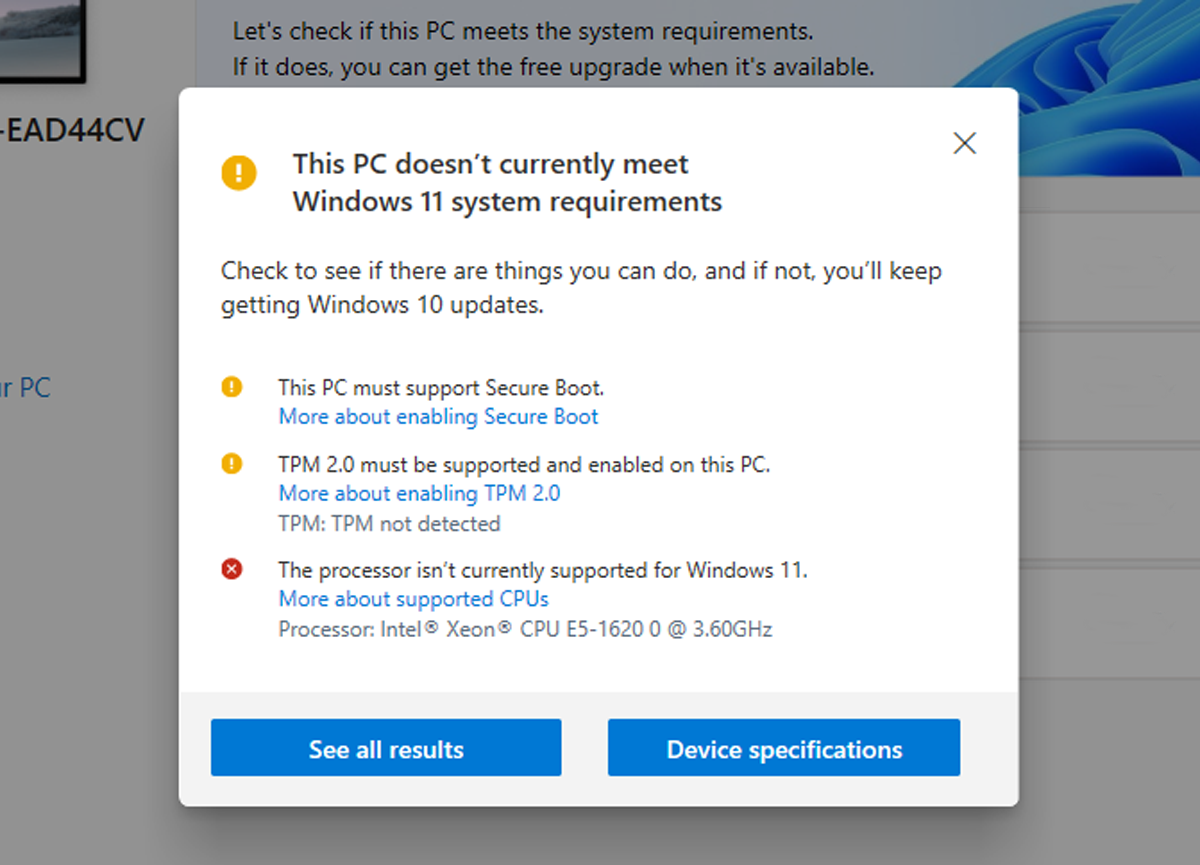
The app will say that the upgrade isn’t recommended if TPM 2.0 and UEFI Secure Kicking are disabled. So let’s see how you can enable each separately.
2. Enable Trusted Platform Module (TPM)
A
Trusted Platform Module
or TPM is a flake installed on motherboards that stores your sensitive security data. To enable it, beginning check if y’all have the fleck in your organization. Open
Run
(Windows Key + R) and lookup
tpm.msc.
-
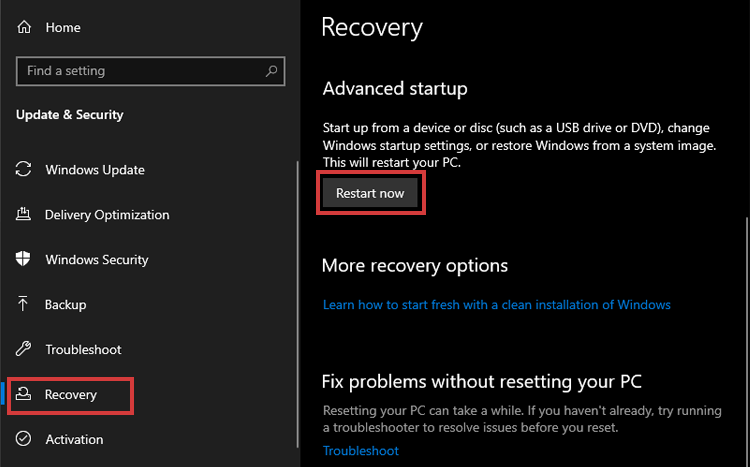
If TPM is ready to use, go to
Settings
>
Update & Security
>
Recovery. At that place, under
Avant-garde Startup, you’ll find the
Restart Now
push button.
-
And then, from the blue menu, click
Troubleshoot
>
Advanced Options
>
UEFI Firmware Settings
>
Restart
>
Boot
and change
TPM 2.0
to
enabled. - If the TPM chip isn’t bachelor, yous will have to install it on your motherboard.
Annotation:
sometimes the choice to enable the TPM switch is labeled differently.
Microsoft
has a helpful page for this.
3. Enable Secure Boot
Similar to TPM, Secure Boot is also a security characteristic. It ensures that the arrangement boots merely a trusted operating organisation. To enable Secure Boot, over again:
-
Restart the organisation
via
Settings
>
Update & Security
>
Recovery
>
Advanced Startup. -
Go to
Troubleshoot
>
Advanced Options
>
UEFI Firmware Settings
>
Restart
>
Kick. -
Alter
Secure Kick
status to
Enabled.
Still, your system may not boot after enabling this security feature if you’re using a desktop PC with BIOS. To prevent this from happening,
catechumen your MBR to GPT
and switch BIOS to UEFI.
4. Backup Your Data
Early versions of new software like Windows 11 usually have a ton of bugs and errors. These put you lot at the take chances of obstructing your workflow and fifty-fifty losing all your data. The best precaution would be to backup your data.
You tin either go with
quick deject backup options
or an external hard drive (SSD or HDD). Call back, backup is essential fifty-fifty if you’re installing Windows xi as your secondary system.
5. Optimize Storage
Another crucial matter is to make space for the new Windows. Microsoft requires your system to have 64GB or more costless infinite for the new Bone. Here, you tin can try either of the following to free up space on your drive.
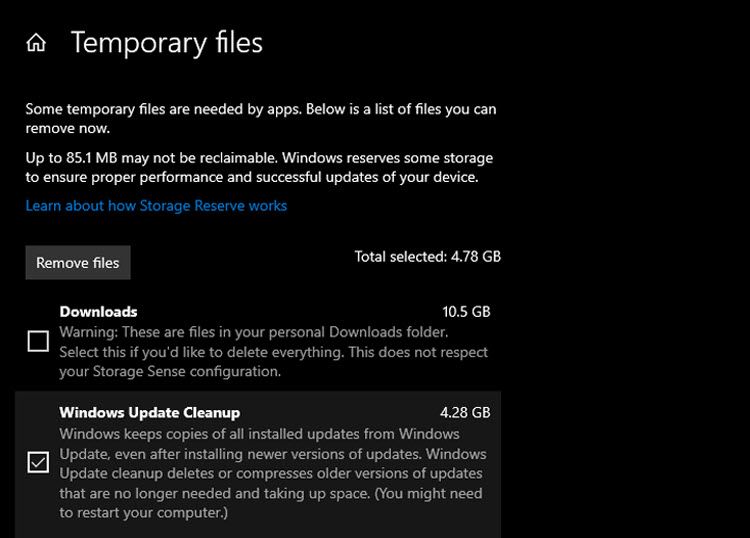
Use Disk Cleanup
Disk Cleanup
is a built-in, quick remedy for cluttered disk drives. Y’all can utilise the maintenance utility to delete temporary files and non-essential files on the primary division that will host the new operating organisation.
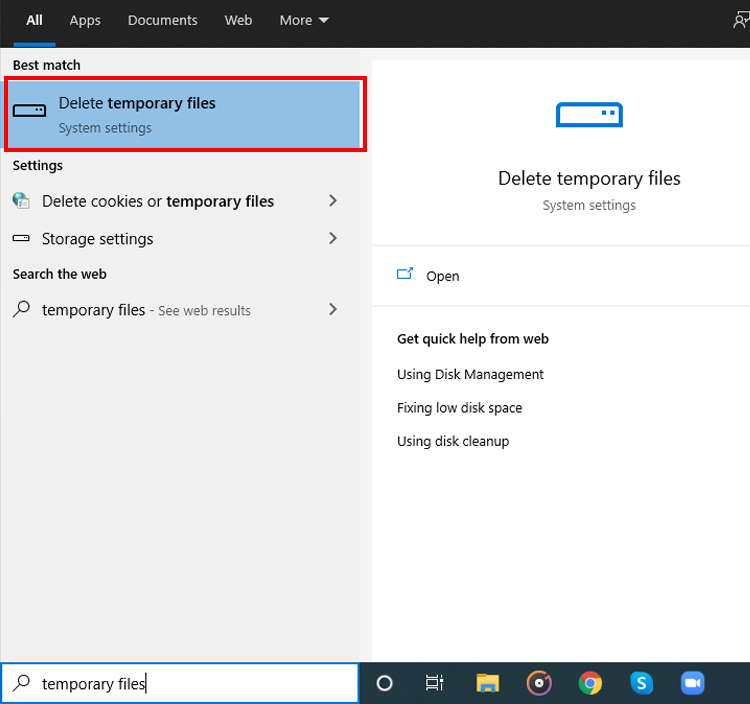
-
Launch Deejay Cleanup is by typing
Temporary Files
at the
Kickoff Menu.
-
Click the
Temporary Files
push button on your correct.
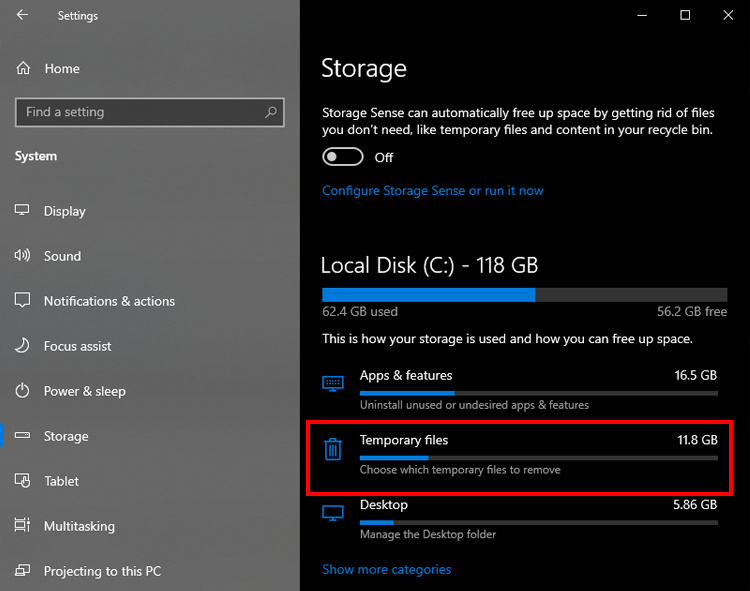
-
You can now check all options and click
Remove Files
to complete the cleanup. Exist careful, withal, that you lot don’t delete your
Downloads
folder mistakenly. It sometimes shows up as an option under
Temporary Files.
Though Deejay Cleanup will generally do the job, you can utilize a combination of other
Windows junk removal methods
besides.
Utilize External Storage
By far, the best way to costless upwardly infinite is to movement your unneeded/rarely-used big files to an external drive. It can be anything from photo albums to software setups.
half-dozen. Remember Your Microsoft Account
Windows 11 update requires you to log into your Microsoft account. If you have synchronized your data with the account (Skype and Electronic mail accounts, for example), make certain you know your login credentials to the business relationship.
You can lose access to multiple accounts if they’re all synced with your main Microsoft account. Timely noting downwardly your login details – or resetting, if needed – would assist you keep your contacts and calendars intact, in plough protecting your workflow from interruptions.
seven. Arrange Stable Net Connection
A major reason why many Windows xi Bone updates neglect is an unsteady internet connection. Windows 11 is a software update from Microsoft’s servers. For this reason, yous have to stay connected to the web throughout the installation.
Using mobile data hotspots, public Wi-Fi, and/or an unstable private connection can brand up for a failure. Avoid going for hotspots and public connections, and ensure your WLAN is at to the lowest degree stable enough to back up a one-half to i
hour-long Windows 11 installation.
ix. Plug-In Charger
If you lot’re on a laptop, brand certain the power cablevision is plugged in, to avoid the bombardment dying out. Similarly, if you’re updating on your PC, brand sure the power supply is uninterrupted. Accidental power cuts can crusade loss of data and can reset installation progress.
Bonus: Better Safe Than Sorry
We strongly advise ensuring your workflow fluency and system fill-in before you lot update, in case things don’t work out.
1. Check Your Apps
A smart motility would exist to confirm that all your professional person tools and apps are available on Windows 11 as well. It’s possible that some specific apps that you use regularly aren’t still available for Microsoft’s new operating system.
ii. Create a Recovery Drive
Creating a organisation recovery
on an external disk means creating a re-create of your Windows as it is. If something doesn’t work well after the update, the recovery bulldoze will help you restore to your pre-update position.
Yous’re Set up To Update Now
With these things done, yous’re all ready to update to Windows 11. Optimizing your storage and backing up your data are the most disquisitional steps in preparing for the update. These steps ensure your workflow and usability remain unclogged.
If your PC doesn’t have TPM or the PC Wellness Check app says it isn’t compatible for some reason, worry not. You notwithstanding have plenty of time to upgrade, as Microsoft has announced updates and support for Windows 10 until 2025.
Virtually The Author