

Vortex Tab 75 Firmware Upgrade Not Working
The Noobs Guide to Programming a Vortex Core
Aug xxx, 2017
Recently I’ve formed a fleck of an unhealthy obsession with mechanical keyboards, and one of the first boards I’ve picked upwardly is the infamous Vortex Core.
For those non in the know, the Core is a 40% keyboard – a pocket-sized keyboard with just 47 keys. It looks like this:
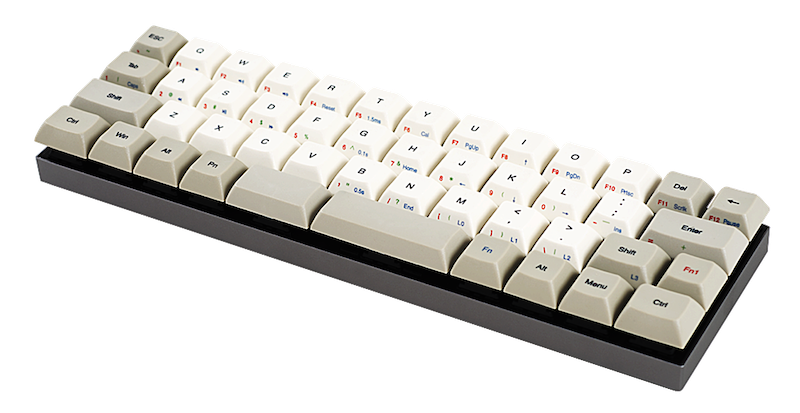
(image taken from vortexgear.tw)
No numbers! No function keys! No arrows! How does one even utilize it????
There are two tricks to getting things done using the Core:
-
The two function keys,
Fn
(blue) and
Fn1
(red). These permit more key combos to be used, equally shown on the front end of the keycaps (ie.
Fn1 + W
is the philharmonic for
F2) -
The four function layers. All of the keys and combos shown apply to the default layer of the keyboard – simply at that place are three more than layers that are almost completely customizable.
And that customization and reprogramming of the layers of the Core, is where this blog post comes in.
A give-and-take of alert
The documentation on how to do whatever of this is sparse at best, and likely to change with firmware updates. (Yes, this keyboard has firmware.) I’grand using the latest firmware at the time of writing, 1.04.03.
Most of the information in this post has come from random Reddit threads, and a lot of trial and error, so in that location may be things I’one thousand non aware of or get slightly wrong. Please allow me know in the comments if that’due south the case!
With that in mind, lets see what can be done.
Switching layers
The default layer on the keyboard is layer 0. Yous’ll know you’re on layer 0 if in that location is no coloured LED shining between the central labelled
Pn
and the left spacebar. This layer is non customizable at all.
Changing from one layer to some other is done with a
Fn
combo:
- Layer 0 –
Fn + M, with no LED shining betwixt
Pn
and
lSpace - Layer one –
Fn + ,, with a ruddy LED shining betwixt
Pn
and
lSpace - Layer 2 –
Fn + ., with a green LED shining betwixt
Pn
and
lSpace, and - Layer 3 –
Fn + rShift, with a blue LED shining between
Pn
and
lSpace
These shortcuts are besides marked on the front of the keycaps in bluish.
By default, all of these layers do exactly the same matter – printing the key labelled
C, and you’ll get a
C
character. But layers i, 2 and 3 can be customized – and then that if y’all press
C, you might get a
S, or a
lCtrl, or a
PgUp. That’s where the programming comes into play.
(One awesome gotcha is that if you modify any of the layer modifier keys –
Fn,
M,
,,
.
or
rShift
– the shortcuts will use the new
Fn
cardinal, but the old modifier. ie. if you move
Fn
to the
lCtrl
position and
M
to the
B
position, so instead of
Fn + M, the shortcut to switch to layer 0 volition be the keys labelled
lCtrl + M, not
lCtrl + B.)
Pick a layer that best suits y’all, other than layer 0, then you can start customizing information technology.
Things that can’t be washed
Customizing the keyboard is done by reassigning actions to keystrokes. eg. if you want to use the Colemak keyboard layout instead of Qwerty, you’ll desire to reassign all of the white keys to their Colemak equivalents. (F
instead of
E,
P
instead of
R, and then on.)
All white keys can exist reassigned, and nearly all modifiers (the biscuit keys) tin can also exist reassigned – with a few exceptions.
-
Fn1
cannot be moved at all. - Either
Pn
or
Fn
can be moved, but not both. (Unless y’all only swap them.) - No shortcuts that utilise
Fn1
can be modified, and no new shortcuts that use
Fn1
tin can exist added. - The layer modifier shortcuts can’t be modified as described above, except for the
Fn
part.
Why? Who knows. Those are limitations you’ll just have to work around. There’south still a lot of flexibility to fit all useful functionality around single keypresses and Fn shortcuts, and if that still isn’t enough, remember that there’south multiple layers.
Enough talking, more programming.
Okay. Hither’s the important part. This works to reassign all keys except for
Fn
and
Pn.
To enter ‘programming manner’, where all the fun happens, press
Fn
(or whatever cardinal you have assigned
Fn
to) and the central labelled
rCtrl. This will cause a blue LED to turn on, in between the two space confined.
Now press the cardinal (or shortcut) you want to reassign. This will make the LED betwixt the two spacebars start flashing scarlet.
Now press the
layer 0
cardinal or shortcut you want to assign to the key or shortcut yous previously entered. This is an of import distinction – non the primal combo as it is on your current layer, but what it is co-ordinate to the labels on the keycaps. This is and so you don’t ‘lose’ any potential actions – if you overwrite the
PgDown
shortcut on your current layer for example, you however want to have
PgDown
available to assign to other shortcuts. The LED volition stay flashing red here.
(The LED stays red because you can program full macros if you wish, using the time delays labelled on
T,
Grand
and
B. I believe y’all press a key/shortcut, then enter a delay to be waited, then press the next key/shortcut, etc.)
Once you’ve finished entering the new activeness, press
Pn
(or whatever cardinal you have assigned
Pn
to) to confirm and save the change. The LED will go dorsum to solid blue.
Now you lot tin either keep entering more than changes, or press
Fn + rCtrl
again to go out programming fashion.
At any fourth dimension, y’all tin only leave the keyboard untouched for xv seconds and information technology will automatically exit programming mode and become dorsum to normal text input.
For a real example…
One common reprogramming idea is to add dedicated arrow keys dorsum, in the familiar bottom correct corner of the keyboard. Y’all tin can utilize
rShift,
rAlt,
Menu, and
rCtrl
for this, it works actually well. I’ll step through exactly how that is washed. This assumes no
Fn/Pn
customization.
- Select a customizable layer – I utilise layer 3 because I similar blue (and there is no purple LED similar on my Pok3r.)
- Press
Fn + rCtrl
to enter programming mode. LED betwixt space bars turns blue. - Press
rShift
to say this is the key we want to reassign. LED starts flashing blood-red. - Press
Fn + I
– the shortcut for an upwardly arrow. - Press
Pn. The LED goes back to blue. - Printing
rAlt
to reassign that key. LED starts flashing red. - Press
Fn + J
to assign left arrow to rAlt. - Press
Pn
again. The LED goes back to blue. - Printing
Menu
to reassign that key. LED starts flashing red. - Press
Fn + K
to assign down arrow to Menu. - Printing
Pn
over again. The LED goes back to bluish. - Press
rCtrl
to reassign that key. LED starts flashing red. - Press
Fn + 50
to assign right pointer to rCtrl. - Press
Pn
over again. The LED goes back to blue. - At present that nosotros’re all washed, press
Fn + rCtrl
to exit programming mode.
Voila, prissy shiny dedicated pointer keys!
But what virtually
Fn
and
Pn?
The above programming won’t work for the
Fn
and
Pn
keys, they have their ain special customization shortcut.
Note:
I would ever leave this step for last. For some reason, in all my testing I’ve found that once you movement
Fn
or
Pn, further reprogramming only seems to work about one-half of the time. For example, in my current layer I tin assign
#
to
Fn + South, merely trying to assign
@
to
Fn + A
only does nothing. I don’t know why.
Anyhow.
You accept the option to swap i of
Fn
and
Pn
with a different cardinal (or with each other). To do this, hold either the button labelled
Fn
or the push button labelled
Pn
(the i you want to move) and
lShift
for five seconds – this will brand a green LED wink in between the ii infinite bars. So only printing the key you lot want to swap with, and you lot’re done!
For a physical example, to switch
Fn
to the left space bar (another common thought), you would:
- Hold
Fn + lShift
until the green LED starts flashing, and so - Press the left space bar.
Now the left space bar would be your
Fn
central, and the key labelled
Fn
is a 2d infinite bar.
(The reason you can only move ane of them is because if yous repeat the process, ie. try to move
Fn
and then endeavor to move
Pn, the first change will exist reverted.)
So what absurd ideas can you program?
I’ve been experimenting for the last few days with different ideas and strategies, and here’s some of what I’ve tried:
Any other absurd ideas? Let me know in the comments.
Closing thoughts
I love the idea of the tiny Vortex Core, and it really does pack a lot of functionality into a tiny packet. I wrote this entire web log mail service using my Core! Ultimately, I recall it’s a fiddling too modest for me to utilise every twenty-four hours, just it’s a great talking point!
(Awesome keyboard layouts generated using http://keyboard-layout-editor.com)
