

There Is a Problem With the Printer or Ink System
Z7_3054ICK0KGTE30AQO5O3KA30N0
HP Designjet T120 and T520 Printers – There is a Problem with the Printer or Ink Organization
This document is for the HP Designjet T120 and T520 printers.
When the printer is turned on or later an ink cartridge is replaced, ‘In that location is a problem with the Printer or Ink System. Turn printer off, then on. If trouble persists, contact HP.‘ mistake displays on the front panel and the printer will not print. A faulty ink cartridge or printhead tin cause this fault.
Figure
: ‘Problem with the printer or ink system’ error on control panel

Solution i: Remove the ink cartridges and the printhead, restart the printer, and then reinstall the printhead and the ink cartridges
Removing and reinstalling the ink cartridges and the printhead tin clear the error displayed on the front console.
Step 1: Remove the ink cartridges and the printhead
-
Printing the Power button to turn on the printer, if it is not already on.
-
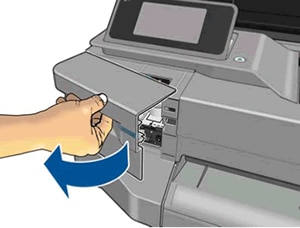
Open the ink cartridge admission door, the carriage moves to the left side of the printer. Wait until the railroad vehicle stops moving before proceeding.
Effigy
: Open the ink cartridge access door
-
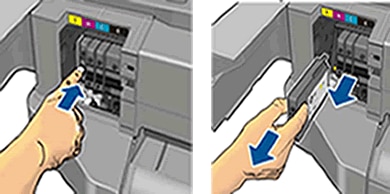
Printing each ink cartridge to unlock it, and then pull each ink cartridge straight out of the wagon.
Figure
: Unlock each ink cartridge and remove from carriage
-
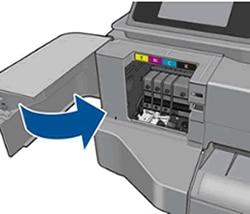
Close the ink cartridge access door.
Figure
: Shut the ink cartridge admission door
-
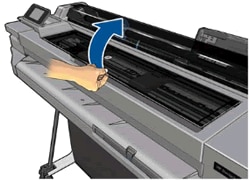
Affect
Next
on the front panel, and and so open the top comprehend.Figure
: Open elevation cover
annotation:
If
Adjacent
does not display, open the top encompass, unplug the ability cord from the printer and the wall, and so slowly movement the railroad vehicle assembly to the left side of the printer in gild to access the printhead. -
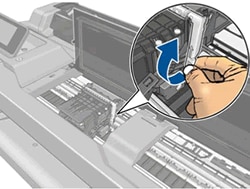
Lift the wagon latch.
Effigy
: Lift the railroad vehicle latch
-
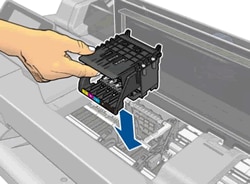
Grasp the sides of the printhead,
gently lift-upwardly and remove
the printhead from the railroad vehicle. Proceed the printhead vertical to prevent ink spilling on the connections.Figure
: Remove the printhead

Step 2: Restart the printer and reinstall the printhead and the ink cartridges
-
Plug the ability cord into the printer and the wall socket, if it was removed.
-
Restart the printer and await for the
Install the printhead
prompt on the printer display. -
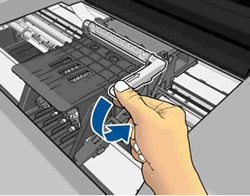
Insert the printhead into the carriage, ensuring that the electrical contacts face the inside of the printer. As you guide the printhead into the carriage, information technology lowers into the wagon equally information technology seats.
caution:The nozzle area on the lesser of the printhead is fragile! Make sure that the bottom of the printhead does non bump or rub on the printer. Do not bear on the nozzles or electric contacts. Touching these areas can cause electrical failures or print quality problems.
Figure
: Insert the printhead
-
Carefully lower the carriage latch to secure the printhead.
Figure
: Lower the carriage latch
-
Close the height cover and then touch
Next
on the front panel. -
Effigy
: Close the peak cover

-
Open the ink cartridge access door.
Figure
: Open up the ink cartridge admission door
-
Wait for
Install ink cartridges
to display on the forepart console. -
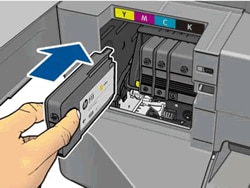
Slide each ink cartridge back into its color-coded slot, and and then gently push it forward until it clicks into identify.
Figure
: Insert the cartridge into its color-coded slot
-
Close the ink cartridge admission door. If a faulty or empty ink cartridge fault is displayed, replace the faulty or empty ink cartridge.
Figure
: Close the ink cartridge admission door
Solution ii: Check the printer firmware version and update the printer firmware, if necessary
Steps to bank check and update the printer firmware.
-
Obtain the current firmware version, touch the
Information
( ) icon, and and then select
Printer information. Utilize the upwards and down arrows to display the firmware version. -
Update the firmware, if necessary. Get to one of the following websites and so click on
Get drivers, software & firmware:
