

Seriously Pro F3 Flight Controller Cleanflight Load Firmware [online] Not Working
This tutorial shows you how to setup Betaflight. After building your FPV drone, you lot need to configure the flight controller earlier flying. There are a ton of options y’all tin enable, but I will evidence you the absolute minimum settings needed to start flying.

Betaflight is an fantabulous open source flying controller software, it’s designed specifically for FPV drones (quadcopters). Check out the
FC Firmware Overview
to learn more than if you are new to all this.
If this is your outset time flying an FPV drone, try to keep it unproblematic at first, establish a flying baseline – then add together extra features. Y’all don’t accept to learn everything before flight, you tin can acquire as you go.
In this tutorial I will walk you lot through the Betaflight configurator (the software), and show you the simple steps to setup your quadcopter for your get-go flight.
Getting Started
To keep this guide as elementary equally possible I am making some important assumptions about your gear and setup:
- You have a quadcopter (4 motors)
- You are running serial receiver (east.thou. Crossfire, ExpressLRS or Frsky SBUS)
- F4 or F7 flight controller running the latest Betaflight firmware
- Your ESC supports DShot ESC protocol (due east.k. BLHeli_S or BLHeli_32 ESC)
Here are the configuration steps in this tutorial (click to jump straight to that section):
- Install Betaflight Configurator
- Update Firmware
- Setup Tab
- Ports
- Configuration
- Receiver
- Modes
- Motor
- OSD
- PID Tuning
- Disable Beeper for USB
Install Betaflight Configurator
Before we begin, please download and install Betaflight Configurator. This is the software we must use to setup Betaflight, it works on Windows, Mac and Linux.
Download:
https://github.com/betaflight/betaflight-configurator/releases
Update Firmware
If you purchased your FC following
my recommendations, it should come with Betaflight pre-installed, so you don’t really need to flash it unless y’all want to stay up to date with the latest features and problems fixes. This tutorial takes you through
how to flash Betaflight footstep by step.
Before flashing firmware to the flight controller, make sure you brand a fill-in of the existing settings in case you lot want to go back for whatsoever reasons.
Tutorial:
How to backup Betaflight settings.
Pro Tip: Before updating FC firmware, you should regularly bank check and update Betaflight Configurator to avoid bugs, as the Configurator is tightly spring to the firmware.
Setup Betaflight For The First Time
To avoid overcomplication, we will configure only the absolutely necessary settings in Betaflight to get you in the air. Y’all can then explore other settings later on to optimize your FPV drone flying performance if yous wish.
Of import! Make sure all propellers are removed before configuring your quad on the bench to avoid accident.
Connect FC to Computer
In one case you’ve connected the FC to your estimator via USB cablevision, your figurer will power the FC.

And a new COM Port should appear in the Configurator, choose this new COM Port and click “Connect”. Note that in the instance, we accept COM11, just information technology could exist different in your example. And often the COM port changes on dissimilar FC.
If you don’t find the COM port, or have trouble connecting, this might exist a driver effect. Follow
this guide to fix flying controller driver issues. Or perchance your FC is “bricked” (extremely rarely), which tin be easily
fixed as explained in this article.

Setup Tab
One time you’ve successfully connected to the FC, you should see the Setup tab. Here yous take admission to the about basic functions and information about your quad.

- Dorsum upwards settings first before changing any settings (How to Backup & Restore Settings)
- Put your quadcopter on a level surface, so press “Calibrate Accelerometer”
- Now hold the quad in your mitt, and motility it effectually. Y’all should see the 3D model moves with the quad, make sure the movement is in the same direction
If the 3D model isn’t moving the aforementioned as your quad, it probably ways your flight controller (FC) is installed facing the incorrect direction (pointer on the FC is not pointing forward). You lot can either rotate the FC until it’s right, or you can set
YAW starting time in the configuration tab, board sensor alignment,
to prepare information technology (usually 90/180/270 degree).
Ports
In the Ports tab, you tin configure your peripherals – external devices connected to the flight controller via UART.

- If you are using a serial RX like Crossfire, SBUS or IBUS, you need to enable “Serial RX” on the UART the RX is connected to
- If yous are using Frsky SmartPort, select “SmartPort” nether Telemetry Output. If not just exit it at Default
Configuration
The Configuration tab contains many basic settings related to your drone’southward flight functioning.

1. ESC/Motor Features
ESC Protocol – check your ESC spec to find out which protocols they support. Generally speaking if you are using BLHeli_S or BLHeli_32 ESC, DShot is recommended. I’d recommend using DShot600 if you are running 8KHz PID loop frequency, DShot300 for 4KHz, DShot150 for 2KHz.
Further Reading:
ESC Protocols and Firmware Overview
We recommend yous to always proceed “MOTOR_STOP” pick disabled, otherwise y’all won’t be able to tell if your quad is armed.
The rest yous can just leave them at default.

2. Organization Configuration
PID Loop Frequency (aka Looptime)
– it depends on what your FC is capable of, select the highest value possible while keeping CPU load under 30%. Note that looptime should be equal or lower than gyro sampling charge per unit.
Gyro Sampling Rate
– same equally looptime, set it as high as possible while keeping CPU load nether 30%.
When changing these two values and other features, pay attending to “CPU load” at the bottom of the window, endeavour to continue it
under 30%. High CPU load could cause instability to the flying controller.
Feel free to experiment and meet what gyro rate and looptime combination works best for you, there is no gear up-rule what you should exist using.
Accelerometer – I recommend to leave it enabled. Y’all can disable it, this will complimentary up some processing power, but y’all won’t exist able to use Bending mode or Horizon mode, and the 3D model in the setup tab will also cease moving.
You can just disable both Barometer and Magnetometer if your FC doesn’t accept these components.
iii. Personalization
Craft name – This will be displayed in the Betaflight OSD.

4 – Receiver
If yous are using a serial RX, just choice “Serial-based receiver” in Receiver Manner. In Serial Receiver Provider, pick the appropriate receiver protocol:
- TBS Crossfire – CRSF
- ExpressLRS – CRSF
- Spektrum DSM2 – SPEKTRUM1024
- Spektrum DSMX – SPEKTRUM2048
- FrSky RX – SBUS
- Futaba RX – SBUS
- FlySky RX – IBUS
- Turnigy RX – IBUS
If you are connecting the RX to FC via PPM, then apply “PPM RX Input” in Receiver Mode.
5. Other Features
These are the features I normally enable in Betaflight. If you are not sure, you lot can but leave these at default, that volition still go you lot in the air without whatever bug.
- Telemetry
- OSD
- Airmode
- Dynamic Filter
Click Relieve & Reboot.
Receiver

In this tab you can check if your receiver is working correctly.
Power on your TX and RX, and move your sticks one at a time to see if the respective channel is moving. You might need to alter “Channel Map” if the channels are in the wrong gild.
Further Reading:
What’s Channel Map and How to configure it properly?
If none of the channels are responding, troubleshoot:
- is the RX bound to the TX? (exercise you see solid green calorie-free on the RX?)
- is the RX soldered on the FC correctly?
- take you enabled serial RX in the right UART?
- take you selected the correct RX protocol?
Subsequently making sure the channels are working correctly, now check the
mid points
and
stop points
of the first iv channels (Pitch, Roll, Yaw, Throttle). These channels should middle at 1500, and have end points of thousand and 2000. If yous see a very small error like 2 to 3, it’s generally okay to just ignore it for at present.
Anyway you can follow
my tutorial on how to set mid bespeak and finish points.
If the midpoint number jumps around, you could use deadband to “fix” it. For example if you see Roll or Pitch midpoint jumps betwixt 1498 and 1500, then enter 2 in the RC deadband, it basically tells the FC to ignore it. Midpoint jump is pretty common and null to worry about, how much it jumps depends on the quality of the receiver.
Before you lot motility to the side by side tab, check to brand sure your arming and mode switches are working properly past flipping them. You should come across the AUX1, AUX2 or AUX3 sliders move in the software. If you oasis’t setup switches yet in your radio,
follow this tutorial.
Modes

In the “Modes” tab yous will tell your flight controller what the switches on your radio exercise. Common modes we use are:
- Arming
- Angle mode (with angle mode disabled, you are in rate mode, aka transmission style. If y’all don’t come across Angle mode, your accelerometer is probably disabled)
- Beeper
- Flip over after crash
I try to explain
the unlike modes in Betaflight in this article.
Here is how to assign a switch to a manner:
- Click “Add Range” on the mode you want to utilise
- Select the switch you desire to apply to control this mode in the driblet down menu. If you don’t know which AUX is your switch, only become to the Receiver tab and meet which AUX channels answer when you flip the switches. AUX1 is channel five, AUX2 is channel vi and so on
- Drag the slider to the desired range for activation
- Flip the switch and the little yellow marker should likewise move around, see if information technology falls within the activation range of the mode when the switch is turned on
- Click “Salve”
Motor

The motor tab is used for testing your motors. Make sure you remove all the propellers before using the motor tab for rubber.
There are a few things you want to check:
- Whether the motors spin?
- Are the motor in the correct gild?
- Are they spinning in the right direction?
Here’s the right motor society and spin rotation:
- motor 1 at rear right
- motor 2 at front correct
- motor iii at rear left
- motor 4 at front left

If the club is incorrect, you tin can ready it using resources remapping
Tutorial:
Betaflight Resource Remapping
Now, cheque motor spin management, if wrong, you tin reverse spin direction in BLHeliSuite
Tutorial:
How to connect to BLHeliSuite (ESC configurator) via FC
OSD

By setting up OSD, y’all can display of import flight data on your screen, such as voltage and timer.
Please come across my
tutorial on how to setup Betaflight OSD
for more detail.
PID Tuning
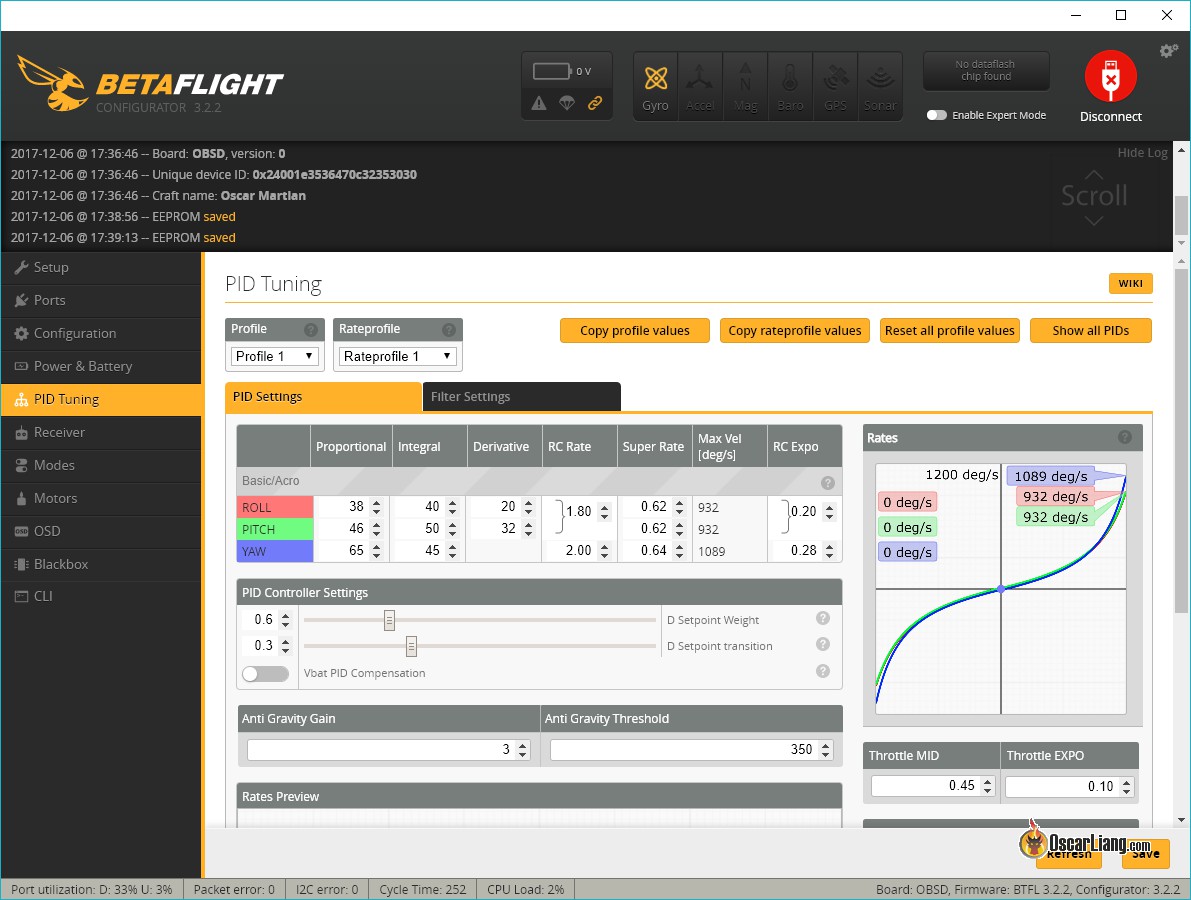
The PID Tuning tab offers the ability to tweak your quad’s flying functioning to get it to fly the way you lot want.
You lot don’t really accept to change anything here in order to take off for the first time. Default values are perhaps not perfect, just they should work fine for nearly models. As you become more than experienced in the future, you can take a look at myPID tuning guide.
However, you lot might want to conform rates and expo to brand the quad easier to control. Rate, Super Charge per unit and Expo touch on the sensitivity of the sticks, how much the quad reacts to your stick movement. Accept a await at this
guide on Rate / Super Charge per unit and Expo.
Stop Beeping on the Bench
If you continued the buzzer to your FC, it might offset beeping equally soon as you connect the USB while your radio is powered off. An easy set is to disable “USB” option under Beeper Configuration in the Configuration tab.
That’s all to the basic setup in Betaflight.
Prophylactic Checks
Check Failsafe – Remove all props, arm the quad. With the motors spinning, power off your radio – this simulates a failsafe during flight. Ideally, your quad should disarm within 5 seconds. If non,
you demand to investigate your failsafe settings.
Cheque CPU Load – While the quadcopter is armed, look at the CPU load in the bottom of Betaflight Configurator, if information technology’s ever over 50% you lot should try disabling some unused features to bring information technology back downwards.
Other Betaflight Related Tutorials
Once you have completed this tutorial, come up back and check out the following tutorials to learn more than nigh the advanced features in Betaflight:
- CLI Explained
- Setup RGB LED Strip
- Resource Remapping
- Setting up Failsafe
- Betaflight OSD
- VTX Control
- Softserial
- LUA Script
- ESC Telemetry
- Camera Command
- GPS Rescue Mode
- Filters
- What Looptime Should I apply
- Moron Threshold
- Overclock Flight Controller to Run 32KHz
- Betaflight Airmode
- PID Tuning with Blackbox in Betaflight (Outdated)
Edit History
- Dec 2017 – Article created
- July 2018 – Updated instructions
- Sep 2018 – Added “how to update”, and links to a few more new tutorials
- Jan 2021 – Updated for BF4.2
