

“Schlage Connect Update “”Firmware”” Reddit Home Assistant”
READING Time: six MINUTES
Later many hours, and reading through tons of forums posts –
I was finally able to add my
Schlage Camelot BE469
to Home Assistant.
For reference, here’south what the lock looks like:
To save yous the hassle of reading through everything like I had to, I’ve consolidated everything into 1 how-to guide.
My Schlage lock was initially paired to SmartThings. Since I migrated from SmartThings to Home Assistant, I first had to exclude the lock from SmartThings.
If you’re Schlage Z-wave lock wasn’t added to SmartThings, you tin can skip Step ane.
As well, if you’re a fan of setting up security devices in Home Assistant, I recommend checking my
Domicile Assistant Alarmo guide,
which will walk you lot through setting up a domicile alert system in Abode Assistant without needing to affect a single line of yaml.
You might likewise find my
Home Assistant Keymaster guide
useful, where you lot can create and manage pin codes directly from Home Banana later on you set up this guide.
Step 1: Exclude Lock From SmartThings
To exclude your lock, y’all will need to first remove it from SmartThings. You will likewise demand your vi-digit pairing lawmaking.
The default pairing code is located in your Schlage instruction transmission, but you lot can likewise observe it on a sticker inside located on the “inside” section of your lock.
- Move your SmartThings hub as close as possible to your Schlage Z-Wave lock. (Mine was about 6 feet abroad.)
- Open your door. Put your lock into the “locked” position, with the lock fully extended.
- Press the SCHLAGE push button on the outside of your door.
- Enter your 6-digit Programming Code, and so press 0.
- From the SmartThings app, select your hub > 3 dots > Z-Wave Utilities > Z-Wave exclusion. After a few seconds, you should encounter a “one device has been excluded” message.
If information technology doesn’t exclude information technology right away, you may have to endeavor excluding it a few times.
How to Mill Reset Schlage Camelot BE469 Lock
For my scenario, I had to factory reset my Schlage lock before I could pair it to Home Assistant.
To factory reset your lock:
- Unplug the battery.
- Concur the Schlage outside push downwards, plug the battery back in, and so enter the programming lawmaking.
- Then, follow the steps higher up to exclude it.
Step 2: Create a Network Key
To generate a network key, download the Domicile Sssistant integration called ‘Terminal & SSH“. (Supervisor > Add-on store > Terminal & SSH).
Add this to your Sidebar later on.

Open the Terminal and paste this code to generate a network key in hex:
true cat /dev/urandom | tr -dc '0-9A-F' | fold -westward 32 | head -n 1 | sed -e 's/\(..\)/0x\1, /g' -e 'south/, $//'
This volition create a random string of numbers similar 0x9a, 0x57, etc
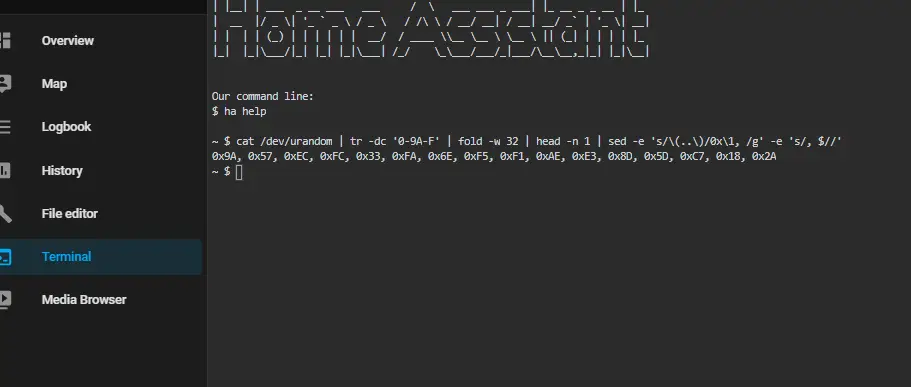
Unfortunately you aren’t able to simply copy & paste this from a concluding, so open Notepad and manually type it out. Then, copy to clipboard.
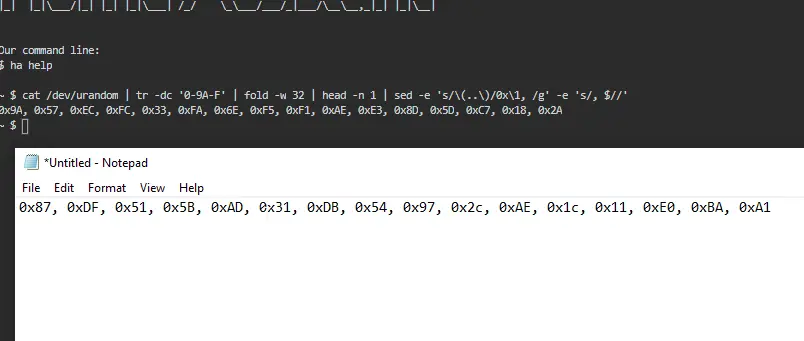
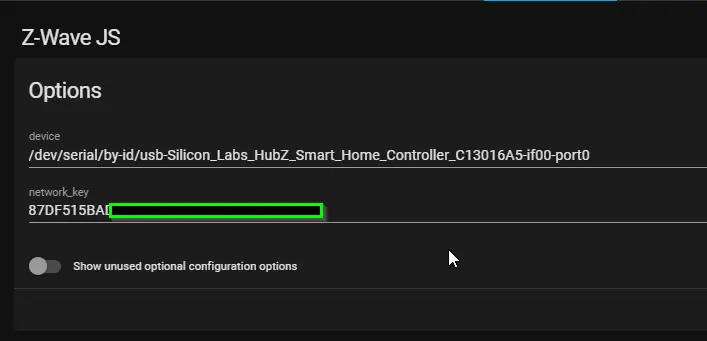
ZWAVE JS NOTE:
If you are using Zwave JS, not OpenZWave or the old deprecated z-moving ridge integration, remove all 0x’s, spaces, and comma’due south.
Information technology would look something similar ’87DF515BAD31DB54972cAE1c11BAA1′
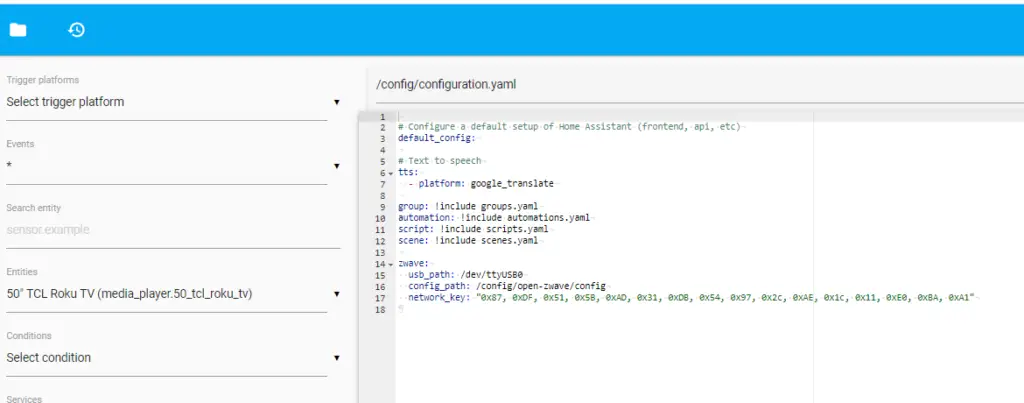
Step 3: Add Network Key to Configuration.yaml
This department is simply for openwave or the old zwave integration.
ZWaveJS users practice not need to add annihilation to the configuration.yaml file.
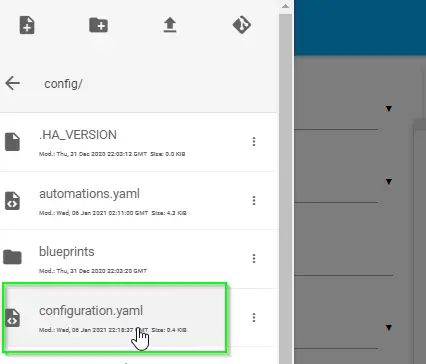
Next, open File Editor. If you don’t have the
File Editor integration
installed yet, yous’ll demand to install that likewise. (Supervisor > Add together-on store > File Editor).
Click the folder icon in the top left corner so choose
configuration.yaml.
Nether your zwave configuration, add your network key similar I’ve washed then
Save.
Reboot Home Assistant. (Supervisor > System > Host Organization > Reboot)
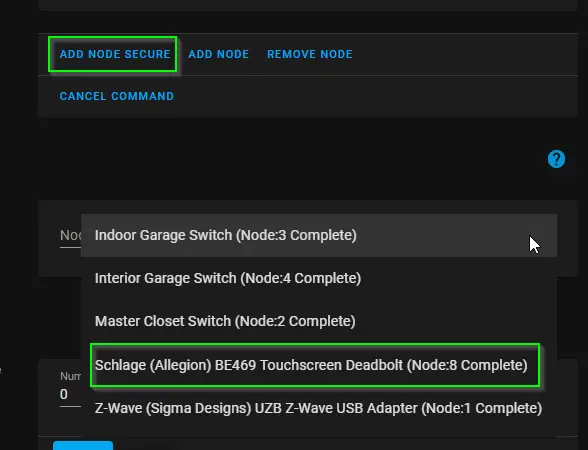
Stride 4: Secure Join node to Home Banana
Schlage locks must be added as “secure join” devices. If you accidentally added it equally a regular node, meet step five to remove it.
Click
Configuration > Integrations > Z-Wave (or JWave JS) > Configure. Then click
Add together Node Secure. After a few moments, you’ll see a new Schlage lock node bear witness up.
Optional Step 5: Remove Regular Schlage node
Of import: Yous only demand to follow this footstep if yous clicked “Add Node” instead of “Add Node Secure”.
From the same page, click Remove Node and and then select your Schlage lock. Enter the programming code. I believe you’ll see a ruddy checkmark on the outside of your lock if this done correctly.
So, reboot Home Assistant and run through Step 4 one more time, this time choosing Add together Node Secure.
Step six: Test Your Lock
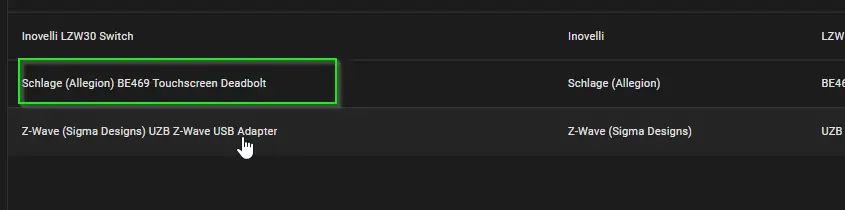
To test, become to Configuration > Integrations > Z-Wave > select the devices:
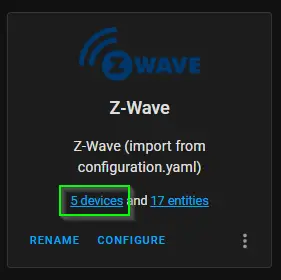
So select your lock.
Under Entities, you should see a Lock or Unlock status.
Get alee and toggle it a few times.
For some reason, the status wasn’t reporting correctly initially for me. But after toggling it a couple times, the condition seemed to written report correctly.

Step 7: Adding New Lock Code
At this stage, you lot should exist able to lock and unlock your door with the default lock codes (located in your instructions or on the within of your lock where you establish the programming code).
From here, you lot have ii options: Add a Lock Lawmaking Manually, or using the Keymaster integration. The Keymaster integration, which gets installed through HACS, will allow to create pin codes from within Dwelling Banana. You tin follow this guide for step past pace instructions:
https://smarthomepursuits.com/how-to-install-keymaster-to-manage-z-wave-lock-pins-in-habitation-banana/
To add a new code, follow the steps in the instruction manual:

Enter six-digit programming lawmaking > number i > enter iv-digit pin > Enter 4 digit pin again. You’ll so see two checkmarks. Hit the Schlage push on the outside of the door and examination the code.
At present you should be able to open your door with a make new User Code!
My Favorite Dwelling Assistant Devices
Below are some of the Habitation Assistant-compatible devices I personally use in my abode. I highly recommend each of them.
-
Zwave/Zigbee hub:
Nortek GoControl HUSBZB-1 - Smart Plugs:Securifi Peanut plugs
-
Motion Sensors:
Hue Indoor Motion - Outdoor Camera:Amcrest IP5M Turret
-
Robot Vacuum:
Roborock S7
The full listing of all Home Assistant uniform & recommended devices I utilise can be found on my
Equipment Listing
page.
Smart Dwelling house Product Finder
What hub do yous currently utilize?

|
SmartThings |
|

|
Dwelling Assistant |
|

|
Hubitat |
What product are yous looking to add?

|
Lights |
|

|
Locks |
|
.svg)
|
Thermostats |
|

|
Cameras |
|

|
Garage Door Opener |
|

|
Switches |
|

|
SensorsMotion, Door & Window, Leak |
|

|
Smart Plugs |
|

|
Buttons |
What protocol?

|
Z-Wave |
|

|
Zigbee |
|

|
Wifi |
