

 User Manual")
Usermanual

Tableof
|
Features |
one |
|
Mobile continuity |
ane |
|
Cortana |
1 |
|
Layersof security |
1 |
|
Activity history |
1 |
|
Get started |
2 |
|
Front end view |
3 |
|
Back view |
4 |
|
Assemble your device |
v |
|
Install a SIM cardandmemory carte |
6 |
|
Accuse the bombardment |
half-dozen |
|
Battery Saver |
seven |
|
Start using your device |
7 |
|
Restart the device |
viii |
|
Addan email account |
8 |
|
Mobile continuity |
8 |
|
Update the device |
10 |
|
Taskbar |
10 |
|
i |
VZW_W767V_EN_UM_TN_SK4_121719_FINAL |

Tableof
|
Outset carte |
12 |
|
Apptiles |
12 |
|
Tablet fashion |
thirteen |
|
Activity center |
14 |
|
Multi desktop |
sixteen |
|
Split up screen view |
xviii |
|
Enter text |
nineteen |
|
Keyboardbacklight |
xx |
|
Apps |
21 |
|
Install Apps |
22 |
|
Uninstall Apps |
22 |
|
AppSettings |
22 |
|
Samsung apps |
23 |
|
Samsung Menstruum |
23 |
|
Samsung Gallery |
23 |
|
Samsung Notes |
24 |
|
SmartThings |
26 |
|
Boosted apps |
26 |
|
Verizon Connexion Manager |
26 |
ii

Tableof
|
Microsoft apps |
27 |
|
Access |
27 |
|
Excel |
27 |
|
Office |
27 |
|
OneDrive |
27 |
|
OneNote |
27 |
|
Outlook |
27 |
|
PowerPoint |
27 |
|
Publisher |
28 |
|
Skype |
28 |
|
Word |
28 |
|
Settings |
29 |
|
AccessSettings |
xxx |
|
Connections |
xxx |
|
Devices |
30 |
|
Network andInternet |
31 |
|
Display |
31 |
|
Lock Screen andSecurity |
32 |
|
WindowsHello Face |
32 |
iii

Tableof
|
WindowsHello Fingerprint |
32 |
|
WindowsHello PIN |
32 |
|
Security Key |
33 |
|
Password |
33 |
|
Film Password |
33 |
|
Crave sign-in |
33 |
|
Dynamic Lock |
33 |
|
Sign-in privacy options |
34 |
|
Privacy |
34 |
|
Update andSecurity |
35 |
|
Device Maintenance |
36 |
|
Arrangement |
36 |
|
Time andLanguage |
37 |
|
Book Settings |
38 |
|
Accounts |
38 |
|
Accessibility |
39 |
|
Ease of Access |
39 |
|
Other settings |
40 |
|
Phone |
40 |
iv

Tableof
|
Gaming |
xl |
|
Learn more |
41 |
|
Videos |
41 |
|
Smart Simulator |
41 |
|
Tips |
41 |
|
Samsung Care |
41 |
|
Talk to an amanuensis |
41 |
|
Legal information |
42 |
|
EndUser License Agreement for Software (EULA) |
42 |
|
Restricting children’saccessto your device |
43 |
five


Getstarted
Front end view
Back view
Assemble your device
Beginning using your device
two

Get started
Frontview
Camera
Microphones
Keyboard
Touchpad
Camera indicator lite
Touchscreen
Power key/ Fingerprint sensor
Status LED
Devicesandsoftwareareconstantlyevolving— theillustrationsyouseeherearefor referenceonly.
3
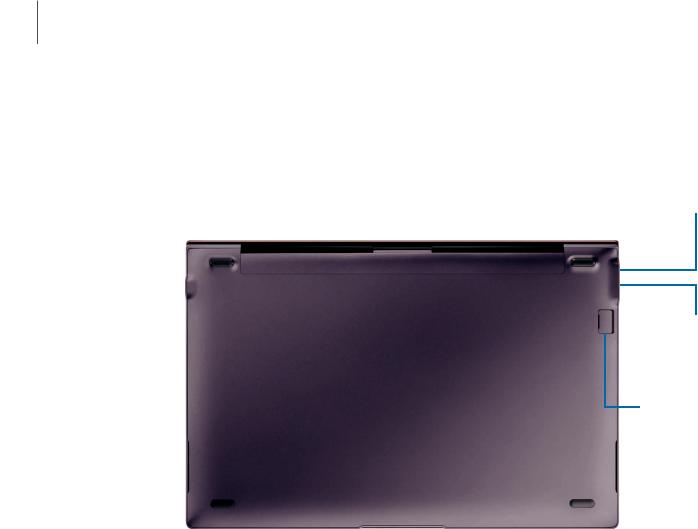
Get started
Backview
Headset jack
|
USB charger/ |
|||||
|
Audio port |
|||||
|
USB charger/ |
|||||
|
Audio port |
|||||
|
SIM and |
|||||
|
retentiveness card |
|||||
|
tray |
|||||
|
Speaker |
Speaker |
||||
Devicesandsoftwareareconstantlyevolving— theillustrationsyouseeherearefor referenceonly.
iv
![]()
\Get started
Assembleyourdevice
Your device usesa nano-SIM card. A SIM cardmay be preinstalled, or youmay be able to use your previousSIM menu. Contact your carrier for more details.
Notation Use only charging devicesandbatteries(if applicable) that are canonical by Samsung. Samsung charging devicesandbatteriesare designedfor your device to maximize battery life. Using other charging devicesandbatteriesmay voidyour warranty andmay cause damage.
Devicesandsoftwareareconstantlyevolving— theillustrationsyouseeherearefor referenceonly.
5
Become started
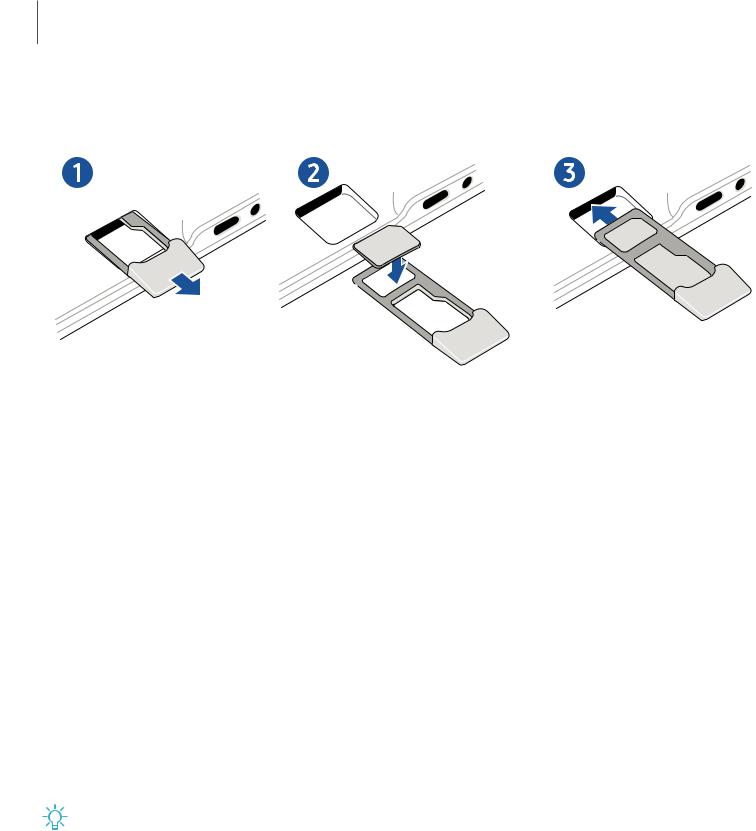
Install a SIM card and memory carte du jour
1.
Slide the SIM card/Memory cardtray out the slot.
2.
Place the SIM cardandmemory cardin the tray with the goldcontactsfacing down.
3.
Slide the SIM card/Memory cardtray dorsum into the slot.
Charge the battery
Your device ispoweredby a rechargeable battery. A charger (charging headandUSB cablevision) isincludedwith the device for charging the battery from a power outlet.
1.
Insert the USB cable into the USB charger port.
2.
Connect the USB cablevision to the charging head, andthen plug the charging head into a standardoutlet.
3.
Unplug the charging headfrom the outlet andremove the USB cable from the device when charging iscomplete.
-:¢:-
TIP Whilecharging,thedeviceandthechargermaybecomehotandstop charging.This usuallydoesnotaffectthedevice’slifespanorperformanceandis inthedevice’snormalrangeofoperation.Disconnectthechargerfromthedevice andwaitforthedevicetocooldown.For moreinformation,visit samsung.com/us/support/answer/ANS00076952.
Devicesandsoftwareareconstantlyevolving— theillustrationsyouseeherearefor referenceonly.
6

Get started
Bombardment Saver
Save battery power by limiting the device’sfunctions.
|
1. |
•• |
Start > |
Settings > System > Battery. |
|
On the taskbar, tap•• |
2.
Tapthe checkmark next to Turn batterysaver on automaticallyif mybattery fallsbelow to activate it.
3.
Drag the slider to the desiredremaining bombardment percentage.
For a quick check of your bombardment level, view the battery accuse indicator locatedin the bottom right corner of your device’sdisplay. A solidcolor (

) indicatesa full accuse.
Startusingyourdevice
The instructionsbelow explain how to turn your device on or off.
To turn the device on:
◌
Pressandholdthe Power cardinal until the device turnson.
To turn the device off:
|
◌ |
•• |
|
Tap•• |
|
|
– or – |
In Tablet fashion, tap Power > Close down.
– or –
Pressandholdthe Power key until the lockedscreen appears, andthen elevate the lockedscreen downward.
7

Get started
Restart the device
To restart the device:
◌
Tap
••
Get-go >
C)
Power > Restart. – or –
In Tablet mode, tap Power > Restart.
If your device isfrozen andunresponsive:
i.
Pressandholdthe Power fundamental for more than x secondsuntil the device turnsoff.
2.
Pressandholdthe Power key once again to restart information technology.
Add an email business relationship
Addan e-mail business relationship to your device.
1.
On the taskbar, tap
••
Start >
@
Settings.
2.
Tap Accounts > Email & accounts.
3.
Tap Add together an account andfollow the prompts.
Mobile continuity
Telephone calls, messages, photograph andvideo storage, andother functionsof your device can be accessedandintegratedacrosscompatible mobile devicesandcomputers.
Link to Windows
Achieve mobile continuity between your Samsung Book S anda Samsung Milky way smartphone. Get instant accessto your smartphone’sphotos, messages, andmore by linking your devices.
Thisfeature isonly available on supportedSamsung Galaxy smartphones. See support.microsoft.com/en-us/aid/4531317/setting-up-and-using-link-to-windows for additional data.
i.
On the smartphone, from Settings, tap
 Advanced features > Link to Windows.
ii.
Tap
C)
to enable thisfeature.
three.
Sign in to your Microsoft account.
8

Get started
 SamsungDeX
Samsung DeX isa service that allowsyouto employ a smartphone like a computer by connecting a Samsung Galaxy smartphone to your Galaxy Book S. Accomplish tasksyouwant done on a smartphone quickly andeasily on a large screen using a keyboardandtouchpad. While using Samsung DeX, youcan also utilize the connectedsmartphone. Thisfeature isonly available for smartphonesthat support Samsung DeX.
InstallSamsungDeX
The Samsung DeX appmust be downloadedandinstalledon both the smartphone and PC.
1.
Connect your smartphone to the Volume S with a USB cable.
ii.
Follow the instructionsprovidedon your devicesfor downloading andinstalling the DeX for PC software.
3.
After the software isinstalled, disconnect the USB cable from 1 device, and so reconnect it. The Samsung DeX window openson the Windowsscreen.
UseSamsungDeX
When Samsung DeX isactive, youcan control the smartphone on both the PC screen andthe smartphone screen.
•
Tapiconsin the Samsung DeX window or use the touchpadto interface with the smartphone.
•
Utilise the keyboardenter text.
•
Drag anddropfilesto transfer them betwixt the smartphone andBook S.
Exit SamsungDeX
Ending a session of Samsung DeX can be done in two ways:
•
In Windows, tap
Ten
Close on the Samsung DeX window.
•
Disconnect the USB cable.
9
Sumber: https://manualmachine.com/verizon/samsunggalaxybooks/2525947-user-manual/
