

Press Ok to Use Available Media Hp Printer
Z7_3054ICK0KGTE30AQO5O3KA30N0
hp-concentra-wrapper-portlet
![]()
Actions
HP LaserJet M1319f Multi-Office Printer – A ‘Load Newspaper Plain, Press [OK] for available media’ Message Displays on the Control Panel and the Printer Does Not Selection Upwards or Feed Paper
Issue
A
Load Paper Obviously, Press [OK] for available media
error message displays on the product command panel, and the product does not pick up or feed the newspaper from the tray. The product might make noises equally though it is printing, but no paper moves through it.

Important:
You must follow these solutions in the society presented to resolve the issue.
Solution ane: Plough off the Manual Feed mode
Choose your operating system for steps to plough off the Manual Feed mode.
-
Windows XP
-
On the Windows taskbar, click
Showtime
( ), then click
Printers and Faxes. The Printers and Faxes window opens. -
Right-click the icon for your product, so click
Printing Preferences
from the driblet down list. The Printing Preferences window opens. -
Click the
Paper/Quality
tab. -
From the
Source is
drop-down list, select
Automobile Select, click
Apply, so click
OK. -
Try to impress.
-
If these steps
resolved the issue, you lot exercise not need to continue troubleshooting. -
If the
effect persists, continue to the next solution.
-
-
Windows Vista
-
On the Windows taskbar, click the Windows icon (
 ), then click
Printers. The Printers window opens. -
Right-click the icon for your product, and and then click
Press Preferences
from the drop down list. The Press Preferences window opens. -
Click the
Paper/Quality
tab. -
From the
Source is
drop-downwardly list, select
Auto Select, click
Use, and then click
OK. -
Endeavor to print.
-
If these steps
resolved the issue, you do not need to continue troubleshooting. -
If the
issue persists, keep to the next solution.
-
-
Windows seven
-
On the Windows taskbar, click the Windows icon (
), so click
Printers and Devices. The Printers and Devices window opens. -
Right-click the icon for your product, and then click
Printing Preferences
from the drop down listing. The Press Preferences window opens. -
Click the
Paper/Quality
tab. -
From the
Source is
drib-down list, select
Car Select, click
Apply, and then click
OK. -
Try to print.
-
If these steps
resolved the issue, you do not need to continue troubleshooting. -
If the
event persists, continue to the side by side solution.
-
Solution ii: Reset the printer
Resetting the product tin can articulate a paper feed issue. Follow these steps to reset the product.
Footstep 1: Reset the printer
-
With the printer turned on, disconnect the power cord from the rear of the printer.
-
Unplug the power cord from the wall outlet.
-
Wait at least 15 seconds.
-
Plug the ability cord dorsum into the wall outlet.
-
Reconnect the power string to the printer.
-
Turn the printer on.
Footstep 2: Print a self-test report
Impress a cocky-test report to make sure that the hardware functions correctly.
-
Make sure that plain white paper is loaded in the input tray.
-
On the product command panel, press
Setup. -
Utilise the Arrow buttons (

 ) to select
Reports, and then press
OK. -
Press the Right Pointer push (
) to select
Config report, and and so press
OK. The self-exam written report prints.
-
If these steps
resolved the issue, and the
test page prints, there is no demand to continue troubleshooting. -
If the
issue persists, keep with the next solution. -
If the
test page does not print, continue with the next solution.
Solution iii: Check the status of the paper, then reload it
Paper feed issues might outcome from dusty, torn, wrinkled, wet, or folded newspaper in the tray. The quality of the newspaper tin likewise make a departure. Apply just good quality paper that meets production specifications. Follow these steps to bank check the status of the paper.
Footstep one: Check the status of the paper
-
Remove the stack of paper from the tray.
-
Check for obstructions inside the tray. Use a flashlight to view the mechanism inside the tray to make sure that nil blocks the paper from engaging with the rollers. Even small pieces of newspaper can cause paper feed issues.
notation:
If yous detect obstructions in the newspaper path, skip to the section on cleaning the rollers.
-
Examine the condition of the paper, and then replace any ripped, dusty, curled, wrinkled, or bent paper.
-
Make sure that all the newspaper in the stack is the same size and type. Never load mixed types of paper in the tray. The product can only process i type of paper at a time.
-
Tap the stack of newspaper on a flat surface to marshal the edges.
-
Make sure that the stack of newspaper contains no fewer than x sheets and no more than than 25 sheets of paper.
note:
You need to use 10 to 25 sheets of paper only for purposes of these troubleshooting steps. When the consequence is resolved, you tin resume loading paper according to the paper tray capacity specifications for your product.
Footstep two: Reload the paper
-
Remove any loose paper from the input tray.
-
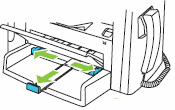
Slide the newspaper width and the paper length guides to their outermost positions.
Figure
: Slide the paper guides out
-
With the impress side down, reinsert the stack of newspaper into the tray until it rests against the rear edge of the tray. Then slide the newspaper guides in until they residual against the edges of the paper.
Figure
: Reinsert the newspaper and then slide the newspaper guides in

-
Try to impress.
-
If these steps
resolved the issue, you lot practice non demand to continue troubleshooting. -
If the
issue persists, continue to the next solution.
Solution four: Check the print settings
Follow these steps to make certain that the paper type and size settings are correct for your print job.
annotation:
The product might not option upward newspaper if the paper size and type in the input tray does not lucifer the paper size and type settings in the product software. This characteristic helps to avoid wasting ink and paper.
-
Render to the document you were trying to print when the issue occurred.
-
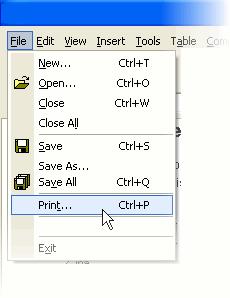
Click
File, and then click
Print. The
Print
window opens.Figure
: Click File, and then click Print
-
Click the button that opens the
Properties
dialog box. Depending on the software program, the push might be
Properties,
Options,
Printer Setup,
Printer, or
Preferences. -
Click the tab that provides paper type and size settings. The tab might be
Features
or
Paper/Quality. -
From the
Type is
drop-downwards list, select the paper blazon that matches the paper in the production. -
From the
Size is
drib-downwardly listing, select the paper size that matches the paper in the product.For example, if you accept 101.6 x 152.4 mm (four 10 six inch) photograph newspaper loaded in the paper tray, select
4x6in.
or
4x6in. (tab).If the required paper size is non in the drop-down list, follow these steps to create a custom paper size.
-
Select
Custom
from the
Size is
drop-downwardly listing, or the
Custom
tab. -
In the
Custom Newspaper Size
dialog box, type a name for the new custom size. -
In the
Width
and
Summit
boxes, or the
Width
and
Length
boxes, blazon the dimensions. -
Select the unit of measurement, and then click
Save. -
Click
OK
to close the
Custom Paper Size
dialog box, and so click
OK
over again to close the
Properties
dialog box.note:
You must leave the
Backdrop
dialog box to utilise your changes. -
Open the
Properties
dialog box over again, and then select the new custom size from the
Size is
drop-down list.
-
-
Click
OK, and and then click
OK
again to print the document.
-
If the
certificate prints, at that place is no need to continue troubleshooting. -
If the
certificate prints on plain white paper, simply not a special paper type, at that place is no need to continue troubleshooting. The outcome is probably related to the paper that you were trying to impress on. Review the
Experiencing frequent or recurring paper pick issues?
and
Causes
sections at the beginning of this document. -
If the
certificate does not impress, continue to the next solution.
Solution five: Audit and make clean the paper pick roller
Newspaper feed issues can occur if grit, paper fiber, and other droppings has accumulated on the paper pick roller, or if the roller is worn or damaged. Follow these steps to audit and then make clean the paper pick roller.
Step one: Remove and inspect the newspaper pick roller
-
Printing the Power button (
 ) to turn off the product.
 -
Disconnect the power string from the rear of the product.
-
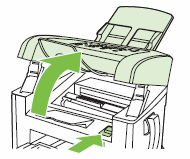
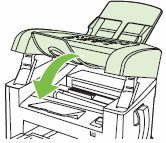
Open up the cartridge door.
Figure
: Open the cartridge door
-
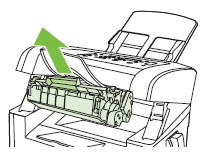
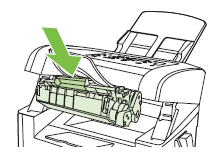
Remove the cartridge. Grasp the handle on the cartridge, and so pull the cartridge toward y’all to remove it.
Figure
: Remove the cartridge
-
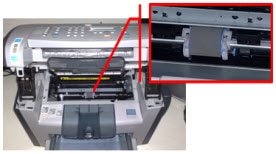
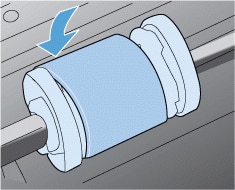
Locate the paper choice roller.
Figure
: Newspaper pick roller
-
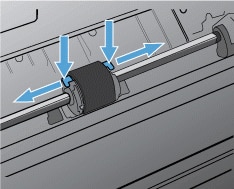
Release the pocket-sized white tabs on each side of the paper pick roller, and then rotate the roller toward you.
Figure
: Release the paper option roller tabs
-
Gently pull the roller up and out to remove it from the product.
Figure
: Remove the roller
-
Inspect the roller for wear or damage.
-
If the roller is worn or damaged, replace the roller. To gild a new roller, visit the
ordering supplies and accessories
page on HP.com. -
If the roller is non worn or damaged, go on to the next pace.
Step two: Clean the paper pick roller
-
Gather the following materials:
-
Two make clean, lint-gratis cloths that will non come apart or leave fibers
-
Isopropyl alcohol
-
-
Dab a cloth in the isopropyl alcohol, and then scrub the roller.
warning:Alcohol is flammable. Continue the alcohol and cloth abroad from an open flame. Earlier you close the product and plug in the power cord, allow the alcohol to dry completely.
Figure
: Scrub the roller

-
Wipe the roller again with a clean, dry cloth to remove any loosened dirt.
Step three: Reinsert the newspaper pick roller
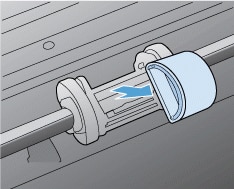
-
Position the roller in the slot. The circular and rectangular slots on each side prevents y’all from installing the roller incorrectly.
Figure
: Position the roller in the slot
-
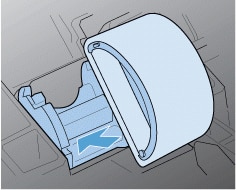
Reinsert the roller. Rotate the top of the roller away from you until both sides snap into place.
Figure
: Reinsert the roller
-
Reinsert the cartridge. Make certain that the cartridge is deeply seated in the production.
Effigy
: Reinsert the cartridge
-
Close the cartridge door.
Figure
: Close the cartridge door
-
If these steps
resolved the outcome, you practise non need to go along troubleshooting. -
If the
issue persists, continue to the next solution.
