

Hp Printer Won T Print on Glossy Paper
Z7_3054ICK0KGTE30AQO5O3KA30N0
hp-concentra-wrapper-portlet
![]()
Actions
An ‘Out of Newspaper’ Bulletin Displays and the Printer Does Not Option Up Paper for the HP Officejet Pro 8610, 8620, 8630, 8640, and 8660 e-All-in-One Printer Series
This document is for the HP Officejet Pro 8610, 8620, 8630, 8640, and 8660 east-All-in-One Printer series.
An ‘Out of paper‘ message displays on the control panel, and the printer does not option up or feed newspaper. The printer might make noises as though it is printing, but no newspaper moves through it.
note:
To buy paper in the Us and Canada, go to the
HP Store.
Solution one: Cheque the newspaper, and and then reload it
Follow these steps to cheque the status of the paper, so print a test page.
Footstep 1: Check the condition of the newspaper
Make sure that the paper you apply to impress is in good condition, that it is neatly stacked in the tray, and that the paper path and tray are free from obstructions.
-
Printing the Ability button to turn off the printer.
warning:Y’all must disconnect the ability string earlier reaching inside the printer to avoid chance of injuries or electrical stupor.
-
Disconnect the USB or Ethernet cable from the rear of the printer.
-
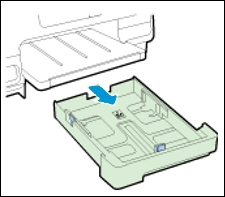
Grasp the underside of Tray 1, and then pull out the tray.
Figure
: Pull out the paper tray
-
Remove any paper from the input tray, and then examine the condition of the paper:
-
Replace whatsoever ripped, curled, wrinkled, or bent newspaper.
-
Avoid printing on newspaper that is dusty. Reload paper that has been in the photo tray for a time.
-
Make sure that all the paper in the stack is the same size and type. The printer can merely process i type of paper at a time.
-
-
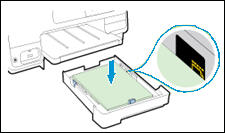
Load plain white paper in the input tray. Make sure that the print side is face-down and the short edge is frontwards.
You need to load no fewer than ten sheets and no more than 25 sheets of evidently white paper only for troubleshooting. When the issue is resolved, you tin can load paper according to the specifications for your printer.
caution:Do not fill the paper above the yellowish, dotted lines on the sides of the paper tray.
Figure
: Load paper into the paper tray
-
Check for obstructions within the input tray. Brand sure that nothing blocks the paper from engaging with the rollers. Even small-scale pieces of paper tin can cause paper feed issues.
Step two: Reload the paper
Follow these steps to reload U.Southward. letter of the alphabet or A4 size paper in the printer.
-
Grasp the underside of Tray 1, and so pull out the tray.
Figure
: Pull out the paper tray
-
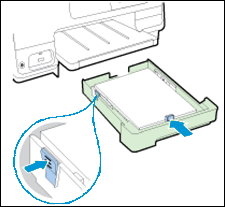
Compression the newspaper width guide tabs, and then slide the paper width guides to their outermost positions.
Figure
: Slide out the paper width guides
-
Insert patently white paper in the tray. Brand sure that the print side is confront-downward and the curt edge is forward.
circumspection:Do non make full the paper above the yellow, dotted lines on the sides of the paper tray.
Figure
: Load paper into the paper tray
-
If necessary, slide the paper width guides inward so that they rest on the edges of the paper.
-
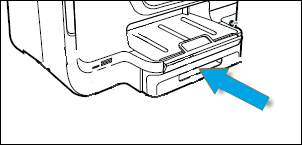
Push the tray toward the printer until it locks into place.
Effigy
: Push button in the paper tray
-
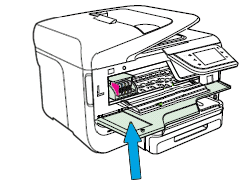
Pull out the output tray extender, and so enhance the newspaper take hold of.
Effigy
: Pull out the tray extender

Step three: Impress a Printer Condition Report
Print a test page from Tray i to make sure that the printer hardware functions properly.
notation:
If your printer includes Tray 2 as an optional accompaniment, load merely U.Southward. letter, legal, or A4 size newspaper. Specialty paper is not supported in Tray 2.
-
Load U.Southward. Alphabetic character or A4 size, unused, plain white paper into the input tray.
-
On the printer control panel, swipe the display to scroll to
Setup, then touch the
Setup
icon ( ). The
Setup
carte displays. -
Touch on
Impress Reports, and so bear upon
Printer Status Report. The printer prints the report.Figure
: Example of a Printer Condition Study

Solution ii: Adapt the paper settings in the print commuter
The printer might non choice upward paper if the newspaper size and type in the paper tray practise not match the size and type settings in the print driver. Choose your operating arrangement for steps to change the paper size and type settings.
Solution three: Make clean the newspaper feed and choice rollers
Dust, paper fiber, and other debris might accrue on the paper feed rollers and paper feed issues. Follow these steps to clean the rollers inside the printer, the duplexer, and the ADF, and then impress a test folio.
Step one: Clean the paper feed rollers in the cartridge access area
Follow these steps to clean the paper feed rollers in the cartridge access expanse.
-
Turn off the printer, and then disconnect the ability cord.
warning:Disconnect the ability cord before reaching inside the printer to avoid adventure of injuries or electrical daze.
-
Disconnect the USB or Ethernet cable from the rear of the printer, if you take a cablevision connexion to the printer.
-
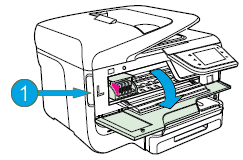
Place your fingers into the slot on the left side of the printer, and then pull forward to open the cartridge access door.
-
Slot on the side of the printer
-
-
Lightly dampen a lint-costless swab with the water, and then squeeze whatever backlog liquid from the swab.
-
Press the swab against the rollers inside the printer, and then rotate the rollers up with your fingers. Apply a moderate amount of force per unit area to remove whatsoever dust or dirt buildup.
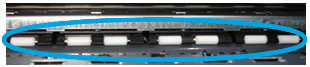
-
Permit the rollers to dry completely (approximately 10 minutes).
-
Close the cartridge access door.
-
Reconnect the power cord to the rear of the printer, and and then turn on the printer.
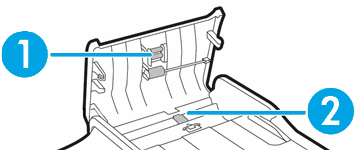
Step 2: Clean the ADF rollers and the separator pad (optional)
If you are trying to copy or fax a document, and the document does not feed into the Automatic Document Feeder (ADF), make clean the ADF rollers and the separator pad. If you are not using the ADF, continue to the next step.
-
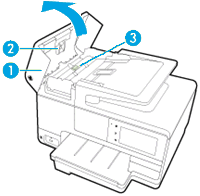
Elevator the top cover of the ADF. This provides piece of cake access to the rollers and separator pad.
-
ADF comprehend
-
Rollers
-
Separator pad
Figure
: Lift the ADF cover
-
-
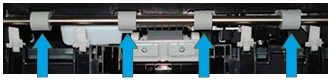
Lightly dampen a clean, lint-free cloth with bottled or distilled water, and then clasp any excess liquid from the cloth.
-
Printing the cloth against the rollers, and then rotate them upwards with your fingers. Apply a moderate amount of force per unit area to remove any dust or clay buildup.
-
Rollers
-
Separator pad
Effigy
: Clean the rollers and separator pad
-
-
Allow the rollers to dry completely (approximately 10 minutes).
-
Close the ADF cover tightly at both ends.
Figure
: Shut the ADF encompass tightly at both ends

Step 3: Clean the paper feed rollers in the rear of the printer
Follow these steps to clean the paper feed rollers in the rear of the printer.
-
Turn off the printer, so disconnect the power cord.
warning:Disconnect the ability cord before reaching inside the printer to avoid risk of injuries or electric shock.
-
Plow the printer so that the rear of the printer faces you lot.
-
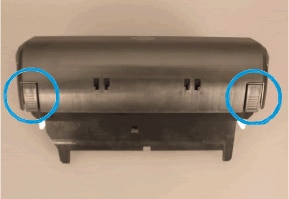
Remove the duplexer. Push in the buttons on both sides of the duplexer, pull out the duplexer, and then set it bated.
-
Push in the duplexer buttons
-
Pull out the duplexer

-
-
Lightly dampen a make clean, lint-free cloth with bottled or distilled water, and then squeeze any excess liquid from the fabric.
-
Press the fabric against the rollers, and so rotate them upwardly with your fingers. Apply a moderate corporeality of pressure to remove whatever dust or dirt buildup.
-
Permit the rollers to dry completely (approximately 10 minutes).
-
Reconnect the power cord to the rear of the printer, and so plough on the printer.
Step 4: Make clean the newspaper pick rollers
Follow these steps to clean the paper option rollers.
-
Place your fingers in the slot on the forepart of Tray i.
Figure
: The slot on the front of Tray 1
-
Pull the tray toward you to remove information technology.
Figure
: Pull out the input tray
-
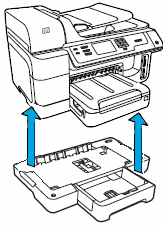
If you use Tray 2, lift the printer off Tray two, and so set the printer aside.
Figure
: Lift the printer off Tray 2
-
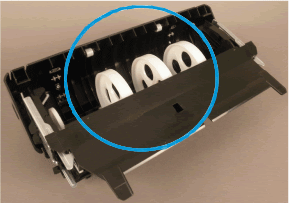
Turn the printer so you lot see its underside, and and then locate the pick roller.
Figure
: Locate the selection roller

-
Curlicue the pick roller to the right so that the rubber role faces y’all. This might require some force.
note:
The pick roller should just rotate to the right.
Figure
: The pick roller in its normal position

-
The safe part of the pick roller
-
Rotate the prophylactic role of the pick roller so that it faces you
Figure
: The rubber part of the pick roller

-
-
Lightly dampen a clean, lint-costless cloth with bottled or distilled water, and and then squeeze whatever excess liquid from the cloth.
-
Press the cloth confronting the rubber part of the roller, and then rotate the roller to the correct with your fingers. Utilise a moderate amount of force per unit area to remove whatever grit or dirt buildup.
-
Rotate the roller back to its original position.
Effigy
: The pick roller in its original position
-
Plow the printer back around so that the printer command console faces you.
-
Place the printer its normal position.
-
Reinstall Tray ane.
Figure
: Reinstall Tray ane
-
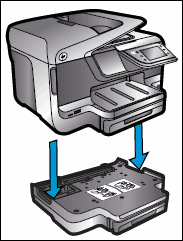
If yous use Tray ii, lift the printer, and and so lower the printer on top of Tray 2.
Figure
: Set the printer on superlative of Tray 2
Step 5: Clean the rollers in the duplexer
Follow these steps to clean the rollers in the duplexer.
-
Lightly dampen a clean, lint-costless fabric with bottled or distilled water, and and then squeeze any excess liquid from the cloth.
-
Press the textile against the external rollers, and then rotate them upward with your fingers. Apply a moderate amount of pressure to remove any grit or dirt buildup.

-
Press the tabs on the sides of the duplexer, and then lower the cover to open the duplexer.
-
Lightly dampen a clean, lint-free cloth with bottled or distilled water, and so squeeze whatever backlog liquid from the material.
-
Press the cloth against the rollers, and so rotate them upward with your fingers. Apply a moderate amount of force per unit area to remove any dust or dirt buildup.
-
Let the rollers to dry completely (approximately x minutes).
-
Close the duplexer cover.
-
Gently push the duplexer into the printer until it snaps firmly into place. Do not printing the buttons on the end of the duplexer while you reattach it.
Stride 6: Print a Printer Status Study
Print a test page to make sure that the hardware functions correctly.
How to print a test folio
Follow these steps to print a exam page.
-
Load U.S. Letter or A4 size, unused, plain white paper into the input tray.
-
On the printer control panel, swipe the display to roll to
Setup, and and then bear upon the
Setup
icon (). The
Setup
carte du jour displays. -
Touch
Print Reports, and so affect
Printer Condition Study. The printer prints a exam folio.
Solution four: Reset the printer
Sometimes, resetting the printer can clear a paper feed issue. Follow these steps to reset the printer.
Step ane: Perform a power reset
Follow these steps in the order presented to reset the printer.
-
With the printer turned on, disconnect the ability cord from the printer.
-
Unplug the power cord from the ability source.
-
Await lx seconds.
-
Reconnect the power cord to a wall outlet and to the printer.
notation:
HP recommends plugging the printer direct into a wall outlet.
Step 2: Print a Printer Status Report
Print a test page to make sure that the hardware functions correctly.
How to print a test page
Follow these steps to impress a test page.
-
Load U.Due south. Letter of the alphabet or A4 size, unused, patently white newspaper into the input tray.
-
On the printer control panel, swipe the brandish to scroll to
Setup, and and so touch the
Setup
icon (). The
Setup
bill of fare displays. -
Touch
Print Reports, and then bear on
Printer Status Report. The printer prints a examination page.
Step 3: Try to impress
If the Printer Status Report prints successfully, effort to print the original document or photo again.
-
If the document or photo does print
successfully, the outcome is resolved. -
If the document or photo does not print, service the printer.
Solution five: Service the printer
Service or supplant your HP product if the issue persists subsequently completing all the preceding steps.
Go to
Contact HP Customer Back up
to schedule a product repair or replacement. If you are in Asia Pacific, you will be directed to a local service eye in your area.
To confirm your warranty status, become to
HP Product Warranty Bank check. Repair fees might apply for out-of-warranty products.
