

How to Setup Hp 2545 Printer Wireless
Z7_3054ICK0KGTE30AQO5O3KA30N0
HP Deskjet 2540 and 2545 Printers – Wireless Printer Setup (Windows)
This document is for HP Deskjet 2540, Deskjet Ink Advantage 2545, 2546, and 2548 printers and Windows computers.
Ready upwards your HP printer on a wireless (Wi-Fi) network. These steps apply to first time connections, new router or ISP setup, or to restore a lost connection.
Step ane: Prepare for installation
Check the requirements, plough on the computer and the router, and fix the printer.
-
To use your printer on a wireless network, you demand the following items:
-
A computer connected to your wireless network
-
Net admission: HP recommends broadband Internet access for software downloads, using Web Services, and getting printer updates.
-
-
Make sure the router and computer are turned on.
-
Brand sure the computer is continued to the aforementioned wireless network that the printer is connected to.
-
Prepare up the printer, load paper into the input tray, and install the toner cartridges. For more information nigh setting up the printer, go to
First Time Printer Setup. -
Plough on the printer and identify it within range of the router during the setup procedure.
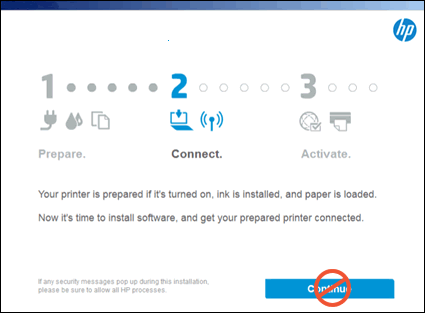
Step 2: Start the software installation
On your computer, starting time the HP full feature impress driver and software installation.
-
Go to
123.hp.com/DJ2540
and click
Download. The installation process begins automatically later the software downloads. -
During the installation, a connect window opens.
STOP at the Connect window! Do non click Continue at this point.
Step 3: Restore default wireless settings on the printer
Reset the wireless settings to make sure the connection completes successfully.
-
Brand sure the printer is on.
-
If the wireless light is blinking, skip to the side by side step to continue installing the software.
-
Press and concord the
Ability
button
 .
. -
While holding down the ability button, press the
Offset Copy Blackness
button

two times, and and then printing the
Cancel
button

iii times. -
Release the power push. The wireless light next to the wireless push blinks. Echo these steps if the wireless light does not blink.
-
Continue to the next step to install the software. You take approximately twenty minutes to complete the software setup using the HP auto wireless connect characteristic.
Step four: Proceed the software installation
Install the software to finish setting up your HP printer and connect information technology to your wireless network.
-
On the HP installation Connect window, click
Keep. -
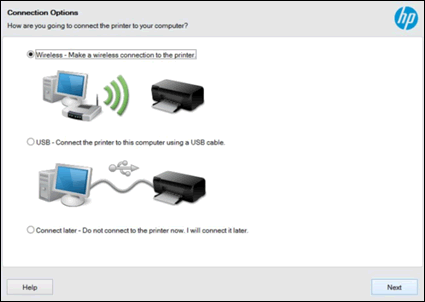
Follow the on-screen instructions until a
Connection Options
screen opens. -
On the Connection Options screen, select
Wireless – make a wireless connection to the printer, then click
Next.
-
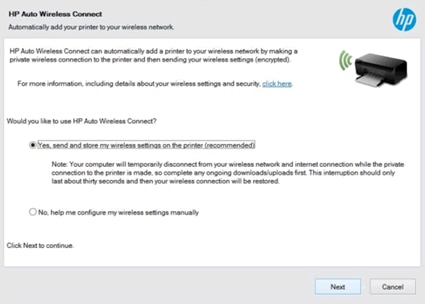
One of the post-obit screens display with the best method to complete the wireless setup.
-
HP Car Wireless Connect
Click
Aye, then click
Next.
-
Wireless Setup Using a USB Connection
Connect a USB cablevision from your computer to the printer and click
Next. A prompt displays to disconnect the USB cablevision afterwards the setup completes.
-
-
Continue following the on-screen instructions.
Frequently asked questions (FAQs)
Review these oftentimes asked questions on setting up the wireless network connexion.
What do I do if the connection dropped?
Some network settings and behaviors might cause the wireless connection to drop. Manually set the printer’southward IP address using the printer’s Embedded Spider web Server (EWS) to re-enable the connection.
-
Restart the printer and the reckoner.
-
Press the power button to wake the printer if it entered sleep way (dim ability light).
-
Try printing again. If the issue persists, continue using these steps.
-
On the printer control panel, press the
Wireless
push button
 and the
Start Copy Black
push button
at the same time.A network configuration page prints.
-
Observe the IP address on the page.
-
If the folio does not list an IP address, the printer and the router are not continued. Employ 1 of the following methods to connect and detect the printer’south IP address.
-
Log into your router’south configuration or setup page. Find the printer’south IP accost listed in an fastened device or DHCP Clients section.
-
Press and hold the
Wireless
button
on the printer until it blinks, and and then press and agree the WPS button on your router. Wait for the wireless low-cal to terminate blinking and remain solid. Impress another network configuration report, and then detect the IP address. -
Printing the
Wireless Direct
button

on the printer, and then open up the list of bachelor networks. Connect the computer to
HP-Impress-xx-[your printer model proper noun]. The printer’due south IP address is
192.168.223.1.
-
-
Type the IP accost into an Cyberspace browser, then press
Enter.The printer’south EWS opens in the browser.
-
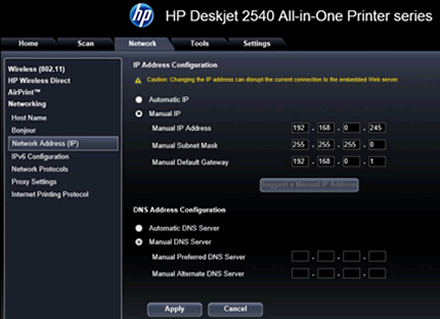
Click the
Network
tab, then click
Network Accost (IP). -
Click
Propose a Transmission IP Address.If information technology is not bachelor, enter Transmission IP values compatible with your router.
-
Click
Apply, then restart the printer.The printer remains connected to your network.
Can I change my printer connection type after the commuter install completes?
To change from a wireless connectedness to a USB or wired network connexion, use the Printer Setup & Software utility.
-
Search Windows for the name of your printer, and and then click your printer in the results.
HP Printer Banana opens.
-
Click
Utilities, and then click
Printer Setup & Software. -
Click
Connect a new device, so follow the on-screen instructions.

