

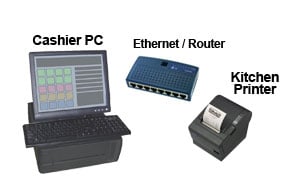
How to Install Epson Tm U220 Network Printer
How to connect an Epson POS Printer with an Ethernet Adapter
|
||
|
|
||
|
Required Components
|
Epson Printers Covered
|
|
 |
Lookout our How-to video on YouTube! |
|

Step past Step
Installation
To connect to your local network the Ethernet printer must exist gear up to settings compatible with your network. To gear up the settings on the adapter y’all must first connect to the adapter in its current or default land.
The installation footstep vary slighting depending on the blazon of Ethernet card you lot have.
Over the by few years Epson has offered three types of Ethernet cards, Blazon Two, Ii and Four.
Each has a unlike set of features and a unlike fashion of setting them up.
|
Blazon II |
 |
|
|
Type 3 |
 |
|
|
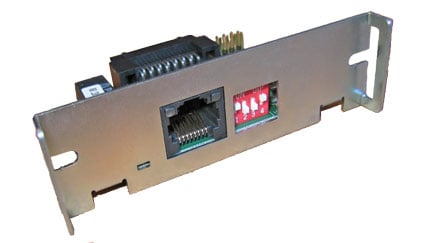
Type Iv UB-E02, UB-E03, UB-E04 |
 |
|
| Click to select |
Installation – Type Four
Installation Steps for Installing Ethernet Adapter
(Blazon IV)
The Blazon 4 module (UB-E02, UB-E03, UB-E04 or similar) is the latest type of Connect-Information technology Ethernet adapter. The module tin be fix by accessing it directly using a spider spider web browser or past a configuration utility. This type of module can as well act every bit a device type Print server to be used by more than 1 calculator.
Installing and Setting the Connect-It Ethernet Adapter
(Type four)
Install the Connect-It Ethernet adapter into the Epson TM serial printer
The Type IV adapter can supersede the existing adapter and is held in identify past two screws.
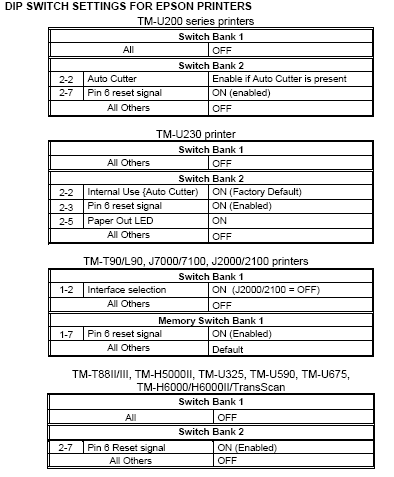
If changing a printer to Ethernet you must change the specific dip switch on the Epson printer to allow for the Ethernet card.
(Primal:
DIP SW2-viii On:
refers to slide switch number eight, on switch bank 2, is turned On)
Cabling
Utilise a regular LAN patch string to connect the printer to the LAN.
RJ-45 Female
(connector on computer and adapter cease)

Ethernet cards utilise CAT5/6 patch cords
|
Tip: Yous can straight connect a printer with an Ethernet interface to a figurer using a crossover cablevision (non the aforementioned equally a patch cablevision). This special cablevision allows you to bypass using a router or switch to connect a computer to a printer for testing. To use this setup set the IP address of the figurer and the printer statically, both in the same sub domain, with unlike addresses. |
Connect a calculator straight to an Ethernet printer using a crossover cable |
|
For example if the printer was set to 192.168.192.168, the estimator could be set up to 192.168.192.167. After proper prepare-up yous should be able to open and talk to the printer directly. Simply enter the IP address (192.168.192.168 in this instance) of the printer using a browser. |
|

Getting initial printer and Ethernet adapter settings
(Type 4)
Get the initial settings of the Ethernet adapter. Run the printer self exam (concur downwardly the feed button while turning on the printer). The printer will impress a list of initial settings including interface blazon and buffer capacity. verify that the interface is “Ethernet”
A similar exam tin can and so be done on the UB-E03, UB-E04 adapter by inserting a paperclip through the small pigsty in the adapter for 3 seconds.
A strip volition print showing the MAC address, Gateway (GW), IP accost and IP assignment method (manual/auto).
Irresolute the IP Address of the Adapter
Now comes the tricky role. To be able to change the IP address on the adapter y’all need to be able to connect with information technology. To do this y’all most likely need to modify the IP accost of your figurer to a value that makes the adapter accessible. You can then connect to the adapter, brand the change to the adapter, and then return the calculator back to it’s original settings.
Notation: the mPOS version of the UB-E03, UB-E04 Ethernet cards are set to DHCP and will endeavor to detect an available IP accost on its ain the get-go fourth dimension information technology appears on your network. If successful, information technology will impress out the IP address it is using. If the address is acceptable to y’all then skip to section about
Configuring the Reckoner for slice of piece of work with the Ethernet card.
LOGIN Information – Epson UB-E04
Cards equally well require yous to enter a user proper noun and password.
The default values are
epson
/
epson
The Epson TM-T88VII Ethernet interface
may utilise the serial number of the printer for the countersign (no user name required)
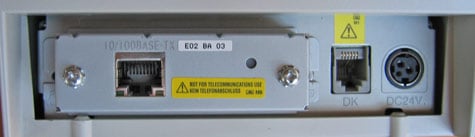
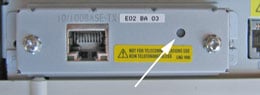
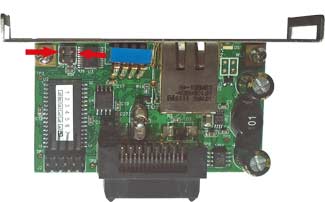
Resetting the Adapter
You can reset the UB-E03, UB-E04 Ethernet Interface card to manufacturing plant defaults by holding downwards the push push on the card (run across arrow above) while turning on the printer power and standing to hold it down for five seconds. This causes all internal settings to return to their factory defaults. For the older UB-E02 cards, hold the push button down afterwards the printer is on for xxx seconds.
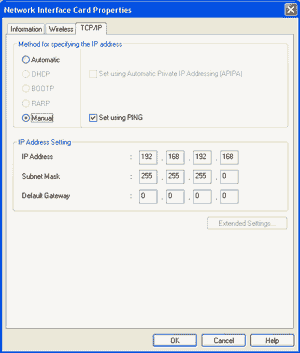
Setting the IP Accost on your Computer
In Windows you can admission the wired Ethernet adapter in the “Network Connections” applet in the Windows Command Panels (Net Protocol/TCP/IP properties, let you lot to enter an IP address.) Brand a note of the existing settings, you’ll exist returning to those settings when your done. Set the IP accost to an accost in the aforementioned domain equally the adapter. For example of the adapter shows an IP address of 172.sixteen.x.63 yous lot could change the calculator to 172.sixteen.10.ii.
Do not fix the reckoner to the same address equally the Ethernet adapter on the printer.
Y’all might take to reset the figurer’southward adapter for the new settings to accept identify.
Logging onto the Adapter using TMNet Web
Config
(Blazon 2 or Type 4)TMNet spider web configuration allows yous to access the adapter via your network using a spider web browser. Generally speaking the adapter must be in the same sub domain every bit the estimator to exist able to log on (run into previous department for how to configure the PC to the aforementioned subdomain)
Setting the IP Address using TMNet WinConfig
(Type 4)
To utilize the UB-E03, UB-E04 with TCP/IP, you outset demand to gear up its IP address. Y’all can set the IP accost past using the EPSON TMNet WinConfig or arp/ping control.
Running the TMNet WinNet configuration utility
on the Calculator
Once connected yous can run the TMNet configuration utility to view or change the settings on the Ethernet card.
To obtain the TMNet configuration utility from Epson:
You may have to re-enable your wired LAN port to download the EpsonTMNetWinConfig utility.
Download and Install Epson’southward TMNetWinConfig bachelor from
world broad spider web.epson.comClick on
TECHNICAL RESOURCESSelect
Ethernet INTERFACES
under the
CONNECT-Information technology INTERFACESClick the
download icon for the TMNetWinConfig
Setting the IP Accost using EPSON TMNet WinConfig
1. Set the TCP/IP of your operating organisation.
2. Install the EPSON TMNet WinConfig.
iii. Gear up the IP address using EPSON TMNet WinConfig.
The utility volition scan for and should list the Ethernet printer.
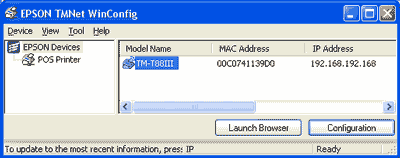
Select the printer and printing Configuration to view or alter settings. (Pressing the Launch Browser push will contact the TMNet WebConfig interface using your spider web browser.)
When yous lot brand changes and press ‘OK’ the utility sends the new settings to the printer and resets the printer. Note: the default countersign is <blank>. Don’t forget to make the same changes on the computer side to maintain connectivity.
Configuration – Type II
Configuration
of Ethernet
Type Ii
Module
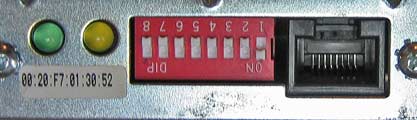
The before blazon of Epson Connect-Information technology Interface used a transmission configuration scheme and a unproblematic web interface. The Type 2 module can be identified by the crimson or blueish 8 position DIP switch visible on the front of the adapter
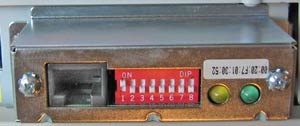
An Epson Type II Ethernet Interface Adapter
(Cardinal:
2-7 On:
refers to the switch number 7 is turned On)
Confirm the initial settings of the Printer
Run the printer self exam (concur downwards the feed push while turning on the printer). The printer will print a listing of initial settings including interface blazon and buffer capacity. Verify that the interface is “serial” for this blazon of Ethernet adapter.
Quick Examination Printout, Type 2 Adapter
To get a configuration / condition study with information nearly the printer and Ethernet module, along with maintenance counts and settings, practise the following:
for PRINTERS with Cover Sensor
-
Power the Printer up, with Ethernet Module installed .
-
Popular the receipt printer encompass
-
Press the FEED push button
-
Close the receipt printer embrace
Notation:
Look for the dark-green LED on the module to kickoff blinking! If you keep with this too apace, the printout volition bespeak an UNKNOWN PRINTER. If this happens, cycle ability, and await for the Green LED to starting time blinking. – With the module connected to a Ethernet, this filibuster will exist shorter than if in that location is no Ethernet connected and the modules spends longer looking for ane.
for PRINTERS without Comprehend Sensor
-
With a powered OFF module
-
Fix Dip-Switch one (on the module) to ON
-
Power upward the unit
-
Condition Report will print
-
Power downwardly the unit of measurement
-
Ready Dip-Switch 1 to OFF
-
Resume operations
Configuration- Type 3
Configuration of Ethernet
Type Three
Module
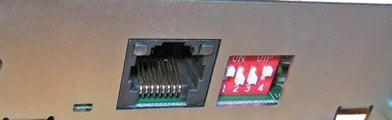
Epson’s “low-cost” Connect-It Ethernet Interface used a manual configuration scheme and and no web interface. The Type Iii module tin can exist identified by the carmine or blue 4 position DIP switch visible on the forepart of the adapter
An Epson Blazon Iii Ethernet Interface Adapter
DIP Normal Switch Settings for the Ethernet Three Module (forepart panel)
DS-ane Off (‘On’ is used to generate a configuration report)
DS-ii Due n/A
DS-three N/A
DS-4 North/A
Jumper Settings (in strip together on excursion lath)
JP-1 baud
JP-2 baud
JP-three DHCP (default: on)
JP-4 manufacturing plant use (normally off)
Baud rate settings (set using combination of jumper ane and jumper two, above)
9600
baud: JP1-Off, JP-2-Off
19200
baud: JP1-On, JP-2-Off
38400
baud: JP1-Off, JP-two-On
Note:
The Ethernet III module simply supports 9600, 19200 and 38400 baud rates.
The printer and the Ethernet Three module must take the same baud rates to communicate.
Become the initial settings of the Printer
Run the printer self test (agree downwardly the feed push while turning on the printer). The printer volition print a list of initial settings including interface type and buffer chapters. Verify that the interface is “serial” for this type of Ethernet adapter and that the baud rate is the same as is assault the bill of fare. If necessary, change the baud charge per unit of measurement on the printer (using the
DIP switches) or the baud rate on the module (using jumpers), so they concur.
Become the initial settings of the Ethernet Adapter Carte
Plough off power on printer. Modify the dip switch one to ON. Plow printer on. The printer will impress a list of including MAC address, electric electric current IP address and DIP switch and jumper settings.
Note:
if you desire to enable DHCP for this menu, you must identify a jumper on JP3. JP3 is located on the circuit board well-nigh the big blackness connector. DHCP stands for Dynamic Host Configuration Protocol, a network service that automatically assigns IP addresses to devices.
| Resetting the card to default settings | |
| You tin can can reset the Ethernet card to it’southward default settings by placing a modest jumper beyond ii pins while ability cycling the bill of fare. | |
|
|
Installation Steps
(Type 2 or Type Three)
1. Disconnect power and other cables from the EPSON printer, and remove the printer DIP switch comprehend plate.
two. Remove the existing interface lath from the printer past unscrewing two screws.
3. Properly align and button the new module into the printer. Fasten the 2 mounting screws through the faceplate of the new interface.
4. Set DIP switches every bit necessary; then adhere the admission cover.
5. Connect the power cable to the printer and employ ability. Attach network cable.
half dozen. Run a configuration report. This shows that the printer, module, and firmware are all installed and operating correctly and shows how the advice parameters are set.
Running a Configuration Report
(Type two or Type Three)
To Run the Config Report
-
Power on the printer,
-
Open the paper cover,
-
printing the FEED button,
-
Shut the newspaper embrace.
The configuration report volition at present impress. Information technology should include information such as the MAC address, the IP accost and the gateway accost. Afterwards printing, don’t forget to return DIP switch 1 to the off position.
For the EPSON TM-U200 printer:
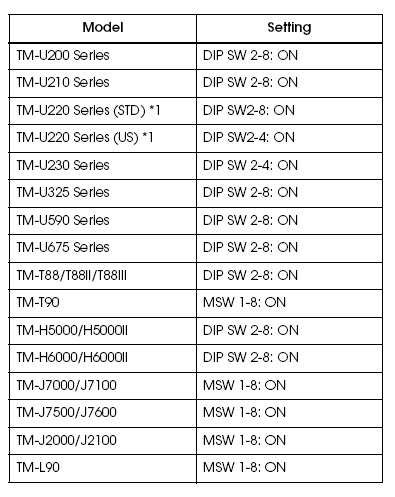
Gear up DIP switch 1 on the Ethernet Module to ON and ability upward the unit. After report has printed, power off unit of measurement and return DIP switch to the OFF position.
Configuring the Interface
(Type Two or Type Three)Each Epson Ethernet Interface module has a ‘Base’ MAC Address programmed into the information technology. A unique MAC Address and a Serial Number are programmed into the Flash ROM at the manufactory, and cannot be changed. Labels with both the MAC accost and serial number are affixed to the module. These numbers are important when configuring the adapter- It is appropriate to brand a note of these values in a secure identify.
The Net or IP accost can exist set up using the spider web interface or Epson EEI utility. It can be dynamically reassigned via DHCP, BOOTP, or ARP/Ping.
Loftier Level Configuration
Choice i (Ethernet ii simply):
Using a spider web browser, type the default IP accost (found on a label on the interface menu) into the address field of your web browser. The configuration screen should appear. The default password for the interface is Epson. We highly recommend this be inverse. Once the web interface is running, all awarding, network, printer and countersign settings can be modified.
Option two (Ethernet Ii or Ethernet Iii):
Use the Epson Ethernet Interface Configuration Program for this series of adapter, EEIUtil.exe, The program will discover all Epson Ethernet printers on your network and allow y’all to reconfigure them. Notation: the TMNetWinConfig is not uniform with this model of adapter.
Of import: If you are assigning a permanent IP accost to the Epson printer, information engineering science is advised that dip switch 8 on the interface module past switched to off once the address has been fix.
Configuring the Calculator
(all types)
Installing the
Device Drivers
for Windows
If provided with a commuter deejay from Beagle Hardware or Epson, you can install the Epson printer drivers from the CD. Alternatively, you lot tin download the files from Epson.
To obtain the latest Device Drivers from Epson:
Download and Install Epson’south drivers bachelor from
www.epson.comClick on
TECHNICAL ResourceSelect the printer model under the menu
Click the
download drivers on the printer page
Configuration Utilities to Run on the Calculator
Epson Flash Utility
The Epson Flash Utility is commonly installed with the Epson printer drives. It is used to upload bitmaps to Epson printers, but has a simple communication test which volition cheque for basic connectivity betwixt the computer and the printer. Pressing the “Comm. Examination” push button on the Setup tab of the utility volition requite a get/no-go indication of basic connectivity.
Installing the Printer Driver in Windows
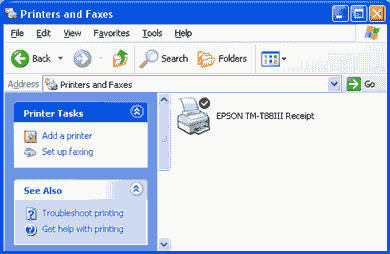
Installing the TMNet utility also installs the printer driver in Windows. The printer should be visible in the printers folder of the Windows Command Console.
Configuring the Printer in Windows
Y’all demand to brand a few changes in the printer settings to go it to work with the Ethernet adapter. Specifically you lot lot need to configure the port you are using. Open the printer in the Windows Printer Folder. Select the Ports Tab. Turn off
bidirectional back up,
if enabled.
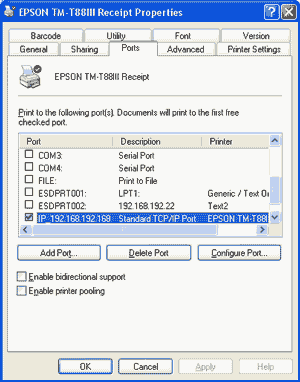
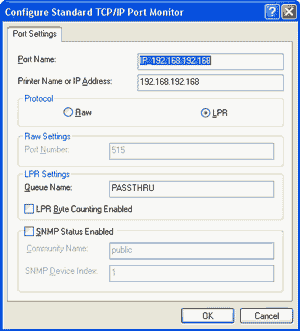
Y’all must now add together together the port equally southward TCP/IP port. Press “Add Port” and select “Standard TCP/IP Port” , and so select “New Port”.
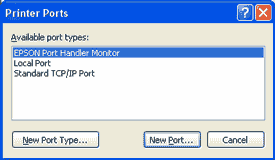
This will open the Add Standard TCP/IP Printer Port Wizard.
Enter the IP address of the Ethernet adapter (192.168.ii.29 shown here). The utility volition then locate the printer on the Ethernet network and create the port. This port (IP_…) will now exist selected fro apply with this printer.
You may need to brand a few changes in the printer settings to go it to piece of work with the Ethernet adapter. Specifically yous need to configure the port yous lot are using. Open the printer in the Windows Printer Folder. Select the Ports Tab. Select the Ethernet port in utilise (i.due east. IP_). Likewise turn off
bidirectional support,
if enabled.
Accessing the Printer Commuter in Windows
Afterwards installing the printer drivers, the printer should be visible in the printers binder of the Windows Control Panel. Right clicking on the icon should permit you open upwards the printer backdrop.
Testing the Printer
Yous lot should at present exist ready to exam the printer by press some text or past pressing the “Print Exam Page” push in the General Tab of the printer properties.
Connectivity Bug
-
The Ethernet adapter has non been configured to work on your local network. Ostend network settings using the adapter
self exam. -
The figurer is unable to connect to the printer over the network. Test connectivity with ping and/or TMNet.
-
The IP address of the adapter has changed.
Cheque IP settings. -
The printer is not online in Windows. Check the condition of the printer in the Windows Command Panel, the printer should prove status equally ready.
Tip:
endeavour stopping and restarting the
Impress Spooler
from the Services applet of the Command Panel. -
IP address setting is not correct. Ostend that the IP address assigned by the network is set upwardly for the Ethernet adapter.
-
Subnet mask setting is non correct. Confirm that the subnet mask assigned by the network is set up for the Ethernet adapter.
-
The IP accost is set redundantly. When the same IP address is used for more than than one device in the network, communication is not possible. Confirm the settings for the other devices. The same default IP address is set for all Ethernet adapter units as the mill setting. Practice non apply more than than i printer with the Ethernet adapter on the same network without changing the IP accost.
-
The Epson printer driver has not been installed for the Ethernet adapter and printer in use.
No longer prints
-
The TM printer is turned off. Turn on the TM printer. Ostend the connection of the power supply unit of measurement or the voltage of the commercial power.
-
The TM printer is offline. Turn the TM printer online.
-
The Mistake LED of the TM printer is on or flashing. Remove the mistake cause.
-
The printing port of the commuter on the estimator side is non specified correctly. Ostend the commuter setting on the calculator side.
-
The IP address of the printer has inverse. Compare IP settings at the
printer side
and computer side.
Printing is tedious
-
There are problems with the figurer or network. Press speed may get downward due to problems with the network system or applications.
Need some aid? Try our
Epson printer examination utility
