

How to Connect to a Shared Printer Windows 10
(Image credit: Windows Key)
On
Windows 10, HomeGroup was a characteristic to simplify the procedure of sharing resources across a small network with other users. However, since the feature has been removed, y’all at present have to apply unlike methods to share files, folders, and printers.
Some of these methods include Share and Nearby sharing, OneDrive, and the more advanced sharing options that offering virtually the aforementioned experience just using a different set of instructions.
In this Windows x guide, nosotros’ll walk you through the steps to share files and printers within the local network without HomeGroup.
Windows 10 offers several means to share files and folders with other users, including using the Share characteristic, OneDrive, and setting up a more advanced configuration File Explorer.
If y’all have to share one or more than files with another user within the dwelling network, office, or across the world only one fourth dimension, you lot tin can use the Share feature, which comes built into File Explorer and almost modern apps.
To share files using the Share feature on Windows 10, use these steps:
- Open up
File Explorer. - Scan to the folder location with the files.
- Select the files.
- Click on the
Share
tab.Quick tip:
Alternatively, y’all tin right-click the selection and choose the
Share
option in the context menu. Too, the
Share
choice can be found in many apps that you acquire from the Microsoft Store. - Click the
Share
push.
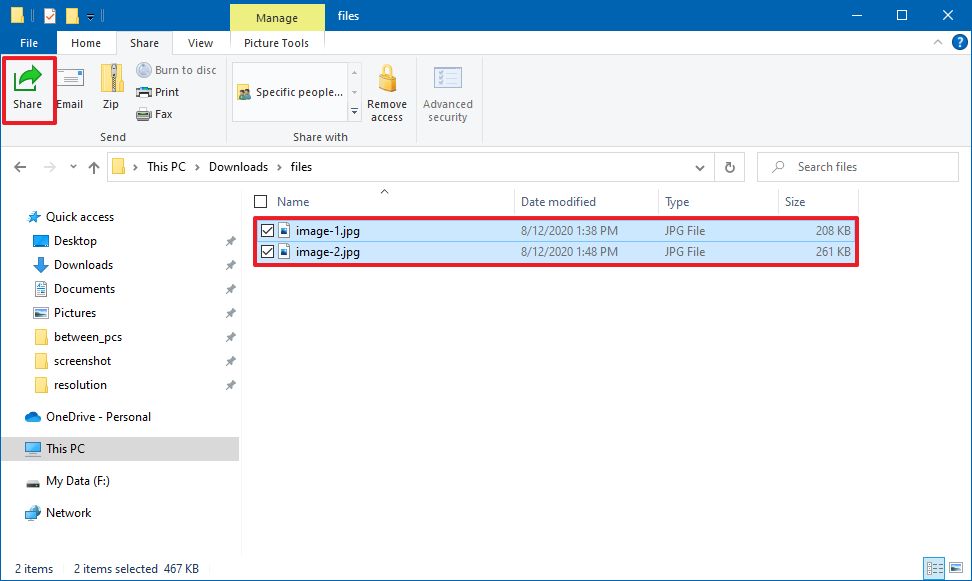
(Image credit: Source: Windows Central)
- Select the app, contact, or nearby sharing device.
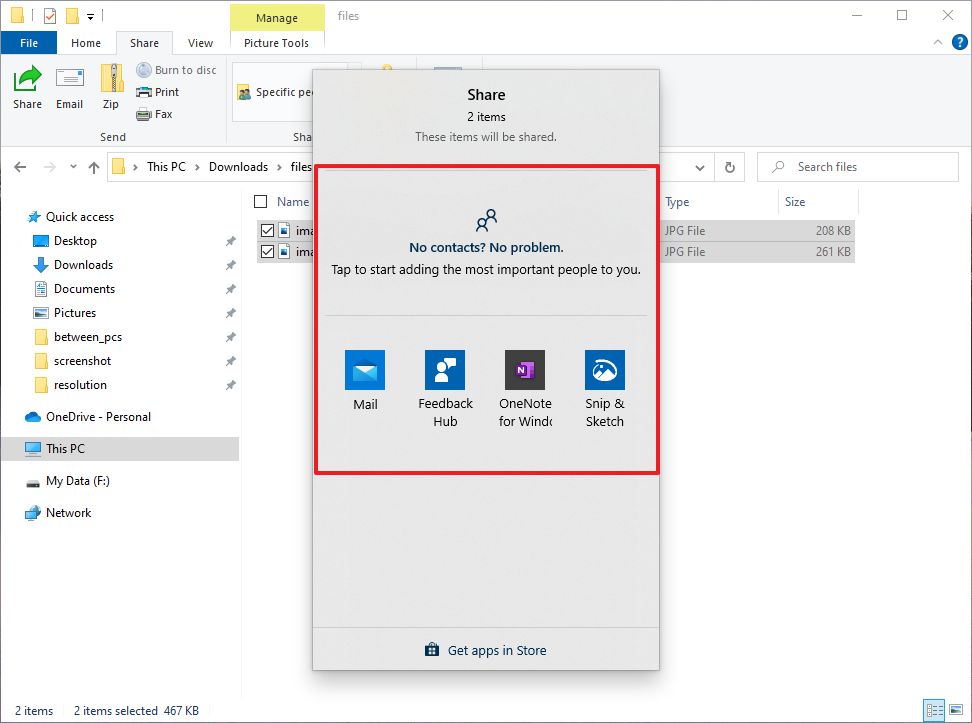
(Image credit: Source: Windows Primal)
- Continue with the on-screen directions to share the content.
Although this is a sharing feature, yous’re technically sending the files to another destination. If you’re about to share files with a nearby device, note that “Nearby sharing” needs to be enabled on the source and destination computers to work correctly. You lot can learn more well-nigh
nearby sharing, in this guide.
On Windows 10, you can also employ OneDrive to share files or folders with family unit, friends, or colleagues.
Unlike sending files using the Share feature, OneDrive allows you to share virtually any file by creating a secure link that others tin use to access the content, which you lot can besides revoke at any fourth dimension.
To share files with OneDrive, use these steps:
- Open
File Explorer. - Click the
OneDrive
folder from the left pane. - Browse to the folder with the files.
- Right-click the file and select the
Share
selection (blue icon).
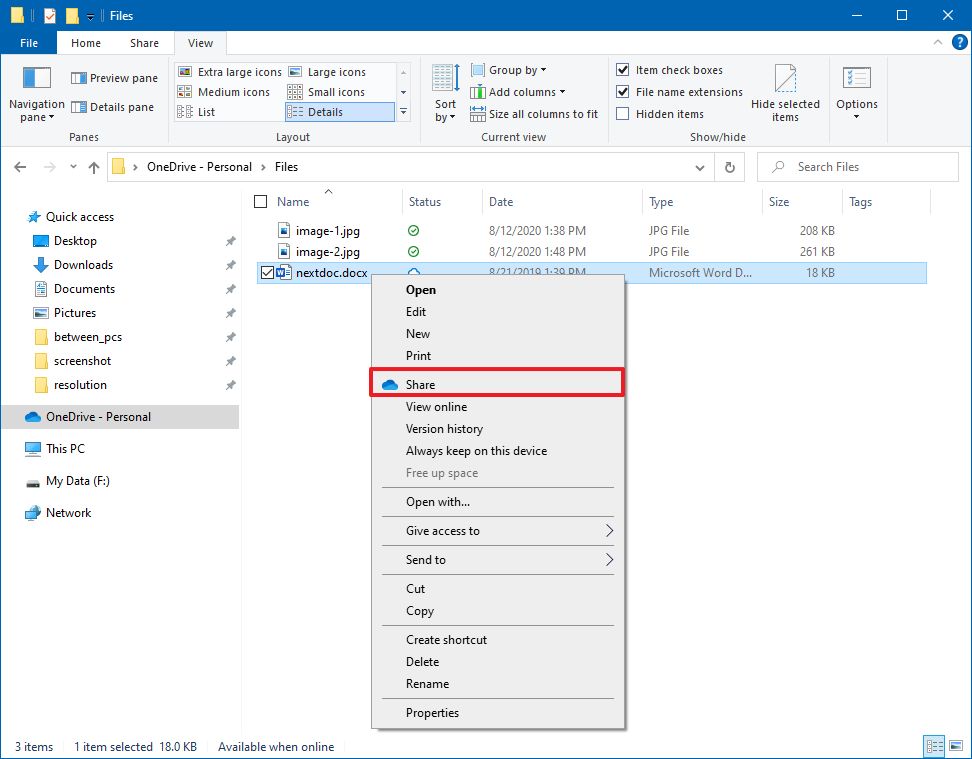
(Image credit: Source: Windows Central)
- (Optional) Click the
Anyone with the link can edit
choice. - Articulate the
Let editing
option if you only desire someone else to view the file.Quick tip:
If you have a
Microsoft 365 subscription
(opens in new tab)
or OneDrive plan, you can likewise set the expiration engagement and password for the link. - Click the
Apply
push button. - Confirm the electronic mail address of the person you desire to share the file. Or click the
Re-create Link
option to copy the link to the clipboard.
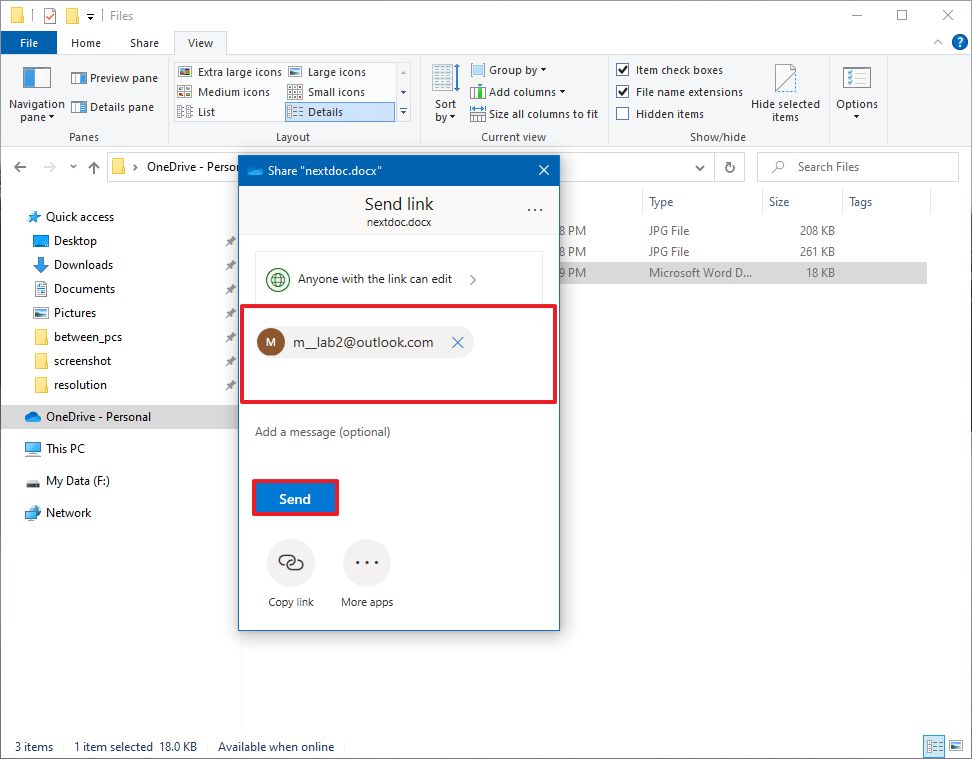
(Image credit: Source: Windows Fundamental)
- (Optional) Add a personalized message for the share.
- Click the
Transport
button.
After you complete the steps, the recipient will receive the link to access the shared file, and depending on the settings, the recipient will be able to view or edit the file.
Stop file sharing
To cease sharing a file in OneDrive, use these steps:
- Open
File Explorer. - Click the
OneDrive
binder from the left pane. - Scan to the folder with the share.
- Right-click the shared file and select the
Share
selection (bluish icon).
(Image credit: Source: Windows Central)
- Click the
3-dotted
button in the top-correct corner. - Select the
Manage Access
choice.
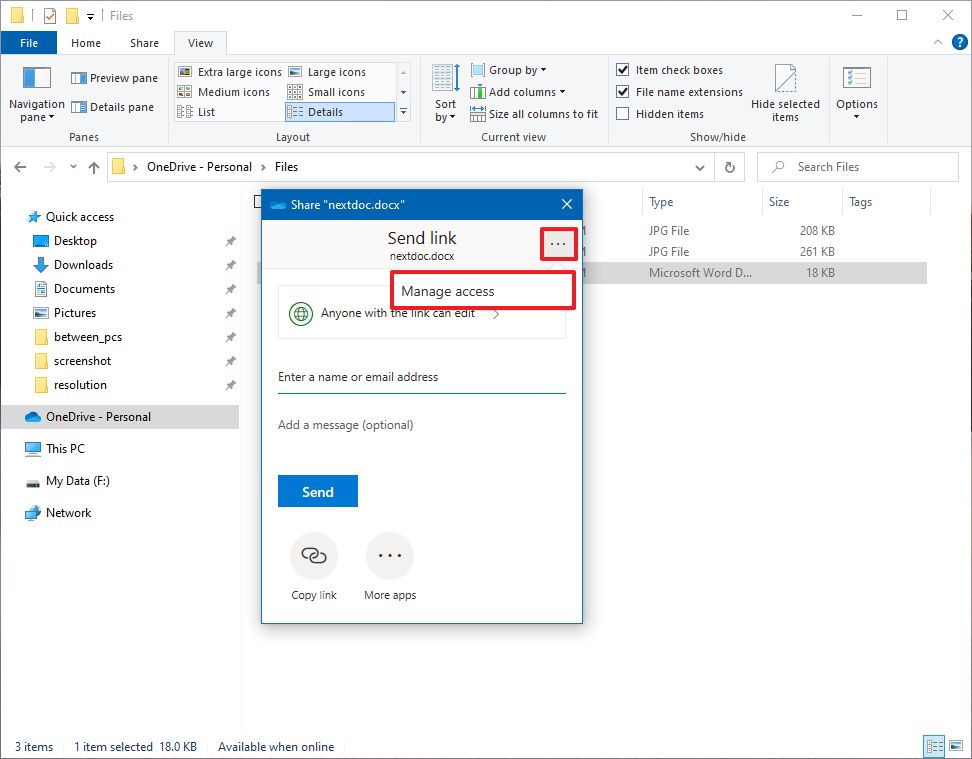
(Image credit: Source: Windows Central)
- Click the
Tin can edito
button and select the
Cease sharing
choice.
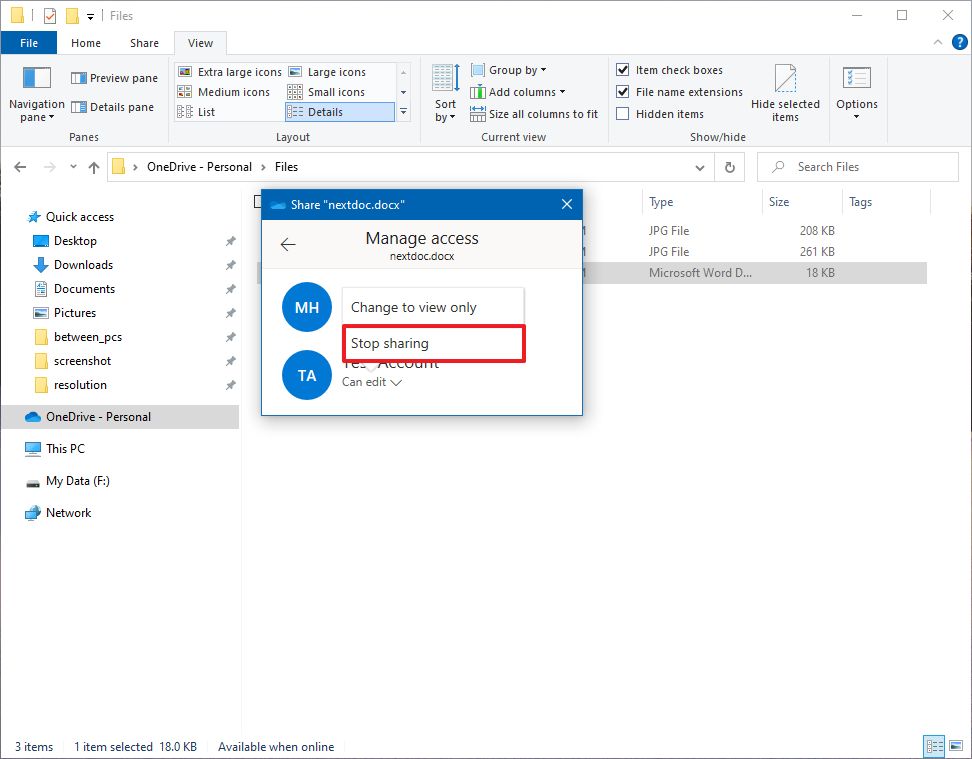
(Image credit: Source: Windows Primal)
One time you lot complete the steps, the files will no longer be attainable by other people with the link.
When you take to share multiple files in the local network, you tin utilise the File Explorer advanced sharing options.
Quick tip:
When sharing a folder, usually, you want to share the folder past creating a binder in the root of the “C” drive or secondary drive or partition. Always avert sharing files from the system folders, including Desktop, Documents, Pictures, etc.
To create a bones folder share on Windows 10, use these steps:
- Open
File Explorer. - Browse to the folder with the content that you want to share.
- Correct-click the folder, select the
Give access to
option, and click the
Specific people
selection.
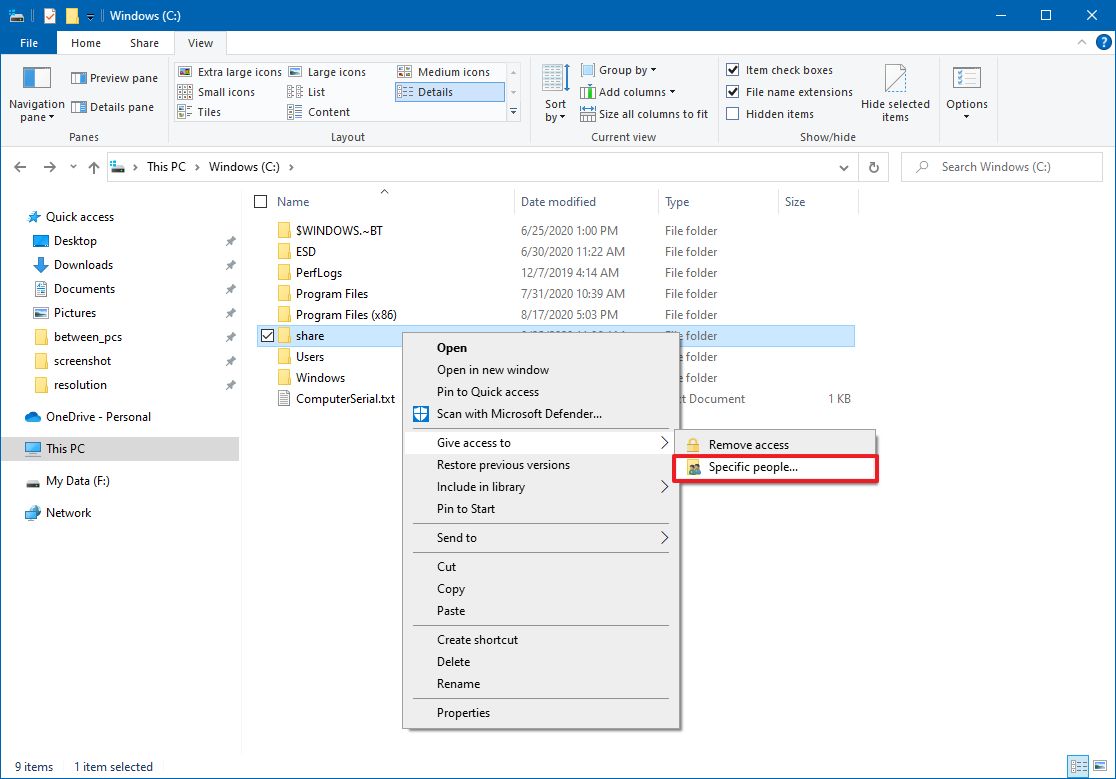
(Image credit: Source: Windows Fundamental)
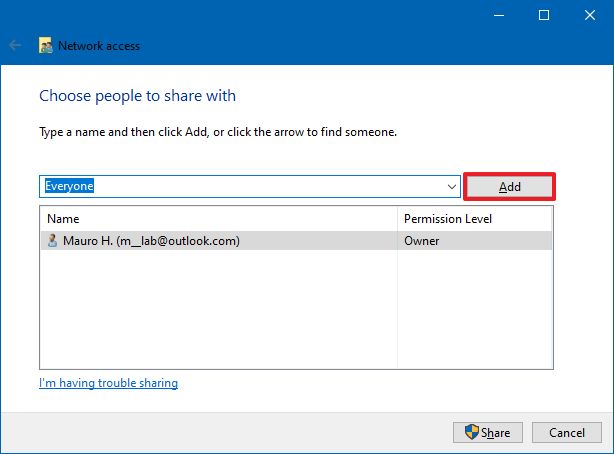
- Use the drop-down menu, and select the user or group to share the binder and its contents. Options available include:
-
Local users —
When you choose individual accounts, the user must provide username and password to access the files. If the user is signed in using the same credentials on their figurer, then they may exist able to access the data without any prompts. -
Everyone —
Shares the contents with anyone in the network without entering a password to admission the files.
Quick notation:
You may also discover an option to create a new account, only it won’t be useful since Windows ten no longer allows the creation of new accounts using Control Console. -
Local users —
- Click the
Add together
button.
(Image credit: Source: Windows Cardinal)
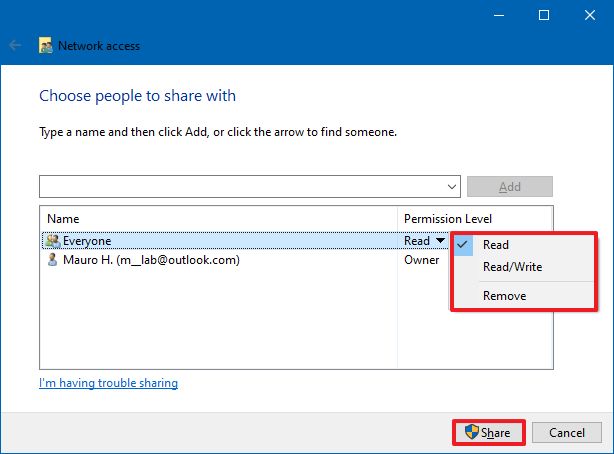
- Nether the “Permission Level” column, select the permissions that user will have to admission the contents:
-
Read —
Gives network users the ability to list and open files, but they won’t be able to modify or delete existing files and folders. Also, they won’t be able to upload or create new folders or files. -
Read/Write —
Allows users to listing, open, change, delete, upload, and create new files and folders. -
Remove —
Blocks the specified user or group from accessing the binder.
-
Read —
- Click the
Share
button.
(Paradigm credit: Source: Windows Central)
- Correct-click the shared folder path and select the
Copy Link
option.

(Image credit: Source: Windows Central)
- Click the
Close
push button.
After you complete the steps, you lot can share the link (which you copied to the clipboard on
step No. eight) with users in the local network.
Connect to shared files over the network
To access a shared binder on Windows 10, use these steps:
- Open up
File Explorer. - Correct-click and paste the network path for the shared folder in the address bar and press
Enter.
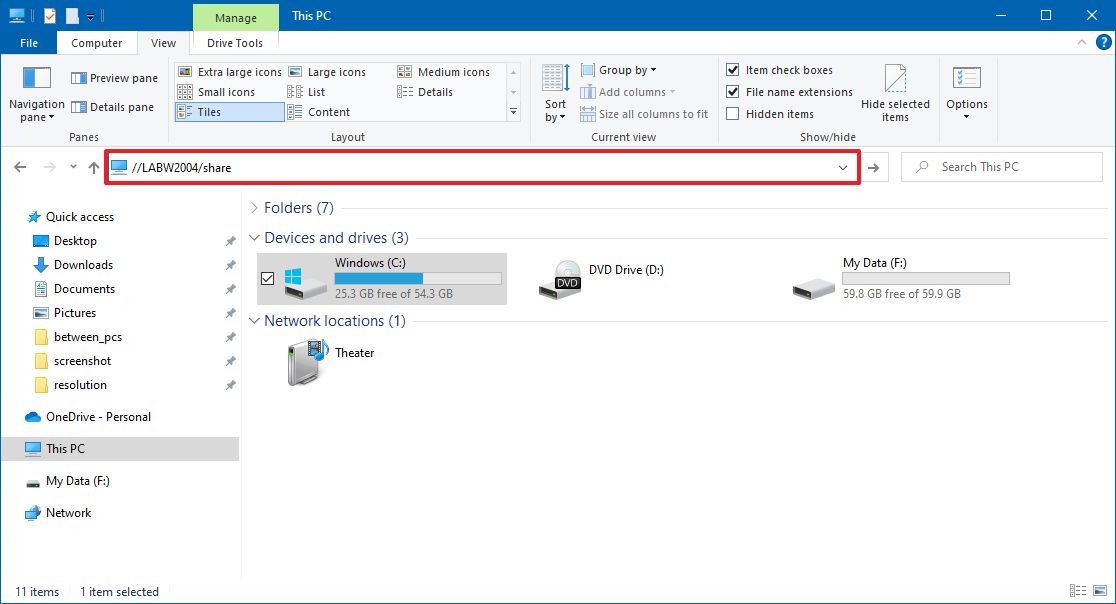
(Prototype credit: Source: Windows Primal)
- Ostend your account credentials (if applicable).
- Upload, download, or modify files as necessary.
If yous’re logged on using a username and password that matches the credentials on the device sharing the folder, you may not need to sign in once more to admission the shared folder. However, if you’re prompted to log in, y’all must enter the business relationship credentials of an account located on the computer sharing the folder.
Alternatively, users tin can besides use the “Network” page from the File Explorer from left pane to scan the computer and access the shared folder contents.
When sharing folders in the network, users will but be able to access the files if the figurer sharing the folder is on and connected to the network.
Stop sharing files over the network
If you no longer wish to share files in the network, use these steps:
- Open
File Explorer. - Browse to the folder with the content that you desire to share.
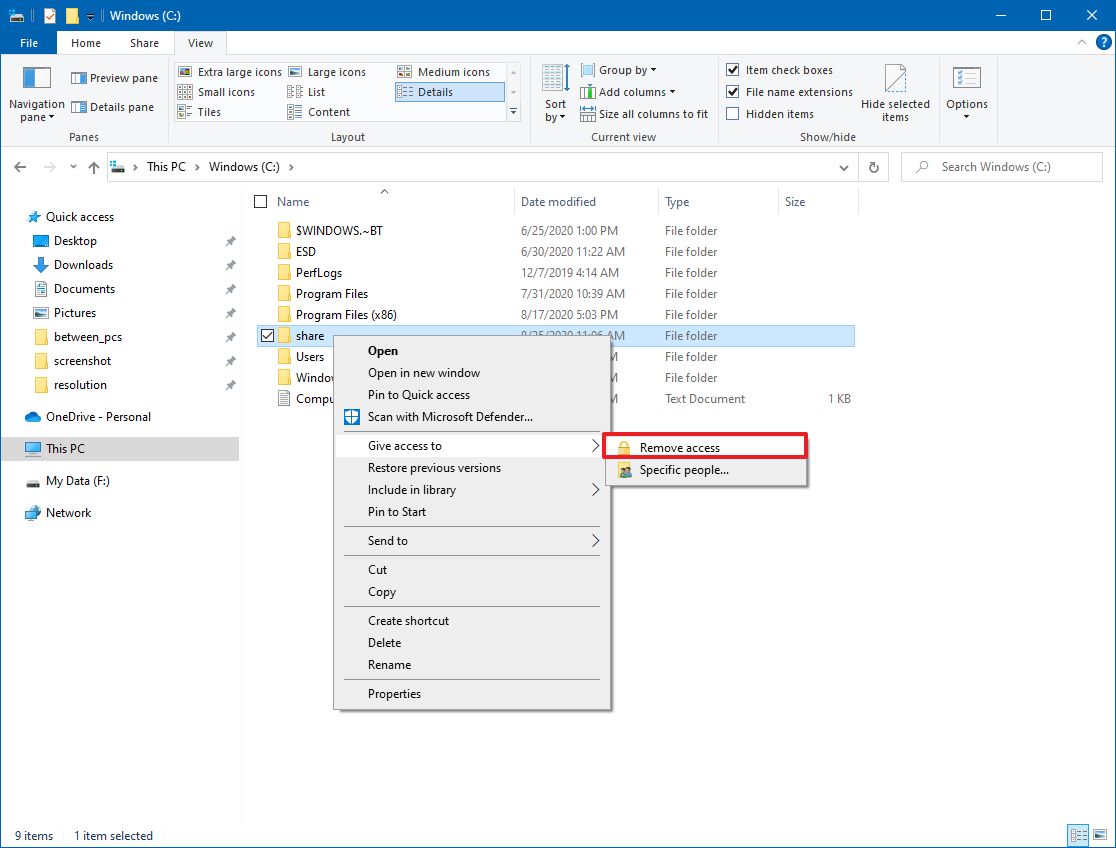
- Right-click the folder, select the
Give access to
selection, and click the
Remove access
pick.
(Image credit: Source: Windows Cardinal)
- Click the
Cease sharing
push.
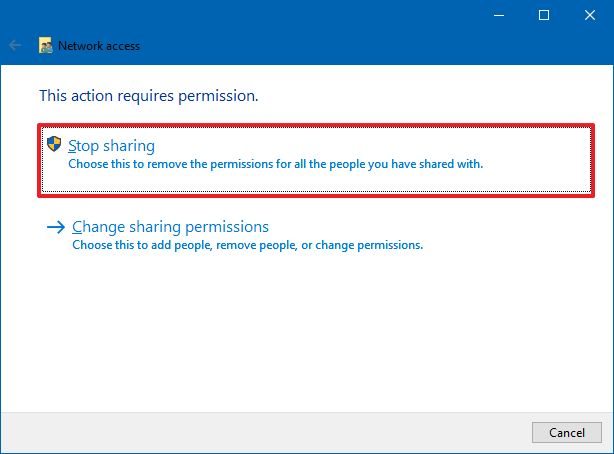
(Image credit: Source: Windows Key)
Once you complete the steps, the content will no longer be accessible through the network.
Troubleshoot access to shared files
When sharing a folder or printer, there’s a chance you lot won’t be able to access the resources because of a problem translating the computer name to a TCP/IP address, issues with the firewall, or network profile settings.
Utilise IP accost instead of estimator name
To determine the device network accost to supersede the reckoner name in the path to access the shared resources, apply these steps:
- Open
Settings. - Click on
Network & Internet. - Click on
Condition. - Click the
Properties
buttons for the electric current Ethernet or Wi-Fi connection.
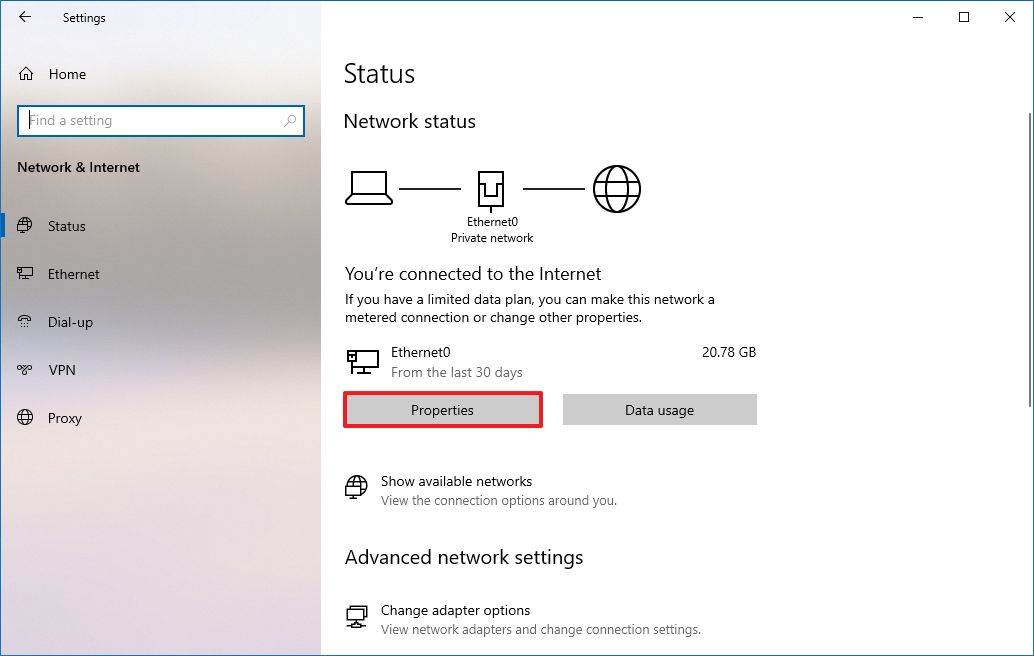
(Image credit: Source: Windows Key)
- Under the “Properties” section, confirm the electric current
IPv4 address.
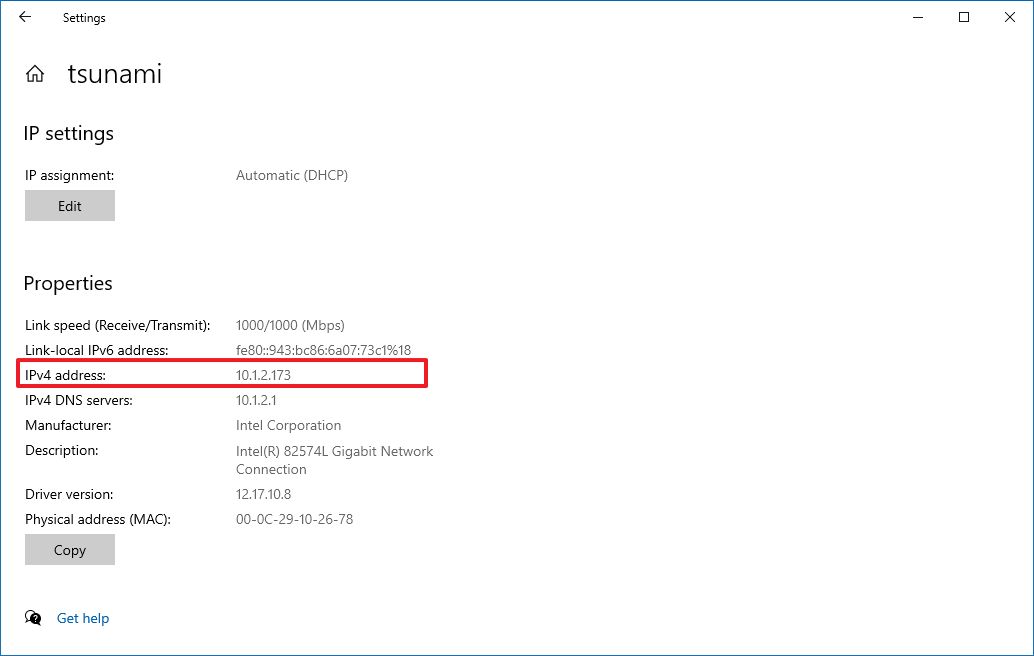
(Image credit: Source: Windows Central)
- In the network path to the shared folder, replace the computer name with the IP accost.For case, after editing the link, the unique path should expect like this:
//10.one.2.173/share
instead of
//homepc/share.
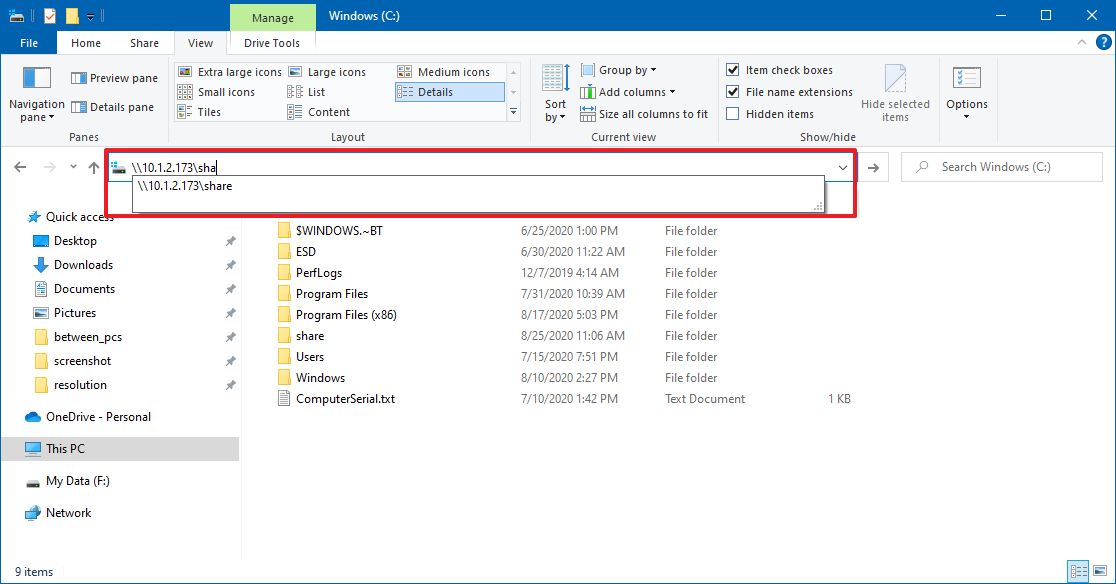
(Image credit: Source: Windows Primal)
After you consummate the steps, you should now be able to admission the network content.
Modify network contour to individual
If the computer is using the public network profile, the folder or printer won’t be discoverable in the network. Equally a result, trying to access the resources volition crave to enter credentials. To avert this issue, y’all must gear up the network profile to individual on every estimator.
To set the network profile to individual, use these steps:
- Open
Settings. - Click on
Network & Internet. - Click on
Status. - Click the
Properties
buttons for the electric current Ethernet or Wi-Fi connectedness.
(Image credit: Source: Windows Key)
- Under the “Network profile” section, select the
Private
choice.
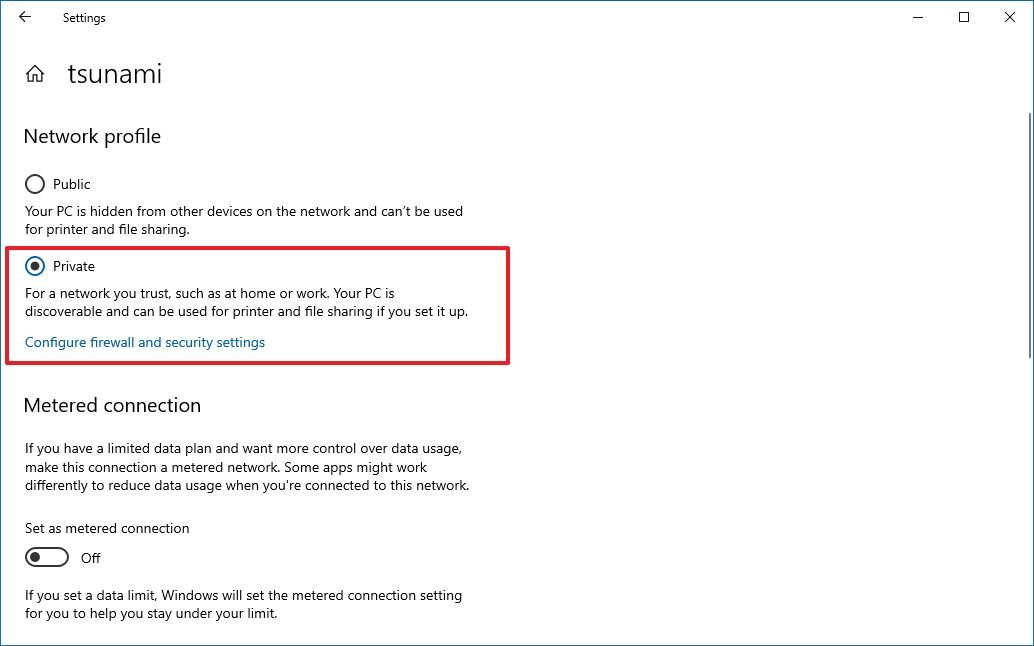
(Image credit: Source: Windows Central)
Once you lot consummate the steps, users should be able to admission shared files and printers from any computer in the local network.
Configure access through firewall
You lot tin temporarily disable the firewall on both devices to determine if that is the cause of the problem. If the firewall blocks access to the shared folder, you’ll demand to open the corresponding ports.
Disable Microsoft Defender Firewall
To temporarily disable the firewall on Windows 10, employ these steps:
- Open
Windows Security. - Click on
Firewall & network protection. - Click the
Individual network
option.
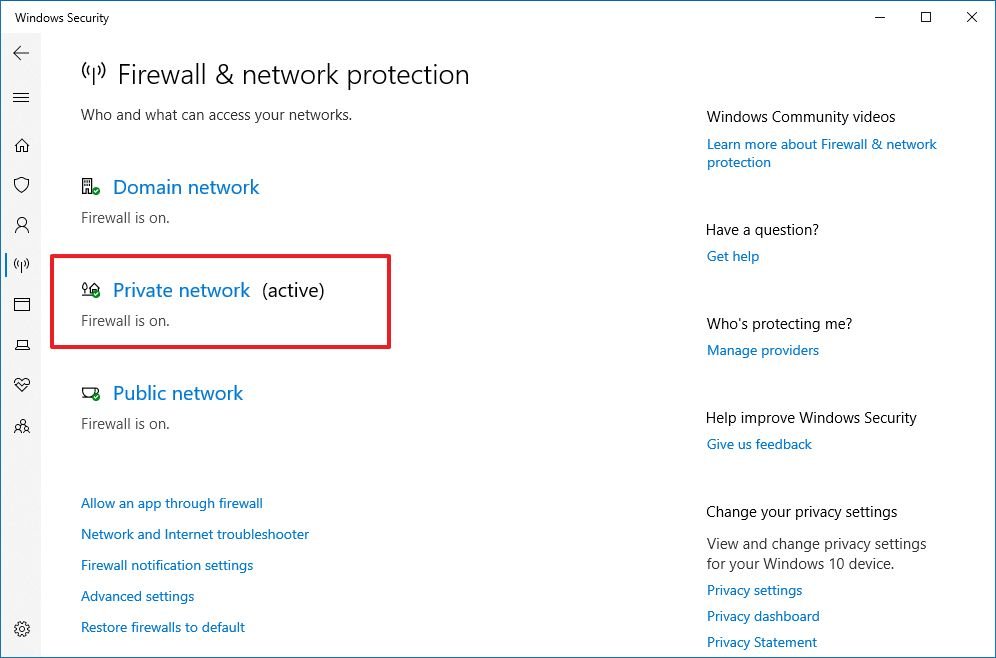
(Image credit: Source: Windows Cardinal)
- Plow off the
Microsoft Defender Firewall
toggle switch.Quick tip:
after finding out the issue, make certain to turn the firewall back on.
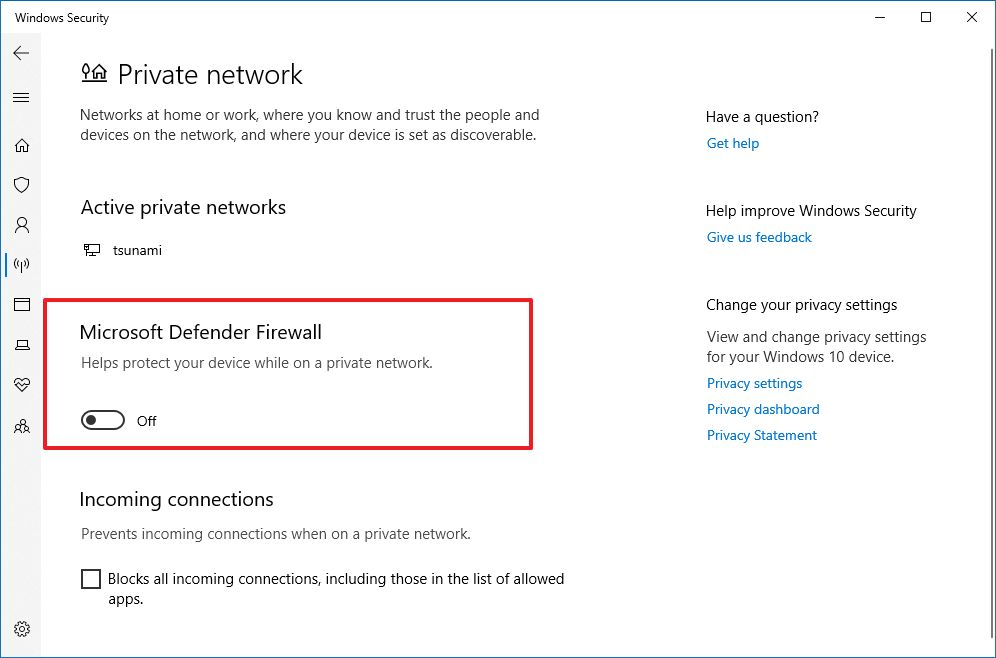
(Epitome credit: Source: Windows Central)
After you consummate the steps, echo the steps on the device, and so try to admission the shared folder. If it’southward a firewall problem, so you’ll demand to open the corresponding network port. Also, after resolving the issue, remember to re-enable the firewall using the same instructions outlined in a higher place, but on
pace No. 4, brand certain to turn on the
Microsoft Defender Firewall
toggle switch.
Open Microsoft Defender Firewall ports
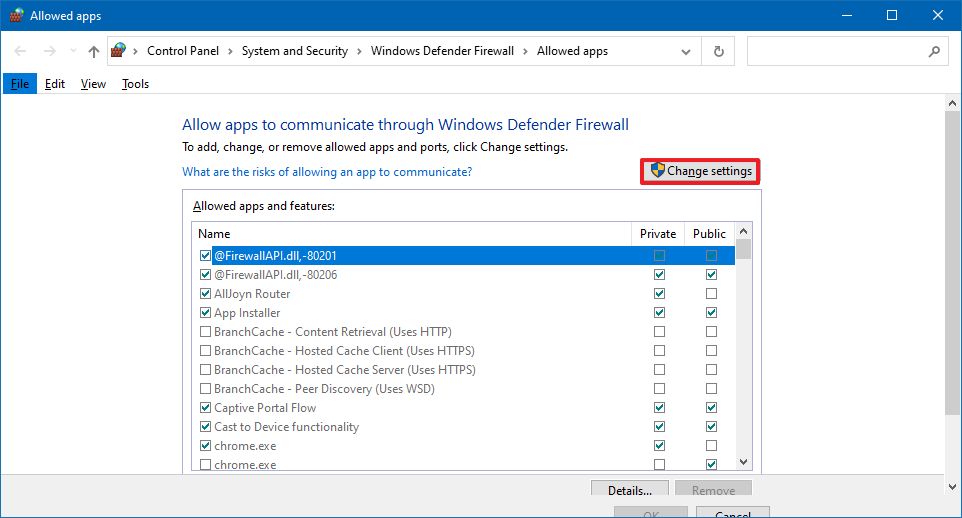
To allow file and printer sharing through the firewall, use these steps:
- Open
Windows Security. - Click on
Firewall & network protection. - Click the
Allow app through firewall
choice.
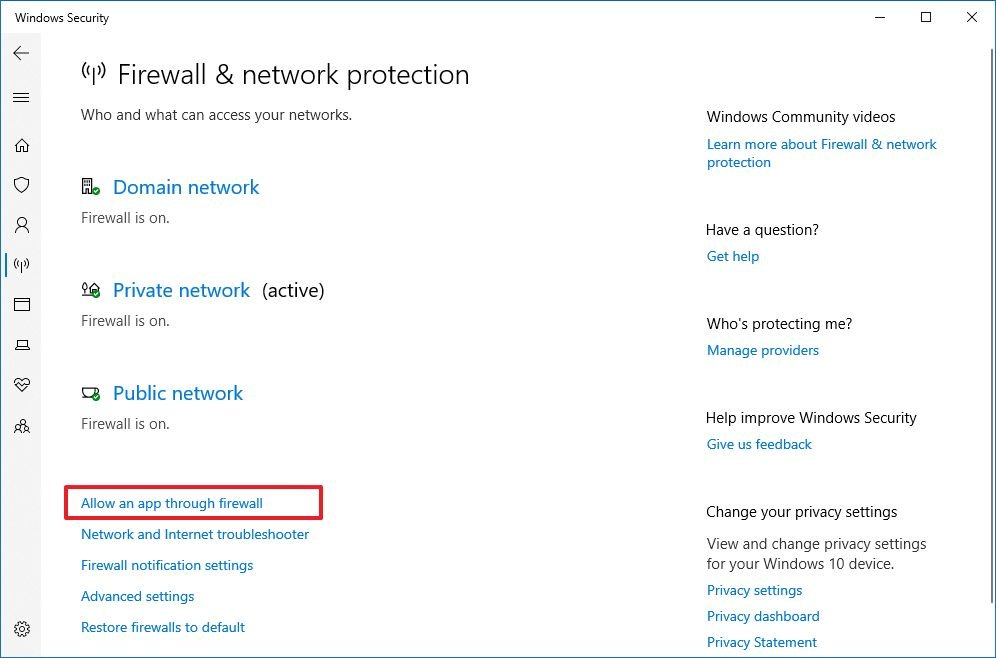
(Image credit: Source: Windows Central)
- Click the
Alter settings
push.
(Epitome credit: Source: Windows Key)
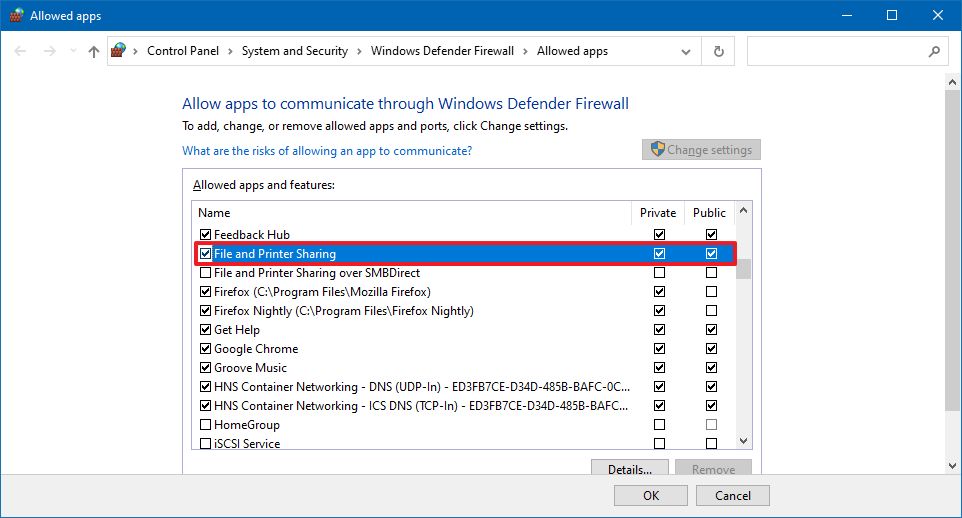
- Select the
File and Printer Sharing
option, and brand sure to check the
Private
network pick.
(Image credit: Source: Windows Cardinal)
- Click the
OK
push button.
One time you lot complete the steps, network users should be able to access the shared folder fifty-fifty with the firewall turned on.
If you’re using a third-party firewall solution, you lot’ll need to check your vendor back up website for specific details on how to get around this trouble.
In previous versions, the easiest method to share a printer was using HomeGroup, but now even without the feature, you can withal share a USB printer with other users in the local network.
Important:
If you have a printer with a born print server, it’s recommended to apply that characteristic. You tin refer to the printer manufacturer back up website for instructions on connecting the device to the network. If yous’re dealing with a print server, you merely need to follow the steps below to share the printer and connect the computers.
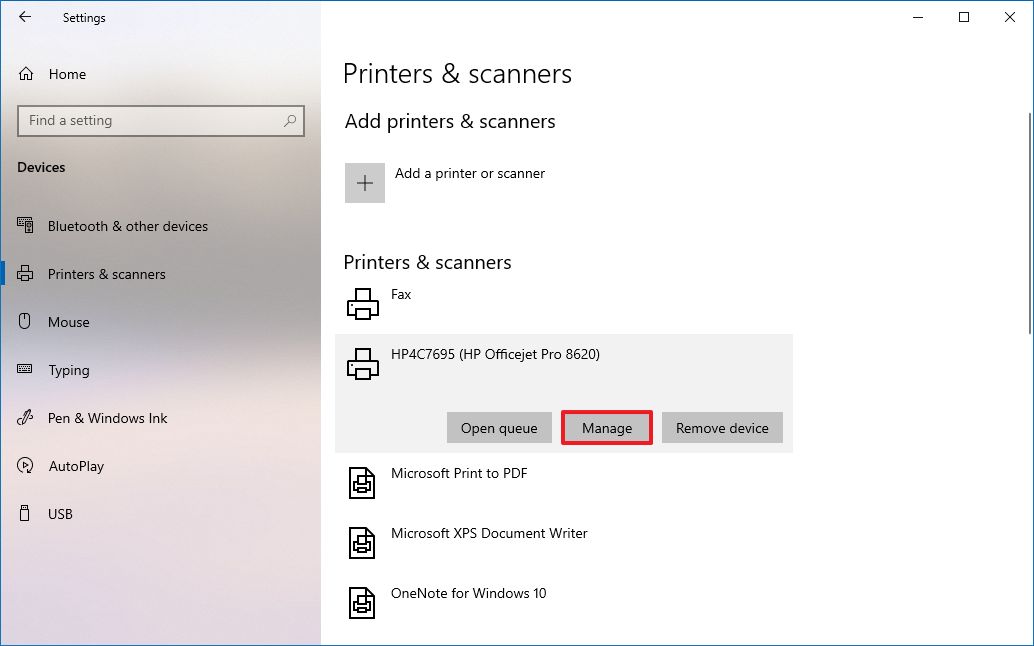
To share a printer on Windows 10 (bold it’s already installed), employ these steps:
- Open
Settings. - Click on
Devices. - Click on
Printers & scanners. - Under the “Printer & scanners” department, select the printer that you want to share.
- Click the
Manage
button.
(Prototype credit: Source: Windows Cardinal)
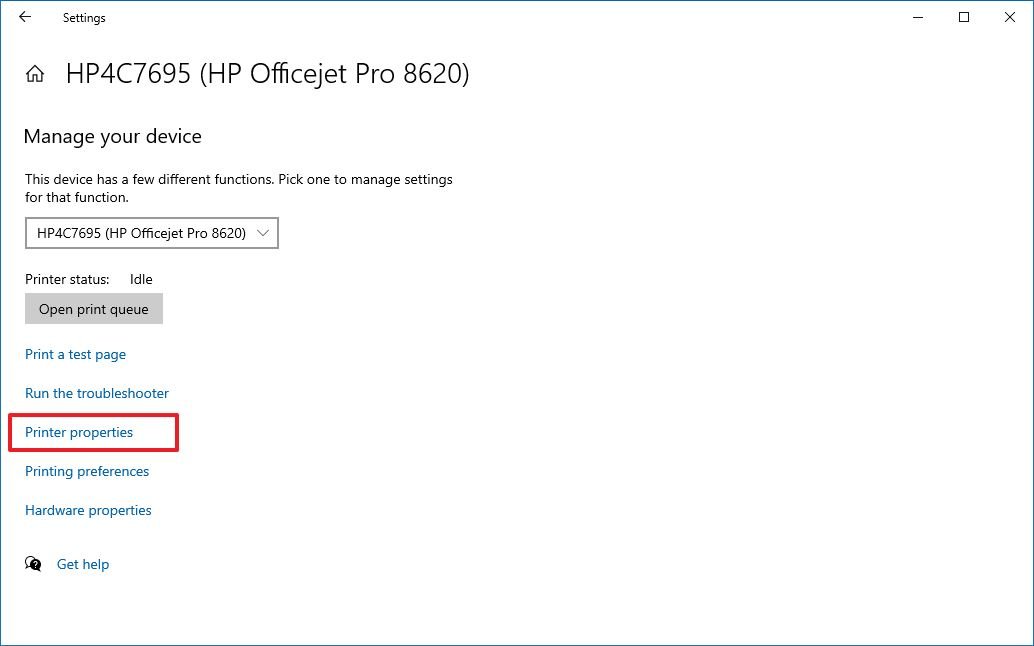
- Click the
Printer properties
pick.
(Image credit: Source: Windows Central)
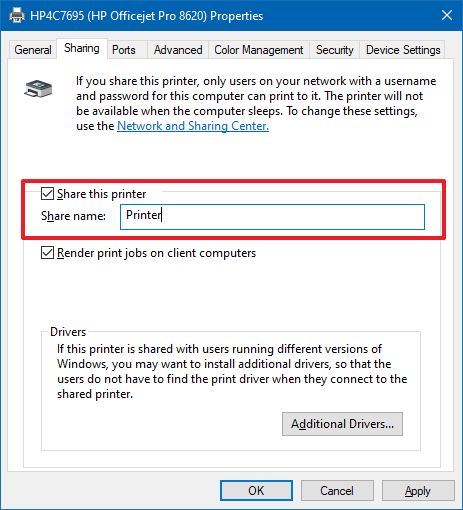
- Click the
Sharing
tab. - Cheque the
Share this printer
option. - In the “Share name” field, specify a new short and descriptive name. (If this is the only printer on the network, you can apply the default name.)
(Image credit: Source: Windows Fundamental)
- Click the
Apply
push. - Click the
OK
push button.
After you lot complete the steps, the printer volition be bachelor to network users, but just if the computer is on.
To connect devices to the shared printer, use these steps:
- Open
Settings. - Click on
Devices. - Click on
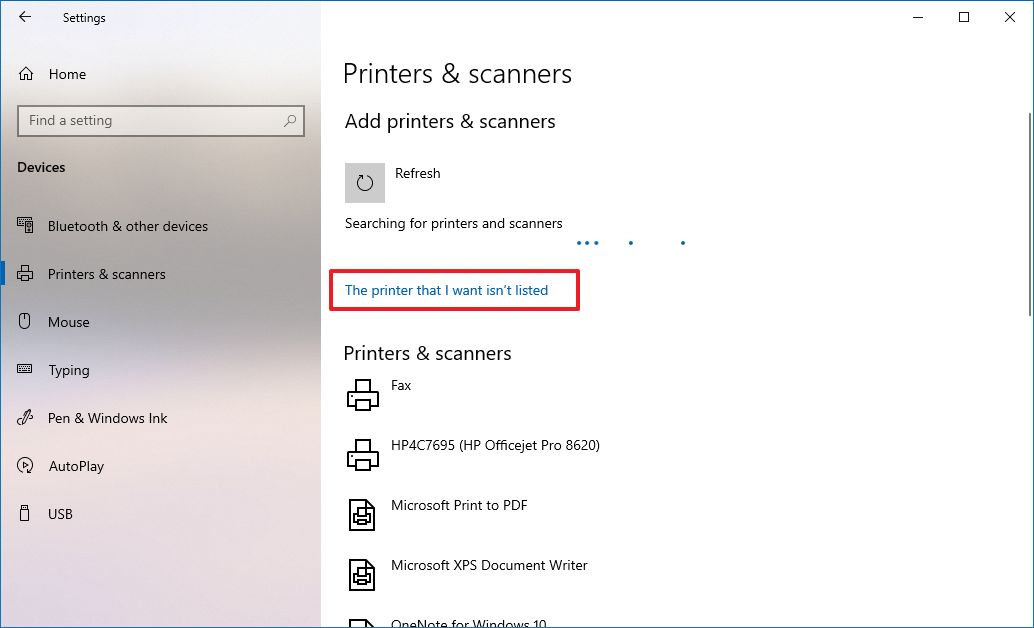
Printer & scanners. - Click the
Add a printer or scanner
button. - Select the printer from the listing.
- (Optional) If the discovery characteristic doesn’t work, click
The printer that I want isn’t listed
option.
(Image credit: Source: Windows Key)
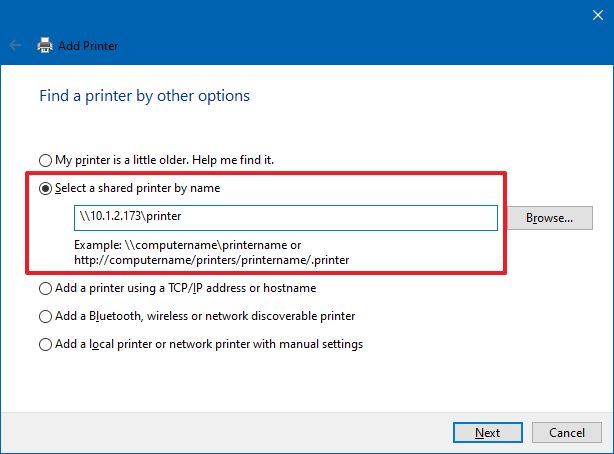
- Choose the
Select a shared printer by name
option. - Type the path of the printer location:
\\xxx.xxx.thirty.xxx\PRINTER-SHARE-NameIn the command, make sure to modify the “30.xxx.thirty.xxx” and “PRINTER-SHARE-NAME” for the IP address (or calculator proper name) and name of the printer.Quick tip:
Y’all can also click the
Scan
push button to select the shared printer.
(Prototype credit: Source: Windows Central)
- Click the
Next
push. - Click the
Install driver
button (if applicable). - (Optional) Specify an name of the printer connection. For case,
Network Printer.
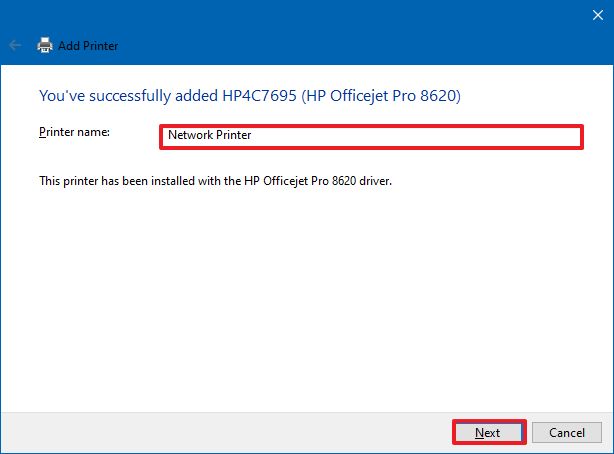
(Image credit: Source: Windows Central)
- Click the
Side by side
button. - Click the
Cease
button.
Once y’all complete the steps, you should exist able to successfully send a print job to the network printer.
Connect old devices to shared printer
If y’all’re running an one-time version of Windows 10, Windows 8.1, or Windows seven, the steps to connect to the printer will be slightly different.
To connect an old computer to a network shared printer, use these steps:
- Open
Command Console. - Click on
Hardware and Audio. - Click on the
Devices and Printers
option. - Click the
Add a printer
push button.
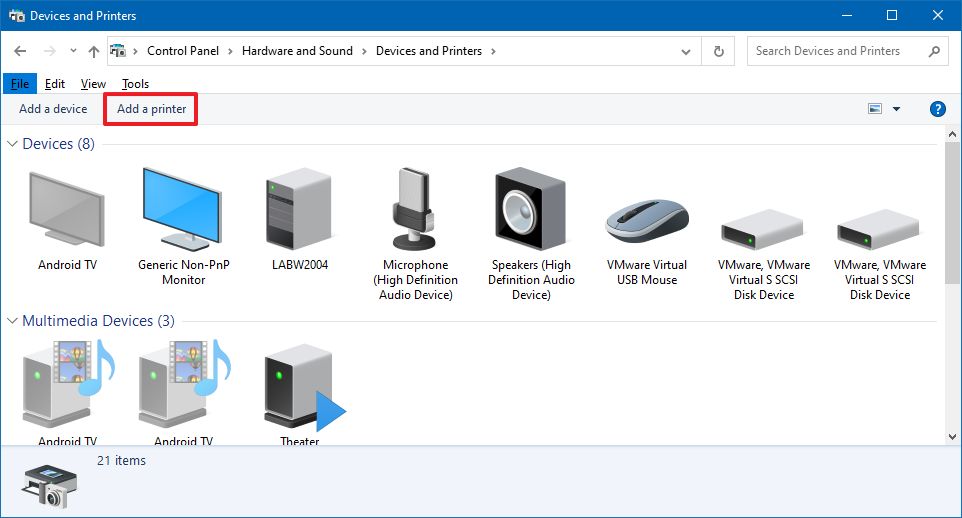
(Epitome credit: Source: Windows Central)
- Select the printer from the list.
- If the discovery feature doesn’t work, click
The printer that I want isn’t listed
option.
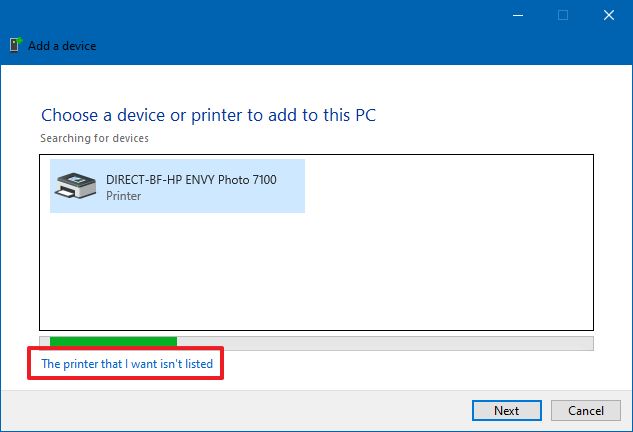
(Image credit: Source: Windows Primal)
- Cull the
Select a shared printer by proper name
option. - Type the path of the printer location:
\\xxx.xxx.thirty.xxx\PRINTER-SHARE-NAMEIn the command, make sure to alter the “30.30.xxx.30” and “PRINTER-SHARE-Name” for the IP address (or computer proper noun) and share the name of the printer that you’re trying to connect.Quick tip:
Yous can click the
Browse
button to locate and select the shared printer.
(Image credit: Source: Windows Cardinal)
- Click the
Next
button. - Click the
Install driver
button (if applicable). - (Optional) Specify an name of the printer connection. For instance,
Network Printer.
(Image credit: Source: Windows Central)
- Click the
Adjacent
button. - Click the
Terminate
button.
Afterwards yous complete the steps, remember that users will only exist able to print as long as the device sharing the printer is powered on and connected to the network. If the computer is sleeping, hibernating, or powered off, no one will exist able to print.
Terminate sharing printer on Windows ten
If there’due south no need to share a printer over the network anymore, so use these steps:
- Open up
Settings. - Click on
Devices. - Click on
Printers & scanners. - Under the “Printer & scanners” department, select the printer that you want to share.
- Click the
Manage
button.
(Paradigm credit: Source: Windows Central)
- Click the
Printer backdrop
choice.
(Image credit: Source: Windows Central)
- Click the
Sharing
tab. - Articulate the
Share this printer
pick.
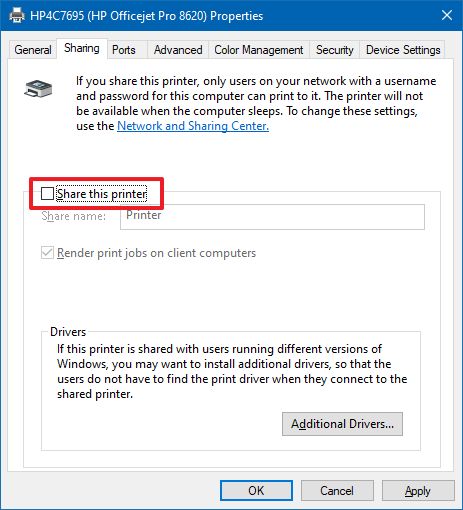
(Image credit: Source: Windows Primal)
- Click the
Utilize
button. - Click the
OK
button.
In one case you complete the steps, the printer will no longer exist available for network users.
Wrapping things up
Windows ten includes many features and avant-garde settings to share resources with network users, but in this guide, we’re focusing on using the essential configurations to assist users coming from HomeGroup.
If you’re in an surroundings running different versions of Windows, you can still refer to this guide to share files and printers on older releases of Windows 10, Windows 8.ane, and even Windows 7.
