

How to Connect Samsung M2070 Printer to Wifi
Z7_3054ICK0KGTE30AQO5O3KA30N0
Samsung Printers – Configure Wireless Settings Using Samsung Printer Diagnostics
This document explains how to use the Samsung Printer Diagnostics software awarding to set up wireless press.
Before you begin
-
Make sure your printer is wireless capable. If you are not certain, check the user guide for your printer model.
-
Make sure your printer and computer are in the aforementioned wireless network surround.
-
Have a USB cable bachelor to assist with the setup if needed.
Configure the wireless settings
Samsung Printer Diagnostics includes 2 methods for configuring the wireless settings. One uses a directly wireless connection between your computer and printer, and the other uses a USB cable connection. The method using a direct wireless connexion runs first. The method using a USB cablevision will function if the printer does not support the WPS function or if the method using a directly wireless connection fails.
note:
While configuring the wireless settings for the printer, your computer might be asunder from the Net.
-
Open Samsung Printer Diagnostics on your reckoner, if information technology is not already open.
-
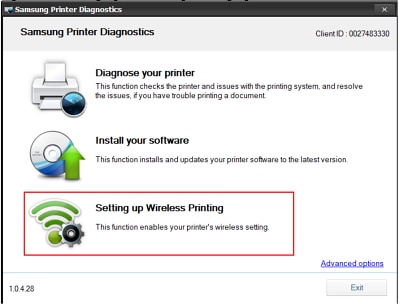
Select
Setting up Wireless press.Figure
: Setting upwards wireless press option
-
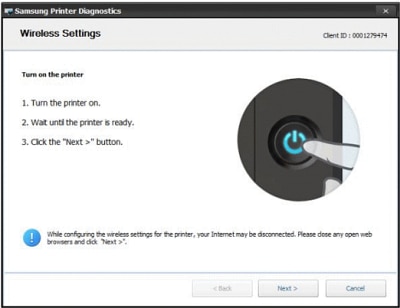
Turn on the printer as prompted.
Effigy
: Turn the printer on
-
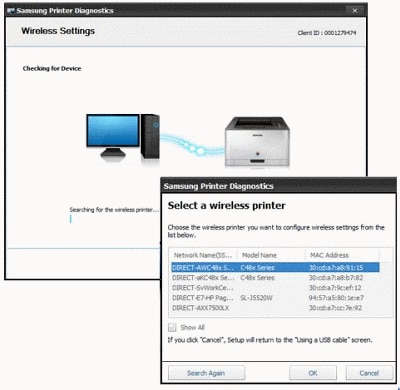
Select the printer.
Samsung Printer Diagnostics checks whether the printer supports the wireless function. The
Select a wireless printer
screen displays if the printer supports the wireless function and more than one wireless printer is detected.Figure
: Checking for device
-
Press the Wi-Fi Protected Setup (WPS) button on the printer command panel.
When you do this, the software proceeds to the next footstep. (If you don’t press the WPS button within two minutes, a Retry push appears.)
Effigy
: Printing the WPS push button

-
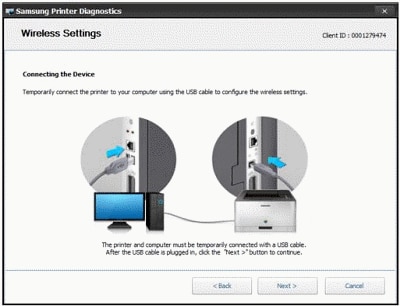
Follow whatever additional onscreen instructions to complete the configuration. Otherwise, check whether you are prompted to connect a USB cable.
If the printer does not back up the wireless function, or if the method using a directly wireless connection failed, you are prompted to plug in a USB cable. The method using a USB cablevision starts automatically. Follow these steps if you lot are prompted to connect the printer to the computer with a USB cable.
-
Connect the printer to the computer with a USB cable.
Effigy
: Connecting with USB cablevision
-
Select the wireless network.
On this screen, the wireless networks retrieved from the connected printer are listed. Just infrastructure mode wireless networks are detected. Click the Refresh button to view the wireless networks, and and then select your wireless network.
Figure
: Select the wireless network

-
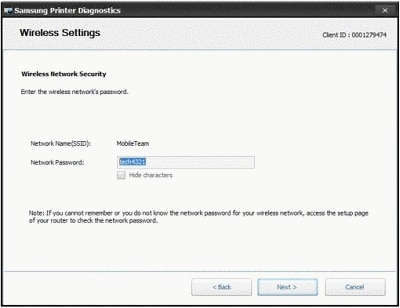
Enter wireless network security credentials if prompted.
The wireless network security screen displays if the selected wireless network is a secured network.
-
If the security of the selected wireless network is WEP, the installer enables the
Next
button when you lot enter a network password of five, 10, 13 or 26 characters. -
If the security is WPA, the installer enables the
Adjacent
push button when y’all enter a password that is more than 8 characters and fewer than 63 characters.
Effigy
: Wireless network security screen
-
-
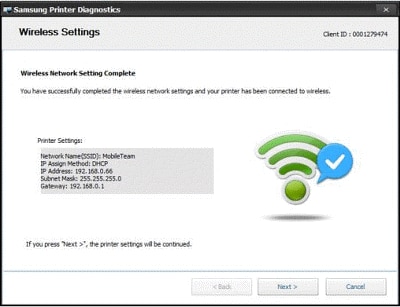
Wait while the connectedness completes.
Figure
: Wireless network connecting screen

If the wireless setup is successful, the Wireless Network Setting Complete screen displays and includes the Printer Settings data.
Figure
: Wireless connection is successful
If the wireless setup was not successful, see the next section, “Troubleshoot connectedness failure messages.”
-
Troubleshoot connection failure messages
The connection failure screen displays if the printer cannot connect to the wireless network.
Figure
: Example of wireless connection failure screens

Check the following troubleshooting instructions for failure messages:
|
Bulletin |
Troubleshooting |
|
Connection Failure – Network Not Found |
The printer did not find the wireless network. Brand sure the Wi-Fi router is working correctly. Try connecting to the wireless network with another device. |
|
Connection Failure – Computer Connection Error |
The printer connected to the wireless network successfully, but the figurer was unable to connect to the printer through the wireless network. Make sure that your computer is configured and connected to the aforementioned wireless network. The SSID and Gateway accost displayed on the screen should match the network settings on the reckoner. |
|
Connection Failure – Invalid Network Security |
The password for the wireless network is invalid. Cheque with the printer ambassador or with your Internet access provider. |
|
Connection Failure – Connected to Wired Network |
An Ethernet cable is connected to the printer. Disconnect the Ethernet cable and restart the printer. |
|
Connection Failure – IP Address Not Assigned |
The printer failed to have an IP address assigned. Restart the printer and cheque again. If an IP address is nonetheless not assigned, make sure the Wi-Fi router is working in DHCP mode. |
|
Connection Failure – General Connection Error |
There is a time-out or an undefined mistake. Cheque whether another device is working correctly in the same wireless network environment. Also bank check the Wi-Fi router settings. |
If you are unable to resolve the connection failure, go to
www.hp.com/support
for assistance.
