

Harga Printer Hp Deskjet Ink Advantage 2060
Z7_3054ICK0KGTE30AQO5O3KA30N0
hp-concentra-wrapper-portlet
![]()
Actions
HP Deskjet Ink Advantage 2060 (K110a) All-in-1 Printer – Troubleshooting Print Quality Issues
Effect
The quality of the printout or printed paradigm is not as expected.
Try the following solutions in the order presented to resolve the issue. When 1 of the solutions resolves the issue, there is no demand to continue troubleshooting.
note:
Some of the following solutions require the total HP software. If you did not install the full software when you installed your product,
click here to go to the software and drivers page, and so download and install the total characteristic software.
Solution one: Utilize genuine HP cartridges
HP recommends that you lot use genuine HP ink or toner supplies. HP cannot guarantee the quality or reliability of not-HP or refilled cartridges. If you do not use 18-carat HP cartridges, the steps in this document might not resolve the issue. To check the actuality of your cartridges, go to the
HP anti-counterfeit
webpage (in English).
Solution ii: Practise not leave photograph paper in the input tray
If photo newspaper is left in the input tray for as well long, a reaction between the paper rollers and the photo paper might occur. This can result in lines or marks on the printed photo.
Recommendation: Do non leave photo paper in the input tray for more than five to 30 minutes. Only leave photograph paper in the tray when printing. Store the photo paper in a resealable purse when not in use.
Solution three: Bank check the newspaper
Utilize the following guidelines to brand sure that the paper you are using is appropriate for the print chore. If it is not, reload the production with an appropriate paper type.
notation:
Come across the specifications for your product for specific paper types that the product supports.
-
Load the paper impress side up in the input tray. Many papers take printing and nonprinting sides.
-
Practise not use wrinkled or curled paper. Load but clean, wrinkle-gratis paper into the product.
-
Employ the correct paper type for your project. For everyday text documents, plain newspaper works well. For documents with dense press, such every bit high contrast graphics or photographs, use HP Advanced Photo Paper for the all-time results.
-
Try using a different paper. Paper that does not have ink well is also prone to print defects. HP designs ink and paper to piece of work together.
note:
Inappropriate newspaper usually causes vertical streaks in printouts (or if the problem occurs on a re-create, dingy scanner glass ordinarily causes the issue). Do not supersede cartridges to fix vertical streaks.
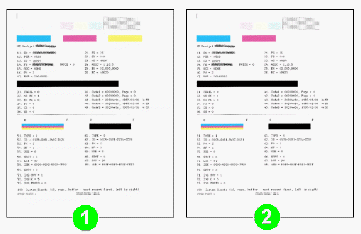
|
Examples of horizontal streaks and vertical streaks in printout |
|
|
Figure
|
Figure
|
|
Continue with the following troubleshooting steps if your printout contains horizontal streaks, or other print-quality issues as well vertical streaks. |
Do not |
After trying the preceding guidelines, try printing once more.
-
If these steps
resolved the upshot, y’all do not need to continue troubleshooting. -
If the
upshot persists, continue to the side by side solution.
Solution four: Check the impress settings
Follow these steps to check the print settings to make sure that they are appropriate for your print chore.
-
In the software program you are trying to print from, click
File, so click
Print. The
Print
dialog box opens. -
Select your product from the
Name
drop-down list, and so click
Properties. The printer
Properties
dialog box opens. -
Click the
Paper/Quality
tab. -
From the
Newspaper Size
drop-downwardly list, select the paper size that matches the loaded newspaper. For example, if y’all have legal paper loaded in your production, select
Legal 8.5×14 in. -
From the
Media
drop-down listing, select the newspaper type that matches the loaded newspaper. -
Click
Advanced
in the lower-right corner of the dialog box. The
Avant-garde Options
dialog box opens. -
Under
Document Options, make sure that
Print in Grayscale
is set to
Off, unless you lot are printing in Grayscale intentionally. -
Click
OK, so click
OK
over again to apply the settings. -
Click
OK
from the
Print
dialog box to first the print task.
-
If these steps
resolved the issue, y’all do non need to continue troubleshooting. -
If the
issue persists, continue to the next solution.
Solution five: Check ink levels and replace low or empty cartridges
Follow these steps to bank check the ink levels on your production, and and so replace depression or empty cartridges according to the results.
note:
Ink level warnings and indicators provide estimates for planning purposes but. When an indicator shows low ink levels, consider having a replacement ink cartridge available to avoid possible printing delays. You practise not need to supersede ink cartridges until print quality becomes unacceptable.
-
Open the HP product software:
-
Windows XP
Click
Showtime
( ), click
All Programs, click
HP, click the folder for your HP product, so click the icon for your HP product ( ).
).
-
Windows Vista
Click the Windows icon (
 ), click
Programs, click
HP, click the folder for your HP product, so click the icon for your HP production ().
-
Windows 7
Click the Windows icon (
), click
All Programs, click
HP, click the binder for your HP product, then click the icon for your HP product ().
annotation:
Y’all can as well open the HP production software from your computer desktop: double-click the icon for your HP production (
 ).
).The product software opens.
-
-
In the production software, double-click
Estimated Ink Levels
( ).
).The HP Toolbox opens, displaying a graphic that represents the estimated ink levels for your production.
Figure
: The estimated ink levels graphic
-
If the
ink level graphic shows full cartridges, you exercise non need to supplant the cartridges yet. Keep to the next solution.
Solution six: Print and evaluate an extended self-test written report and troubleshoot defects
Follow these steps to print, and and then evaluate an extended cocky-test report.
Step one: Print an extended self-test report
-
Load plain white, alphabetic character-size paper in the input tray.
-
Open up the HP product software:
-
Windows XP
Click
Beginning
(), click
All Programs, click
HP, click the folder for your HP product, and then click the icon for your HP product ().
-
Windows Vista
Click the Windows icon (
), click
Programs, click
HP, click the folder for your HP product, and then click the icon for your HP product ().
-
Windows 7
Click the Windows icon (
), click
All Programs, click
HP, click the folder for your HP product, and then click the icon for your HP product ().
note:
Yous tin can too open up the HP production software from your computer desktop: double-click the icon for your HP product (
).The product software opens.
-
-
In the production software, double-click
Printer Actions
( ).
). -
Double-click
Maintenance Tasks
( ). The HP Toolbox opens.
-
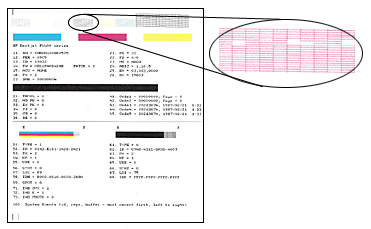
Click
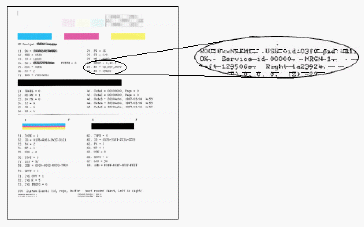
Print Diagnostic Information. The extended self-test written report prints.Figure
: Example self-test report

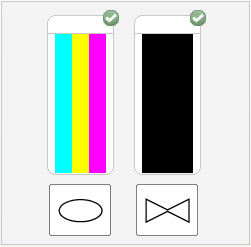
Step two: Determine which cartridges printed which areas of the extended self-examination written report
Different cartridges print unlike areas of the extended cocky-test report. Use the post-obit guidelines to decide which cartridge printed which areas.
-
The blackness cartridge prints the black areas of the written report, such every bit the blackness bars and blackness text.
-
The color cartridge prints the color areas of the report, such as the cyan (bluish), magenta, and yellow color bars.
-
Printed by the color cartridge
-
Printed by the black cartridge
Effigy
: Which cartridges print which areas of the extended self-test written report
Make a annotation of which cartridges printed which areas of the extended self-test, and then continue to the next step to check the report for defects.
Step three: Check the extended self-test study for defects
In general, if the product and its cartridges are working correctly, all the color bars should be nowadays, unstreaked, and uniform in color. The blackness text on the page should not testify ink streaks.
Use the following table for examples of defects that can be on the extended self-test report. The following examples are not inclusive, but tend to represent the about common issues.
|
Examples of defects on the extended self-test report |
||
|
Defect |
Instance |
Description or cause |
|
Cleaved lines in grid patterns |
|
Problem with the ink nozzles |
|
Faded or nonuniform colors in the colour blocks |
|
Depleted cartridges, or ink mixing together |
|
Rails marks or ink smears in the text |
|
Fibers or other debris on 1 or both of the cartridges |
|
The color blocks are streaked or lined |
|
The cartridge might be running out of ink or the nozzles might be clogged |
|
I or more of the colored blocks is missing entirely |
|
The cartridge is out of i color of ink or the ink nozzles might exist chock-full. |


-
If you encounter
no defects on the extended self-test written report, the print mechanism and ink supplies work correctly. If printouts are still unsatisfactory, endeavor these full general impress-quality guidelines, then do not continue the troubleshooting steps in the balance of this certificate.-
Make sure that the image yous are printing has sufficient resolution. Images that take been enlarged too much might appear fuzzy or blurry.
-
If the problem is confined to a band nigh the edge of a printout, use the software you installed with the product, or some other software program to rotate the image 180°. The problem might not appear on the other finish of the printout.
-
-
If y’all encounter
one or more than of these defects on the extended self-test report, continue to the next steps.
Step four: Clean the cartridges using an automated tool
Follow these steps to run an automated tool to clean the cartridges if you institute defects on the extended cocky-exam report.
-
Open the HP product software:
-
Windows XP
Click
Start
(), click
All Programs, click
HP, click the folder for your HP product, and and so click the icon for your HP product ().
-
Windows Vista
Click the Windows icon (
), click
Programs, click
HP, click the folder for your HP product, and then click the icon for your HP product ().
-
Windows 7
Click the Windows icon (
), click
All Programs, click
HP, click the folder for your HP product, and then click the icon for your HP product ().
annotation:
You lot can also open the HP product software from your calculator desktop: double-click the icon for your HP production (
).The product software opens.
-
-
In the product software, double-click
Printer Actions
(). -
Double-click
Maintenance Tasks
(). The HP Toolbox opens.
-
Click
Make clean Ink Cartridges, so follow the on-screen instructions to clean the cartridges. -
After running the tool, click
Print
to print a test folio. If the print quality is still unacceptable, follow the on-screen instructions to run a
2d-level clean.
Step five: Align the printer
-
Open the HP product software:
-
Windows XP
Click
Beginning
(), click
All Programs, click
HP, click the binder for your HP product, and so click the icon for your HP production ().
-
Windows Vista
Click the Windows icon (
), click
Programs, click
HP, click the folder for your HP product, and then click the icon for your HP product ().
-
Windows 7
Click the Windows icon (
), click
All Programs, click
HP, click the binder for your HP product, and and so click the icon for your HP production ().
annotation:
Y’all tin can also open up the HP product software from your figurer desktop: double-click the icon for your HP product (
).The production software opens.
-
-
In the product software, double-click
Printer Actions
(). -
Double-click
Maintenance Tasks
(). The HP Toolbox opens.
-
Click
Align Ink Cartridges, and then follow the on-screen instructions to print the alignment page. -
Lift the scanner chapeau.
-
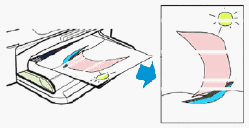
Place the alignment page with the printed-side down on the correct-forepart corner of the scanner glass. Run across the engraved guide adjacent to the scanner drinking glass for assistance loading the alignment page.
Figure
: Place the alignment folio on the scanner glass
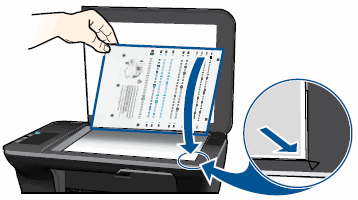
-
Close the scanner lid.
-
Printing the Outset Copy Black button (
 ) to brainstorm the scan. The production aligns the cartridges.
 -
Wait until the Power light (
 ) stops blinking, which indicates that the cartridge alignment is complete.
Stride six: Clean the area around the ink nozzles
You need to complete these steps simply if you noticed track marks or smears in the text on the extended self-test report equally described earlier in this document.

Of import:
Practise non perform these steps unless your extended self-test report specifically shows smeared text or rails marks. If your study does non prove this defect, continue to the next solution.
-
Assemble the post-obit materials:
-
Dry foam-condom swabs, lint-free cloth, or any soft material that will not come autonomously or go out fibers (coffee filters work well)
-
Clean sheets of paper
-
Distilled, filtered, or bottled water (tap water might contain contaminants that can damage the impress cartridges)
circumspection:Practice not use platen cleaners or booze to clean the area. These can damage the cartridge or the production.
-
-
Press the Ability button (
) to turn on the product, if information technology is not already on. -
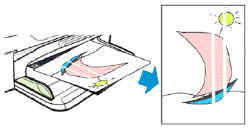
Open the cartridge admission door. The carriage moves to the center of the product. Wait until the carriage is idle and silent before standing.
Figure
: Open up the cartridge access door

-
Lightly printing down on the cartridge to release information technology, and so pull the cartridge out to remove it from its slot.
Effigy
: Remove the cartridge

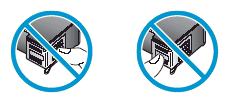
caution:Do non affect the copper-colored contacts or the ink nozzles. Touching these parts can upshot in clogs, ink failure, and bad electrical connections.
Effigy
: Do non touch the contacts or nozzles
-
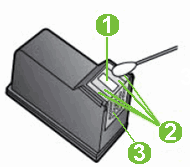
Place the cartridge on a piece of paper with the ink nozzles facing up.
-
Lightly moisten a clean, foam-rubber swab with distilled h2o.
-
Clean the face and edges
around
the ink nozzle with the swab.
caution:Do not clean the ink nozzle plate.
-
Nozzle plate – Practice Non Make clean
-
Surface area surrounding ink nozzle – Do make clean
-
Cartridge contacts – Do not clean
Figure
: Clean the area around the ink nozzle
-
-
Either permit the cartridge sit for 10 minutes to let the cleaned surface area to dry out, or employ a new swab to dry out it.
-
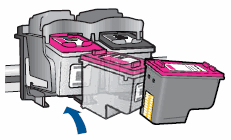
Agree the cartridge past its sides with the nozzles toward the product, and so insert the cartridge into its slot. Make sure that the icon on the cartridge matches the icon on the slot.
-
The tri-color cartridge (
 ) goes in the slot on the left
 -
The black cartridge (
 ) goes in the slot on the right
Effigy
: Insert the cartridge into its slot
-
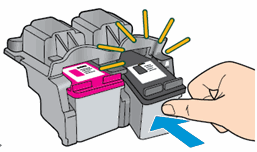
-
Push the cartridge forward into its slot until information technology snaps into identify.
Effigy
: Snap the cartridge into place
-
Repeat these steps to clean the expanse surrounding the ink nozzle on the other cartridge.
-
Shut the cartridge admission door.
Figure
: Shut the cartridge access door
-
Try press again.
-
If these steps
resolved the issue, you do not need to continue troubleshooting. -
If the
effect persists, go along to the next solution.
Solution seven: Replace the problem cartridge
Follow these steps to replace the problem cartridge if y’all saw defects on the extended self-examination report and the preceding steps did not resolve the outcome, fifty-fifty if the cartridge is not low on ink. The problem cartridge is the one that printed the defects on the extended self-examination written report every bit described earlier in this document.
-
With the product on, remove the onetime cartridge.
-
Remove the new cartridge from its packaging.
-
Remove the pinkish pull tab from the new cartridge.
caution:Do not bear on the copper-colored electric contacts or the ink nozzles on the cartridge. Doing so can crusade bad electrical connections, clogged ink nozzles, or poor print quality.
-
Hold the cartridge by its sides with the nozzles toward the product, and so slide the cartridge into its color-coded slot until it snaps into place. Brand sure that the icon on the cartridge matches the icon on the slot.
-
Insert the colour cartridge in the slot on the left.
-
Insert the blackness cartridge in the slot on the right.
-
-
Follow the steps in “Solution six, Stride five” of this document to align the printer.
Solution viii: Service the All-in-One
Service or replace your HP product if the issue persists after completing all the preceding steps.
Get to
Contact HP Customer Support
to schedule a product repair or replacement. If you are in Asia Pacific, you will be directed to a local service center in your area.
To confirm your warranty condition, go to
HP Product Warranty Check. Repair fees might apply for out-of-warranty products.
