

unbrick.id – Failed to Test Tone Windows 7
A fairly common error,
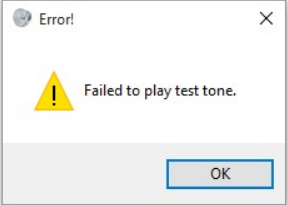
failed to play test tone
is likely to arise when there’s some sort of an issue between your Windows PC and installed sound device.
This error is not limited to one version of Windows. It occurs, more or less, as frequently on Windows 10 as on its previous avatars like Win 7 and Win 8 computers.
Quite naturally,
failed to play test tone
is an irritating error because it means that you will titinada be able to hear any audio from your pc.
Many forum posts claim that this issue is related to hardware, but that’s titinada the case. You can solve the error in numerous ways via software.
However, before we look at the solutions, let’s check out other problems that users have reported receiving besides this error.
Other Problems Experienced With “Failed to Play test tone” error
Here’s a short list of problems that users have complained of receiving along with the aforementioned error.
-
Conexant Audio, Realtek, IDT, Sound Blaster Audio failed to play test tone
– Users have said that this issue generally occurs with Realtek or IDT audio devices. Outdated drivers are usually the root cause of this issue, and updating them fixes the problem. -
AMD HDMI audio failed to play test tone –
Users stated that the listed error occurred when they used HDMI cable along with AMD graphics card. -
USB audio failed to play test tone –
Some users who used USB headphones or USB sound card reported experiencing this problem. As per users, this error typically occurs more frequently when USB audio devices are used. -
HP, Dell audio failed to play test tone –
Such audio problems can arise on every type of pc. HP users as well as Dell users have reported experiencing this issue. -
Sound card failed to play test tone –
This issue can affect nearly every sound card. Not only built-in but also dedicated sound cards have been reported to be affected by the mentioned issue. -
Laptop no sound, failed to play test tone –
Laptop s and desktops are both affected by the said problem. As a matter of fact, certain laptops are more affected than desktop PCs. -
Not able to play sound on laptop –
When this problem arises, you will not be able to play any sound on the laptop. -
Sound disabled, failed to play sound
– This problem can cause to sound to be completely disabled, and as a result, you will fail to play any sound on the pc.
First Update Windows 10
Listed below are several solutions to the aforementioned problem. However, if you run Win 10, before trying these steps, you should make sure that your pc is up-to-date. Updating Win 10 with all the latest patches have helped fix the ‘failed to play test tone’ error in many cases.
In case the problem persists even after updating Win 10, go ahead and try these steps.
Windows 8 and 7 users can straightaway menginjak with the first solution.
Solutions to Failed to play test tone
Here are the various solutions. All of them have been reported to work. You don’t need to try each one of these. We recommend you try the solutions listed in this post one-by-one until the issue is resolved on your computer.
Solution 1 – Restart Windows Audio
For a large number of users, this solution has worked wonderfully. Precisely for this reason, we’ve listed it before other solutions. Also it doesn’cakrawala take much time to execute the steps listed here.
That said, a few users have reported that this solution only worked for a short period. After which, the issue reoccurred. If that’s the case with you, we recommend you try other solutions when the ki kesulitan reoccurs.
Here are the steps you need to follow to restart Windows Audio.
- Launch Run window by pressing
Win + R
on your keyboard - Now type
services.msc
in the run window and then click the
OK
button or press Enter - In the right pane of Services window, locate
Windows Audio, right-click it and click
Restart -
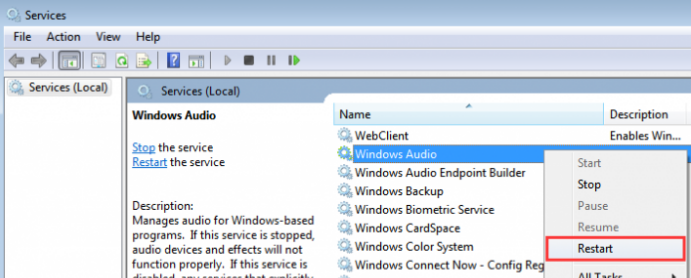
- Exit Services window and restart your pc
- Now your pc should be able to play sound
If titinada, jump up to the next solution.
Solution 2 – Run sfc/scannow
Here are the steps to follow.
- In the Start Search box, type cmd. Now right-click cmd.exe and click
Run as administrator - Now type
sfc/scannow. Press Enter. -
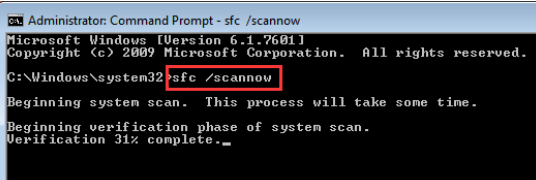
- Once the scan is complete, restart Windows
(Note: Don’t interrupt the scan when it is running. Restart windows only when the scan is oper.)
Solution 3 – Delete KB974571 updated (This is for Win 7 users only)
More than one Win 7 user has complained that this particular updated caused the
Failed to play test tone
issue. The error was resolved when this updated was deleted manually.
To do this, complete these steps.
- Type
control panel
in the start search box and then press Enter - In the control panel window, use the jatuh-down menu against
View by
to select
Small icons - Locate
Programs and features
and double-click it - In the right pane of the window that opens, click the
View installed updates
button - Now locate and select
KB974571
update, and then click the
Uninstall
button - Once that’s done, restart Windows
Solution 4 – Disable all enhancements
For many issues this solution worked like a charm. Therefore, if the earlier two solutions didn’cakrawala work for you, we recommend you to try this one.
Here are the steps to follow.
- Type
control panel
in the berangkat search box and then press Enter - In the control panel window, use the runtuh-down menu against
View by
to select
Small icons - Locate
Sound
and then click it - Select the speakers you are using. Click
Properties
(near the bottom of this box) - Click
Enhancements - Tick the box next to
Disable all enhancements -
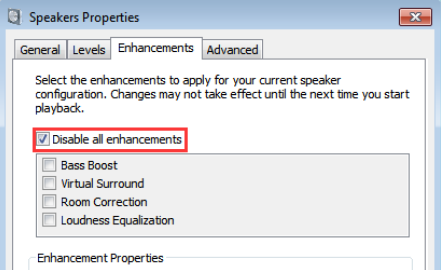
- Click the
Apply
Now click
OK
Check if the issue is resolved. If not, move to the 5th
solution.
Solution 5 – Install HD Audio Device driver
This issue could occur when drivers are faulty or corrupted.
To resolve the issue, reinstall audio drivers. Here are the steps to follow.
- Type
device manager
in the start search box and then press Enter - In the Device Manager window, expand
Sound, video and game controllers - Right-click your audio device. Next, select
Uninstall -
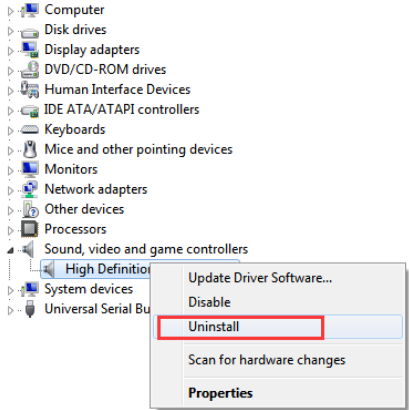
- Follow on-screen prompts to uninstall the audio drivers
- Now reboot windows
- When Windows restarts, it’ll automatically install the generic driver for this device
- If the error continues to occur, then go to the manufacturer’s website and download the latest driver for your audio device
- After you’ve downloaded the driver file, double-click it to install the drivers
- Restart Windows and the issue should be resolved
In case you don’horizon want to spend so much time updating audio drivers manually, we recommend you to use a fast, accurate driver update tool like
DriverDownloader
.
This tool will update your audio driver and other drivers with a single click. Registered users enjoy customer support and 30-day money back guarantee.
To download
DriverDownloader
, just click the green button below.
Start Download
Solution 6 – Change Sample Rate
To do this, just follow the steps listed here.
- Type
control panel
in the start search box and then press Enter - In the control panel window, use the drop-down menu against
View by
to select
Small icons - Locate
Sound
and then click it - In the Playback tab (this is the first tab), select your speaker and then click the
Properties
button - Now click the
Advanced
tab - In the drop-down menu in the
Default Dimensi
section, select a different audio matra, such as
16 bit, 48000 Hz -
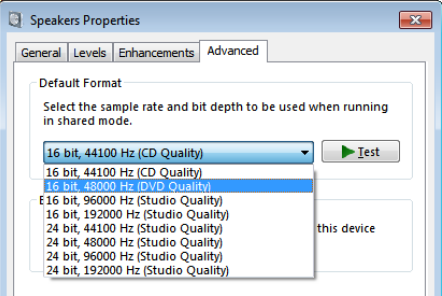
- Click the
Apply
Now click
OK - Now see if the issue is resolved. You may have to try different sound formats, so if one doesn’falak work, try another. This solution has worked for several users, so do try it
- In case altering sound formats doesn’t work, some users recommend restoring audio settings to the original values by clicking
Restore Defaults
Do that and now check whether your computer can play sound
Solution 7 – Add Local Service in Local Users and Groups
While this solution might appear unrelated to the aforementioned audio penyakit, more than one user have said that it worked for them.
- Right-click
My Computer
or
This PC, depending on your Windows version - Click
Manage - Expand
System Tools - Expand
Local Users and Groups - Select
Groups - Now right-click
Administrators
(this is in the middle pane) - Click
Add to Group - Now click
Add - Click
Advanced - Click
Find now - Now double-click
Local Service
and then click the
OK
button - You will see
NT Authority\Local Servicein the list. Now click the OK button - Exit Computer Management window
- Restart your computer
Check if the issue is resolved.
Solution 8 – Change the speaker settings
According to some Windows users, the speaker settings alter to Quadraphonic when they upgrade to Win 10. In case you use 5.1 speaker system, after the upgrade, open your speaker settings and change it to 5.1 from Quadraphonic.
Solution 9 – Disable the exclusive mode
Exclusive mode can cause
Failed to play sound test tone
error. You can solve the issue by disabling this option.
Here are the steps to follow
- Type
control panel
in the start search box and then press Enter - In the control panel window, use the runtuh-down menu against
View by
to select
Small icons - Locate
Sound
and then click it - In the Playback tab (this is the first tab), select your speaker and then click the
Properties
button - Click the
Advanced
tab - In the Exclusive Tendensi section, uncheck the box before
Allow applications to take exclusive control of this device -
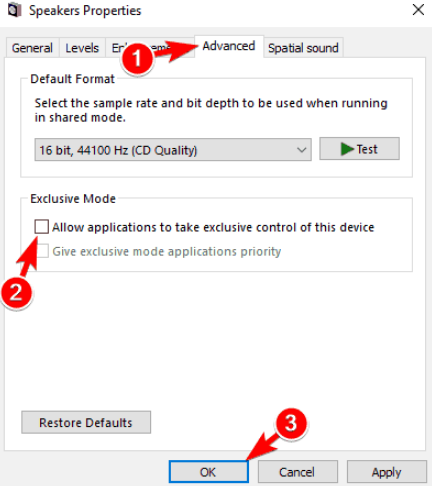
- Click the Apply button to save the changes. And then click OK to close the Speakers Properties dialog box
Solution 10 – Run a troubleshooter
Some users state that running a troubleshooter helped them resolve
Failed to play sound test tone
issue.
Here are the steps you need to perform to run Sound Troubleshooter.
- Open
Settings app
by pressing
Win + I - Click
Update & security - In the left pane, click
Troubleshoot - In the section in right pane, click
Playing Audio. Now click
Run the troubleshooter -
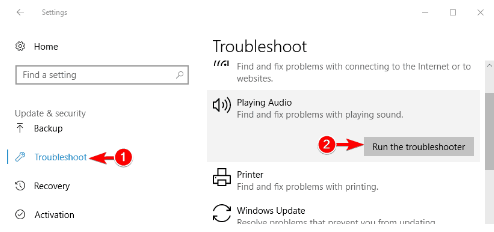
- This will launch the troubleshooter. Wait mencicil troubleshooter resolves the issue
Another way to launch Sound Troubleshooter is by following these steps.
- Click the Windows icon in the task kantin and then type
control panel
in the tiba search box, and then select
Control Panel - Click
Troubleshooting - In the left-hand side menu, click
View all - Click
Playing Audio
to launch the troubleshooter - Click the
Next
button - Wait till the troubleshooter resolves the issue
Solution 11 – Turn off audio effects
There are several sound cards which have a dedicated software app which offers different audio effects. These effects at time can boost audio quality, but the flip side is that they can also cause different problems.
Some users have complained that disabling the sound effects helped them resolve the
Failed to play sound test tone
issue.
We suggest you give this solution a try. Open the audio configuration software and then browse to
Effects
section. All you need to do now is to disable these effects.
Now check whether the issue is resolved.
Solution 12 – Disconnect USB devices
It is possible that the keburukan might be occurring because of other USB devices like USB speakers or headphones.
Some users have reported receiving the error due to Xbox 360 wireless gaming receiver. If you too use this receiver, we recommend you to disconnect it from the PC. Then simply restart Windows. Now check if the problem is resolved.
Solution 13 – Set the audio device as default communication device
Some users have said that this error appears because the audio device isn’t configured as the default device.
Here are the steps you need to follow to fix the issue.
- Type
control panel
in the tiba search box and then press Enter - In the control panel window, use the drop-down menu against
View by
to select
Small icons - Locate
Sound
and then click it - Click the
Playback
tab - In the Sound window, right click a device other than your audio device and click
Set as Default Communication Device - Now right-click your device and click
Set as default. Now again right-click this audio device and click
Set as Default Communication Device -
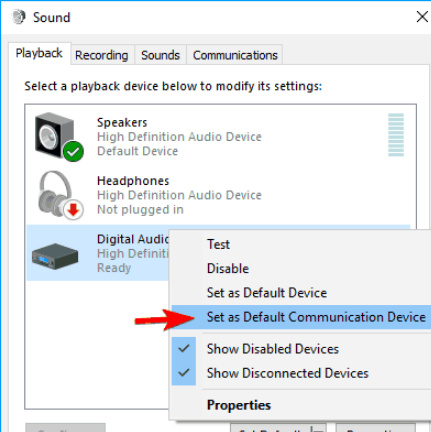
The ki aib should be fixed. Please check.
Solution 14 – Disable and then Enable the audio device
Some users have said that they were able to fix this problem by disabling audio device temporarily.
Here are the steps to follow.
Solution 15 – Directly connect audio device to the pc
Some laptop users have reported experiencing this problem when they used any docking station. As you may know, docking stations are immensely useful as they give you access to additional ports. However, at times, certain issues can arise with them. Users have stated that they received the
Failed to play sound test tone
issue occurred when they connected their headphones or speakers with the docking station.
Users have stated that this keburukan can be fixed by connecting speakers directly to audio port on the laptop.
Solution 16 – Change security permissions in Windows registry
Changing security permissions in Windows registry can help you resolve the kelainan.
However, please note that this step is for only advanced users. In case you feel that you enau’t comfortable with tweaking registry, don’n attempt this step.
That said, many users have reported that this solution worked for them. So if you have considerable technical knowledge, you may want to give this a try.
For this solution you will need to access another PC running the same Windows version as your PC. Ensure that the
Failed to play test tone
is not occurring on this pc. Now you’ll need to compare security permissions between these two PCs and if something is missing in your system’s registry, make the required changes.
Here are the steps to follow.
- Press
Win + R. Type
regedit
and click the
OK
button -
Important –
Although titinada necessary, it is highly recommended that you create a backup of your registry. The backup copy will prove immensely useful if you make wrong changes or if something go amiss after the changes. To create backup, click the
File
menu and then select
Export. In the
Export range
section, select
All. Now give the file a desired name and then click
Save. With these simple steps, you will have created a backup copy of your registry. If any ki aib occurs after you modify Windows registry, just run the backup file. This will restore the Windows registry to its original state - Browse to
HKEY_LOCAL_MACHINESOFTWAREMicrosoftWindowsCurrentVersion - Right-click
Audio
Select
Permissions - Perform the last two steps on the other PC that’s working fine. Run a comparison of entries in
user names or Group
sections between two PCs. Check the permissions for every istimewa entry listed in the list. In case some permissions or entries are absent in your PC, readjust them - Once you’ve made sure that all permissions and entries on your pc matches perfectly with those on the working PC, click the
Advanced
button - Check
Owner
section in both the PCs. In case this section on your pc is different than on the working pc, make the required changes
Once you’ve made the settings on the affected PC the same as on the working PC, check if the issue is fixed.
Solution 17 – Reinstall the AMD drivers
Sometimes the graphics card drivers also install audio drivers, which in turn, cause this problem to appear. To solve the issue, uninstall the AMD device driver and then reinstall it. You can refer to the steps listed in the solution 5 to see how to uninstall and reinstall a device driver.
We are sure that one of these steps would have worked for you.
Failed to Test Tone Windows 7
Source: https://www.drivers.com/update/pc-fix-tips/how-to-solve-failed-to-play-test-tone-error-on-window-7-8-10/
