

There’s no denying the fact that Wi-Fi has opened up a number of new opportunities and has become an essential part of our lives. All the same, just like everything else, it is vulnerable to issues.
At times users may encounter the error ‘DHCP is not enabled for wireless network connection’. If you are receiving this error, you will not be able to connect to the net. This in turn may affect your work or personal life.
However, the good news is that you can easily resolve this error on your own, of course with a little help from us. Before we check out the solutions, let’s see what DHCP exactly is.
DHCP Explained
The term DHCP is a short form for Dynamic Host Configuration Protocol. It is the standardized protocol for assigning reusable IPs in a network. In a nutshell, DHCP is a reliable and safe way of letting you communicate on a network.
Common Causes Behind the DHCP is not Enabled Error
You can get the titled issue for a number of reasons, the most commons being the following:
- Software conflicts
- Network issues
- Faulty or outdated drivers
- Malware
- Incorrect settings
How to Resolve the DHCP is not Enabled Error
Here are some common solutions for this error.
Solution 1 – Use Network Troubleshooter
Windows come with an inbuilt tool for repairing network problems, and it goes by the name of Network Troubleshooter. If you are getting the said error, the first thing you should do is run this troubleshooter.
Here are the steps to follow:
- Simultaneously press Win + R keys to launch the run dialog box
- Now type ncpa.cpl and press the Enter key
- In the Network Connections window, locate the Wi-Fi connection you are using, right-click it, and choose Diagnose
- Run the Network Troubleshooter. The following message will appear: DHCP is not enabled for wireless network connection
- Choose Try These Repairs as an Administrator. Click Apply this Fix
- Lastly, reboot windows and see if your connection is now restored
Solution 2 – Configure the network adapter settings
Often, the issue occurs from wrong adapter settings. Tweaking them is likely to do the trick.
Here are the steps to follow.
- Right-click the Internet icon on your desktop
- Click Open Network and Sharing Center
- You will see the option called ‘Change adapter settings’ in the left pane. Click it
- Now locate the wireless network connection you are using, right-click it and select Properties
- Double-click Internet Protocol Version 4 (TCP/IPv4)
- Select Obtain an IP address automatically
- Select Obtain DNS server address automatically
- Now click OK
- Click OK again in the Wi-Fi Properties window
- Restart Windows and see if now you are able to access the kisa
Solution 3 – Turn the DHCP client on
Another reason behind the titled error could be a disabled DHCP client peladen. Enabling it may help fix the problem once and for all.
Here are the steps to follow.
- Simultaneously press Win + R keys
- In the run dialog box, type services.msc and click the OK button
- Locate and double click DHCP client (browse through the list of services to find it)
- Set the startup type of this service to Automatic
- Click the Apply button and then click OK
- Restart Windows and check if the issue is resolved
Solution 4 – Look at Windows Firewall
Windows Firewall might be configured to block the DHCP client. To ensure this is not the case, disable the firewall.
Here are the steps to follow.
- Simultaneously press Win + X keys
- Now choose Control Panel
- Go to the System and Security window and then click Windows Firewall
- Go to the left pane. Here you will find Turn Windows Firewall on or off. Click it
- Choose Turn off Windows Firewall
- Reboot your computer
If now you are able to access the internet, you can safely assume the masalah was arising from Windows Firewall, and you must configure it to not stop the DHCP protocol. This you can do by creating an exception.
Here are the steps to follow.
In Win 10/8/8.1
- Open the Start menu
- Click Settings
- In the Settings menu find the Find a Settings search kawasan
- Now type Firewall. Among the search results, choose Firewall
- Go to the left pane in the Windows Firewall window
- Click Allow an App or Feature through Windows Firewall
- Click Change Settings in the Allowed Apps window
- Locate the DHCP service you use. Now check its box to prevent the Firewall from stopping the DHCP client from communicating through Windows Firewall
In Win 7
- Go to the Start menu. Open Control Panel
- Go to System and Security
- Proceed to Allow a Program through Windows Firewall
- Here check the box before DHCP
- Save the changes
- Restart Windows
Solution 5 – Reinstall the network driver
If the error persists, it is possible that your network driver is faulty. For this reason, we recommend reinstalling the network driver.
Here are the steps to follow.
- Simultaneously press Win + R
- In the run dialog box, type devmgmt.msc and then click the OK button
- In the Device Manager window, locate and double-click Network adapters. Now right-click the Wi-Fi adapter and then select Uninstall device. Win 7 & 8 users, on the other hand, need to click Uninstall
- Tick the box before Delete the driver software for this device. Next click Uninstall. Win 7 & 8 users need to click OK
- Now download the latest driver from another computer with working Internet. Transfer the driver file to a USB
- Plug the USB drive into your computer. Install the latest driver
- Restart Windows
Solution 6 – Update the network driver
If the above-mentioned solution fails to fix the issue, try updating the network driver.
You can do this manually or automatically. The latter is not only easier but also much faster and accurate. All the same, we have discussed both the methods here, so that you can decide for yourself which one is best for you.
Update Network Driver Manually
Here are the steps to follow:
- Simultaneously press Win + R
- In the run dialog box, type devmgmt.msc
- In the Device Manager window, locate and double-click Network adapter
- Now note down the ideal number and make of your Wi-Fi adapter
- Go to the manufacturer’s website and download the latest driver for your Wi-Fi adapter
- Save the driver file on your desktop. Launch the driver file if it is an executable file (.exe) and follow onscreen instructions
- If the driver file is a nonexecutable file, you will have to install the driver from the Device Manager
- Go to Device Manager, double-click Network adapter, right-click your Wi-Fi adapter and then click Update Driver
- Select the Browse my computer for driver software option
- Click the Browse button. Navigate to the location where you saved the driver file and select it
- Click Next and follow onscreen instructions
- Reboot Windows
Update Network Driver Automatically
A much simpler way to update your network driver is by using a reliable and fast driver update software tool, such as
DriverDownloader
.
The tool will update your network driver in a jiffy. Since it comes with a 30-day money back guarantee, you can try it without and worry.
Here’s the link to download
DriverDownloader
.
Start Download
Solution 7 – Temporarily disable the antivirus software
If you’re using a third-party antivirus software, try disabling it temporarily. Now check if the error is fixed. If it is, you will need to switch to another antivirus software.
Solution 8 – Disable Proxy
This is another effective method to fix the titled error.
- Simultaneously press Win + R
- In the run dialog box, type inetcpl.cpl and then click OK
- In the Internet Properties dialog box, go to Connections and then click LAN settings
- Now locate the Use a Proxy Peladen for LAN option and unselect it
- Next check automatically detect settings
- Finally click OK
- Restart Windows and check if the error is fixed
Solution 9 – Scan Windows for malware
If nothing else has worked, it may be worth the while to scan the computer for malware infection. Malware can cause all kinds of issues, including the titled error. We recommend you run a boot scan as it is more thorough.
Solution 10 – Reset Winsock
If nothing else has worked, we recommend you perform these steps.
- Simultaneously press Win + X keys
- Select command prompt. You need to select one with administrator rights
- Now you need to type the following commands and press Enter after each one
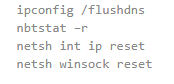
- Wait mencicil the reset process is complete. Once that is done, close command prompt
- Now check your internet connection
We hope one of these ten solutions would have worked for you. Let us know which one was that.
Dhcp is Not Enabled for Wifi Artinya
Source: https://www.drivers.com/update/pc-fix-tips/dhcp-is-not-enabled-for-wi-fi-10-solutions/
