

Cara Unlock Dell Optiplex 9020 Mini Tower
In this mail service I will show you how you can change the BIOS of your Dell OptiPlex 9020, 7020 or 3020 so that they can support an NVMe SSD drive as a boot device. These machines have a UEFI BIOS, only they do not incorporate an NVMe driver. By adding the commuter into the BIOS yous can boot from a PCIe NVMe SSD.
I managed to achieve these speeds:
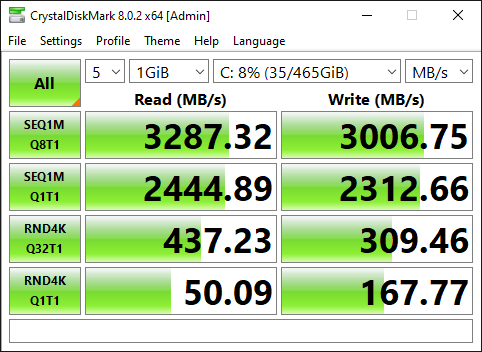
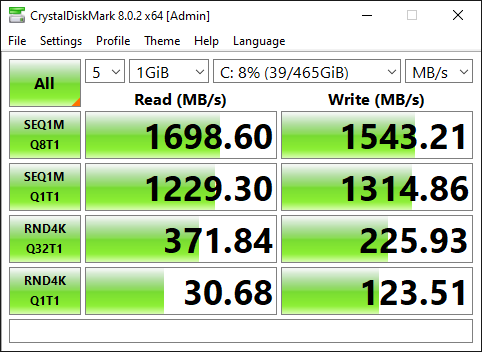
Drive Speed result for OptiPlex 3020
The speed results above are from the same SSD. (
Samsung 970 EVOPlus
)
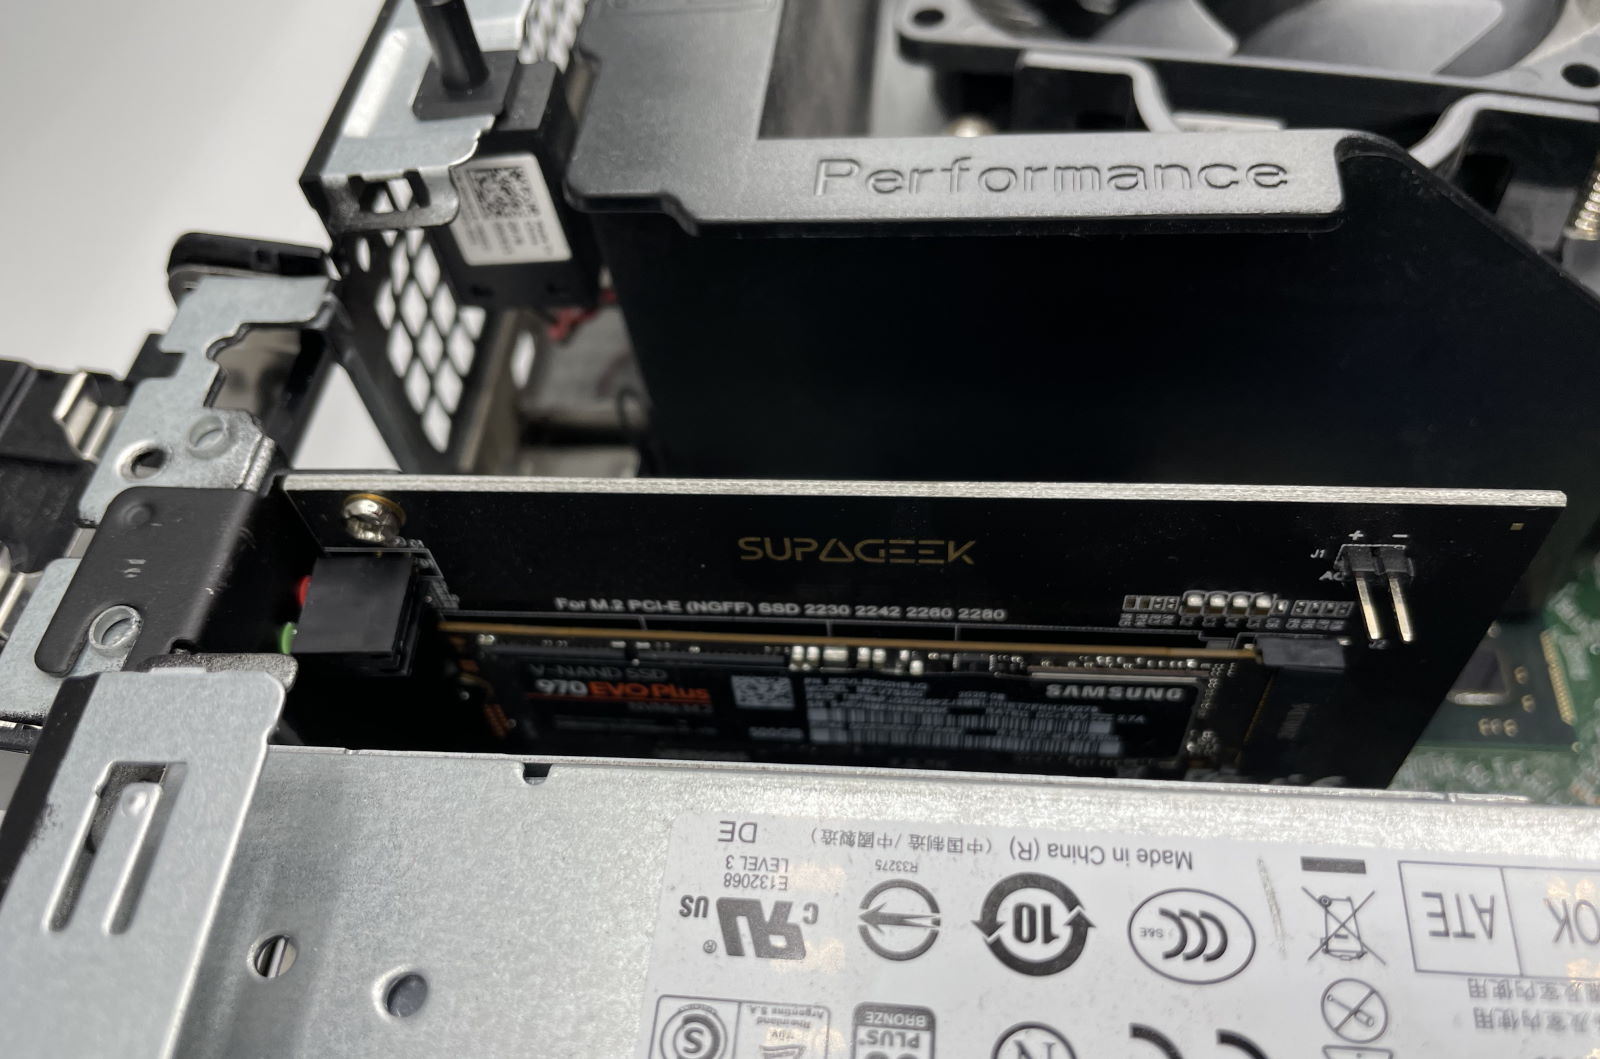
Information technology took me quite a chip of research to figure out how to do this modification. But it is actually very piece of cake and provides an immense heave in speed. Here is the card and SSD installed and working in OptiPlex 7020.
Warning
This web log post contains instructions on how to change your BIOS.
You could
easily
break your motorcar.
Continue at your own chance!
Required Hardware
In gild to acquit out this upgrade, you will need a few things:
- An NVMe SSD. I used a 512Gb
Samsung 970 EVOPlus - An NVMe to PCIe Adapter, I used
this i from Amazon. - A Dell OptiPlex 9020, 7020 or 3020 to upgrade.
I have personally tried this procedure on the 3020 and 7020 Small Class Factor and a 9020 Minitower. It works for every variant of the car. There are slight variations in the process for each machine.
Procedure Overview
This procedure involves five steps:
- Upgrade your current BIOS if required.
- Backup your electric current BIOS.
- Add together NVMe driver support into the BIOS fill-in.
- Writing the modified BIOS back to the system.
- Install the PCIe NVMe SSD and Adapter.
- Optimise BIOS settings.
Car Preparation
Before starting the the physical installation of the NVMe SSD y’all can practise all of the required grooming while the machine is running on your existing drive.
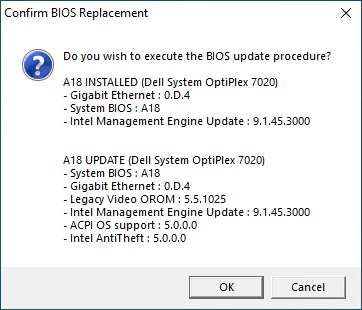
Upgrade your BIOS
The kickoff step, is to upgrade your current BIOS:
Just download the BIOS update from the Dell website and run the update. Before the update runs information technology will show your electric current version and the version that you will be updated to:
Install Intel Management Engine Components
Next install the
Intel Management Engine Components from Dell. These management components volition allow y’all to access the BIOS in order to back information technology up. Reboot once later on installation of the management tools.
Download Intel Management Engine Tools
Now download
Intel ME System Tools
and extract the Cipher file to your auto. For the purposes of this blog post I will presume that it has been extracted to:
C:\Intel ME System Tools v9.1 r7.
The Intel ME System Tools will be used to backup the BIOS and write the modified image back to the motorcar.
Backup your current BIOS
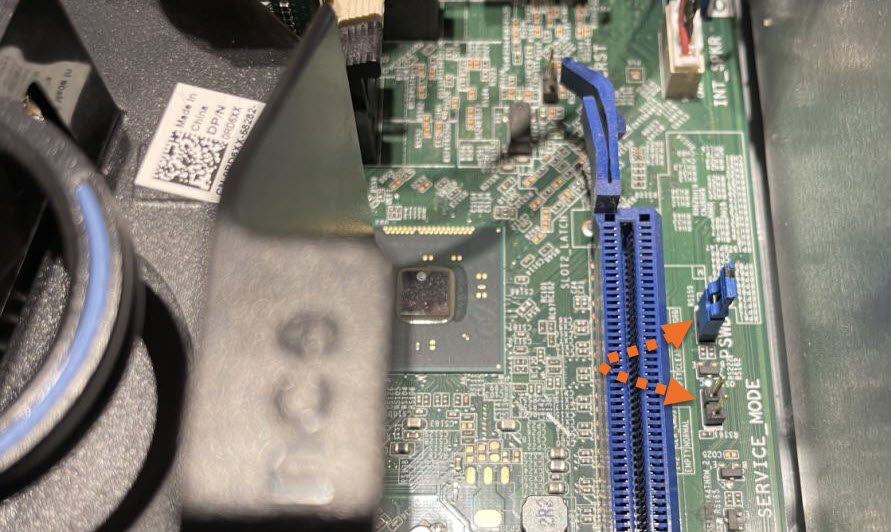
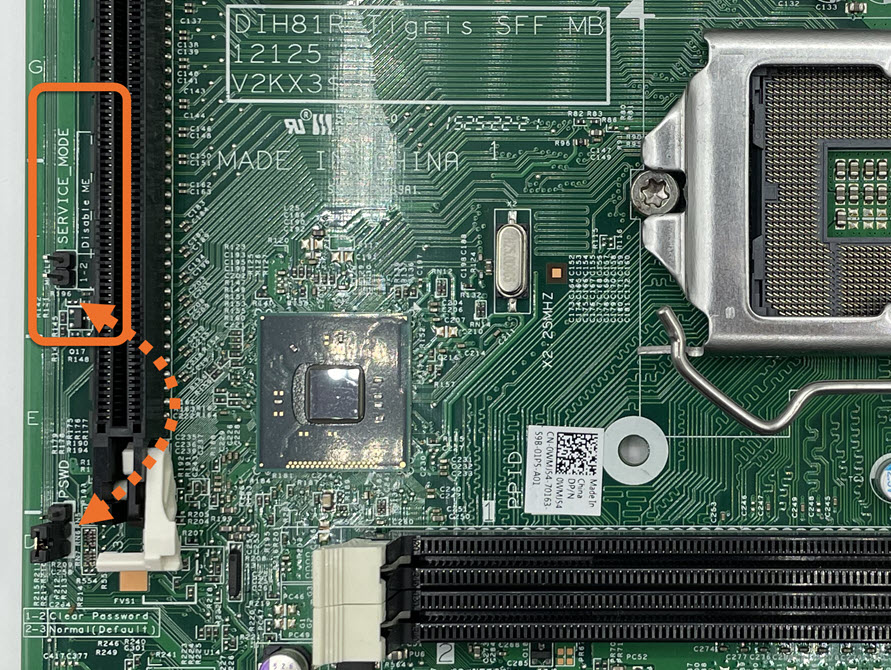
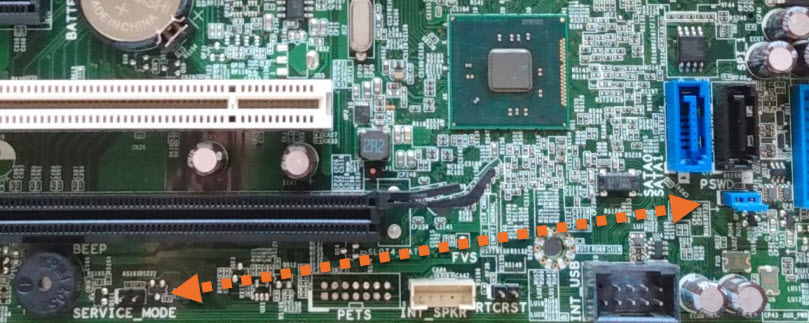
Parts of the BIOS are protected and cannot be read to or written from. In order to get a consummate backup the automobile must be put into service mode.
- Switch the machine off completely.
- Disconnect it from the mains Power.
- Motility the jumper from the ii pin PSWD connector, to the two Pivot SERVICE_MODE connector. It is located between the Power Supply and the PCI Slot closest to it:
Annotation: If you lot take a spare jumper you could exit the countersign jumper in place.
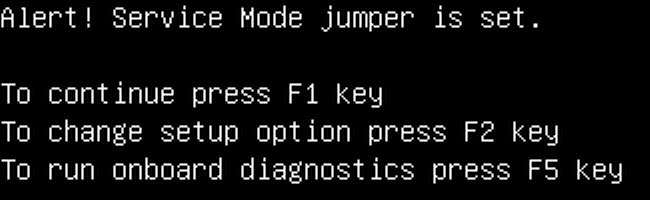
Once the machine is in service fashion, turn it back on, you volition receive some alert notifications:
First a alarm informing you that the password has been disabled. Don’t worry virtually this equally you will be putting the password jumper back where information technology should be soon. It will show this bulletin:
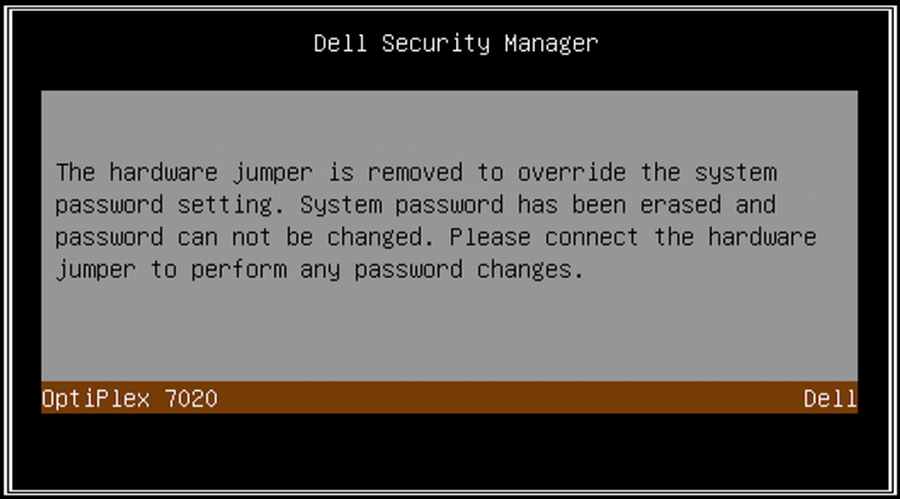
Adjacent, you will also receive a bulletin notifying you that service mode is enabled:
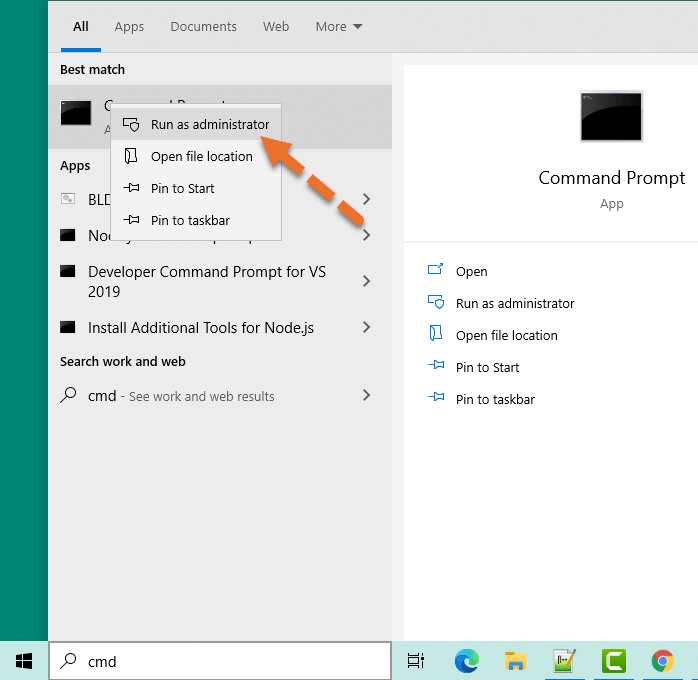
When your auto is booted upwards again yous can take a fill-in of your existing firmware. Open a command prompt as administrator:
Run the following commands:
cd "\Intel ME Organisation Tools v9.1 r7\Wink Programming Tool\WIN64" fptw64.exe -d backup.bin
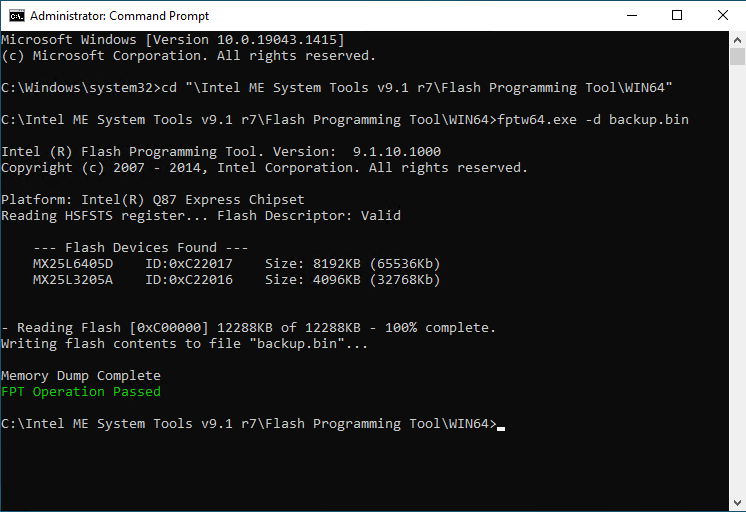
The case above is from an OptiPlex 7020, the output from the 3020 will wait slightly different as it only has a single flash device and volition give output such equally:
Platform: Intel(R) H81 Express Chipset Reading HSFSTS register... Flash Descriptor: Valid --- Flash Devices Constitute --- MX25L6405D ID:0xc22017 Size: 8192KB (65535Kb) - Reading Flash [0x800000] 8192KB of 8192KB - 100% complete. Writing flash contents to file "backup.bin"... Retention Dump Complete FPT Operation Passed
You volition now take a file named
backup.bin
which contains a full backup of your BIOS. Get out the command prompt open as nosotros are going to use information technology again to write the modified BIOS back.
Modify the BIOS Prototype
Download and open
UEFITool
0.28.0 to change your BIOS (Straight link to version I used).
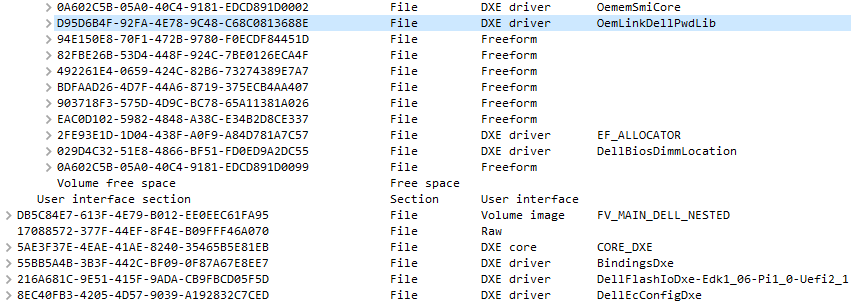
Open up the backup.bin from the previous step in UEFI Tool and aggrandize it like and so:
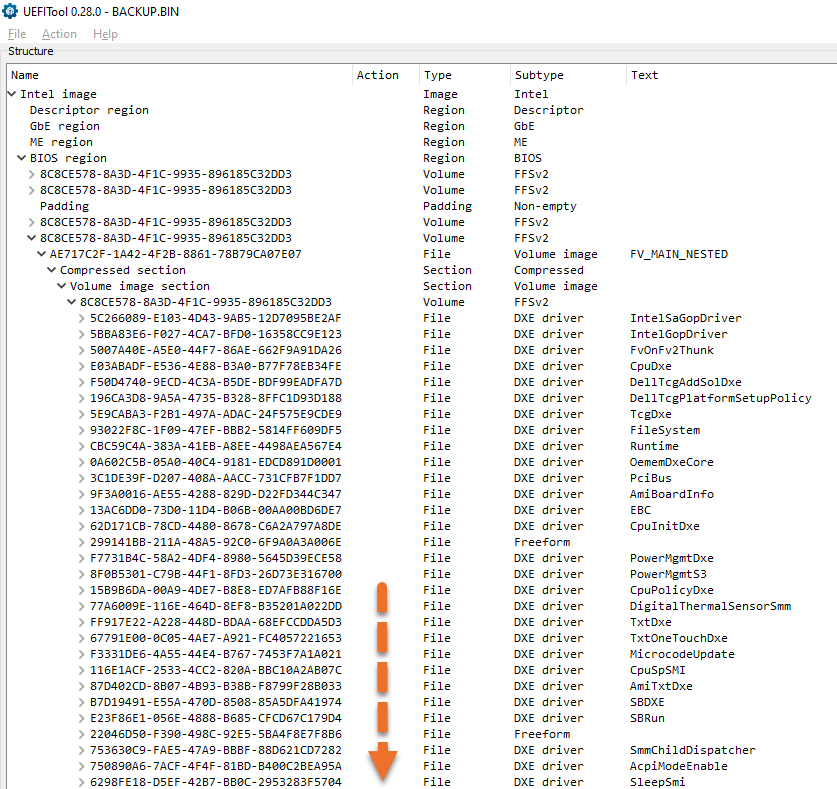
Ringlet to the bottom of this section and you should run across an surface area that looks like this:
Now, download this
NVMe Limited Commuter
and save it to your machine. Next, correct click on the last
DXE Driver
before the
Freeform
entries. Specifically these is IDs:
-
D95D6B4F-92FA-4E78-9C48-C68C0813688E
for the OptiPlex 7020 or 9020 -
6C58FC74-64DA-4D83-8BCD-9FD574C97316
for the OptiPlex 3020
Right click the detail and choose
Insert After:
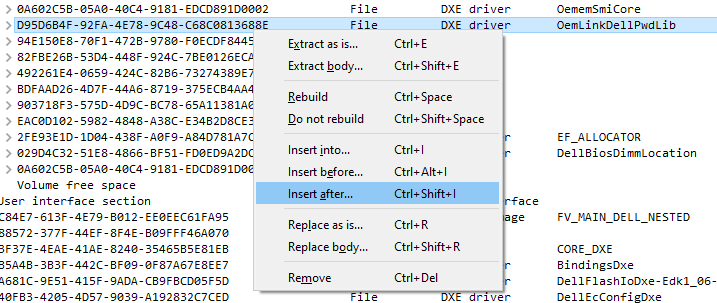
Choose the file
NvmExpressDxe_Small.ffs
that you just downloaded and you lot will see information technology appear right afterwards the item that you selected:

Now become to
File -> Save Image File
and save the file equally
nvme.bin.
Write the new BIOS to the machine
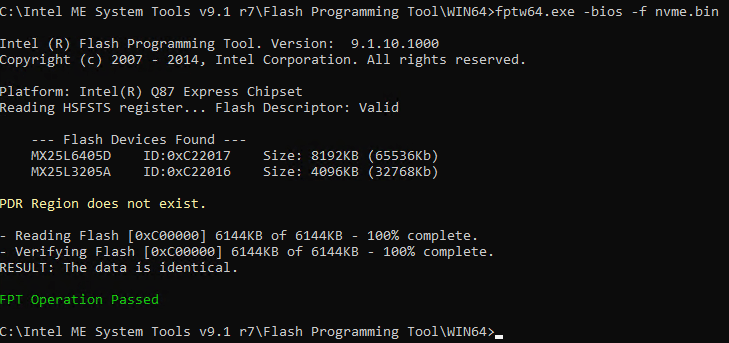
You lot are now ready to write the new file back to the motorcar. Go dorsum to the command prompt session. Type the following command:
fptw64.exe -bios -f nvme.bin
You lot should become output like this:
Shut down the automobile and accept the jumper off the service pins and motion it dorsum to the countersign reset pins if you took it from there.
Install the PCI NVMe SSD
If you accept not all the same installed your SSD into the motorcar, you can do it at present. For the 7020 use the blue PCI slot, information technology is approximately twice as fast as the smaller blackness ane.
For the 3020 you need to install information technology into the PCI Slot closest to the Power Supply.
Optimise BIOS Settings
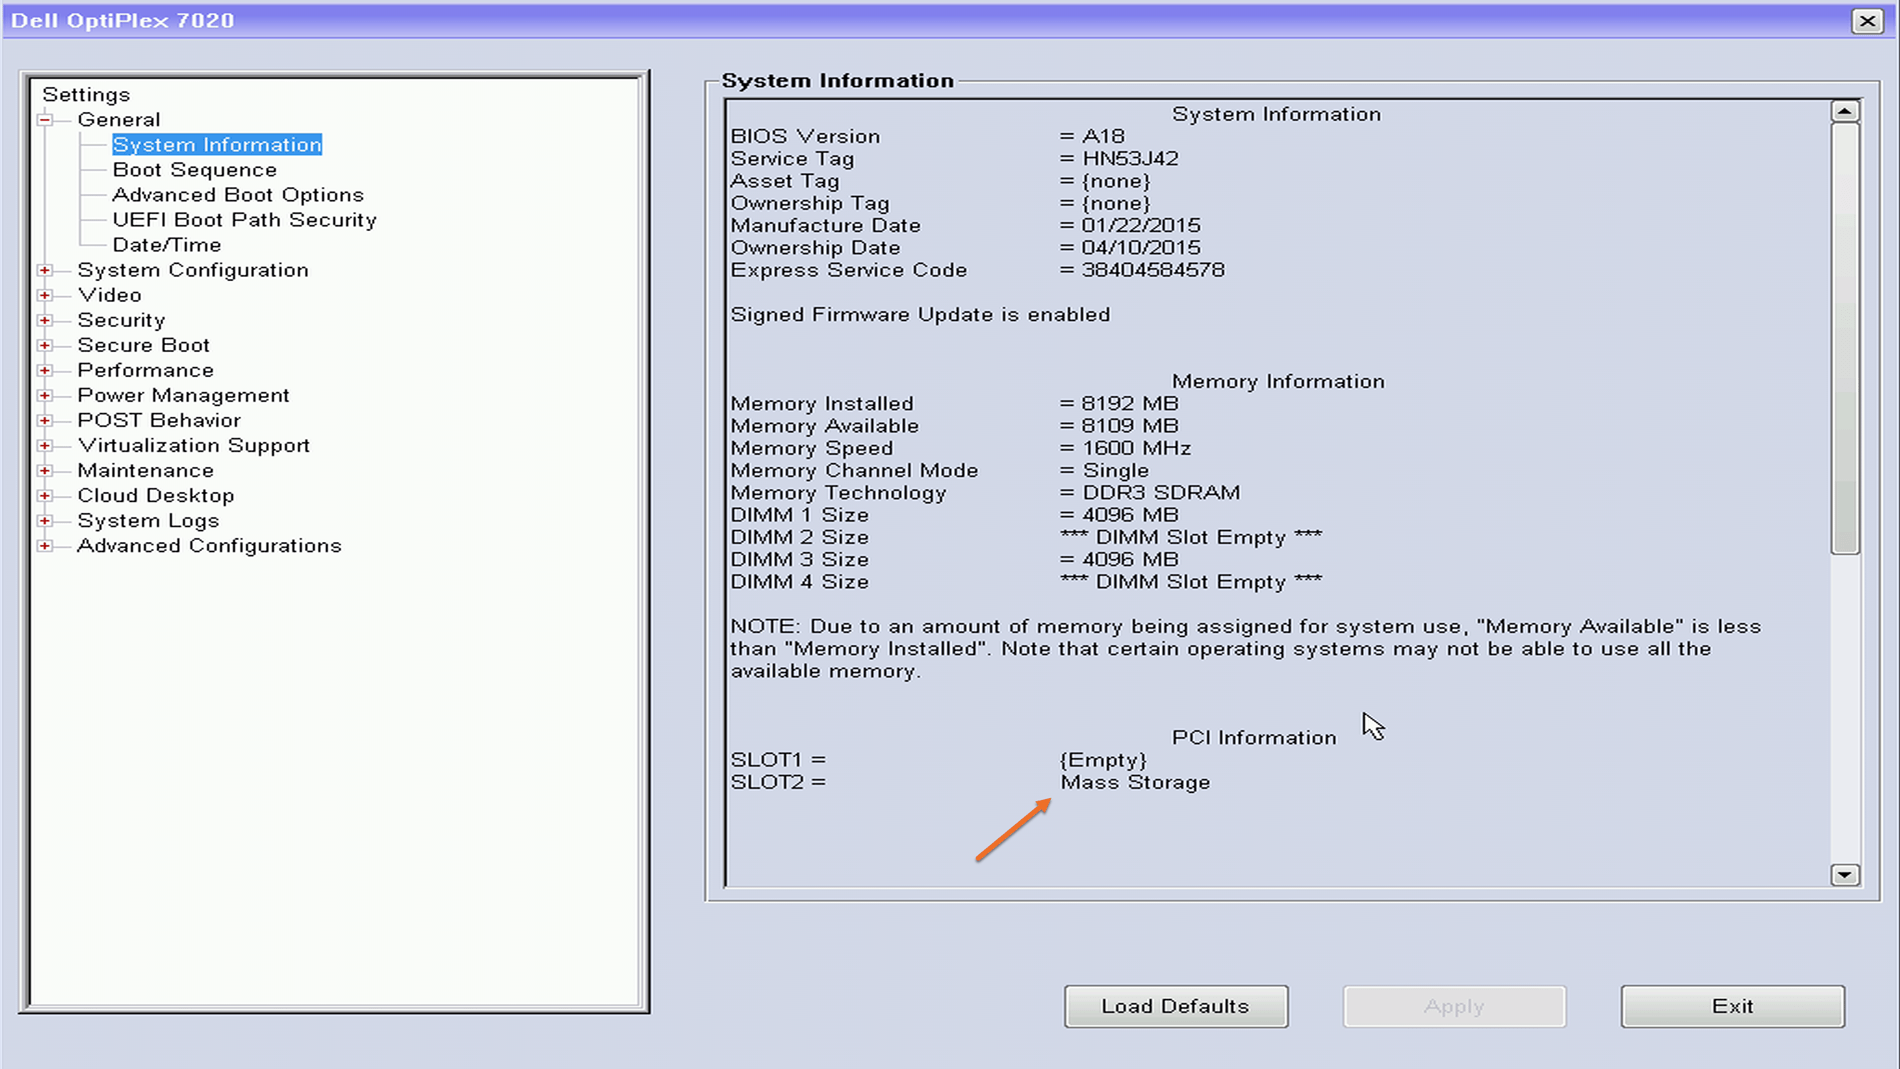
Now that you have written the new BIOS, restart the machine.
You should exist able to see the adapter in the BIOS:
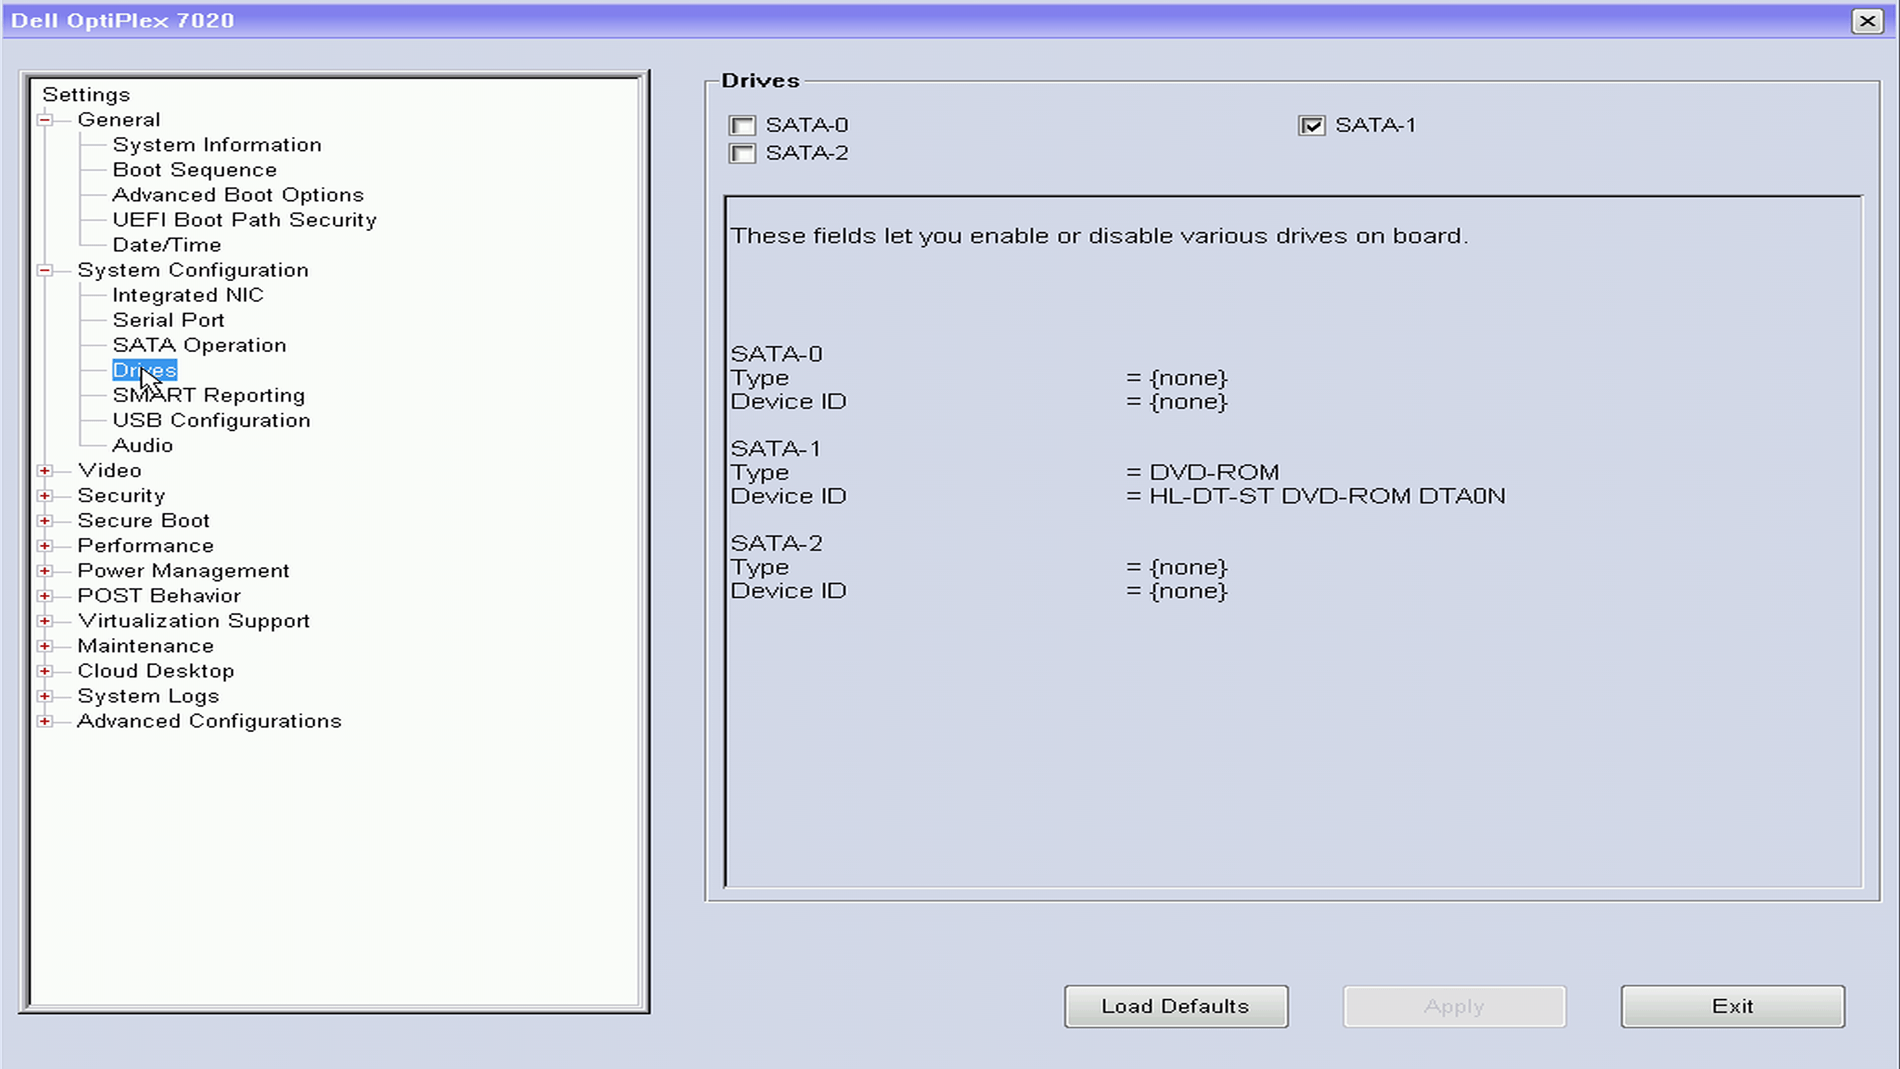
If you are not going to have whatsoever SATA drives connected you need to disable them in the BIOS, hither you can meet I accept disabled all of the ports that practice non have a bulldoze connected:
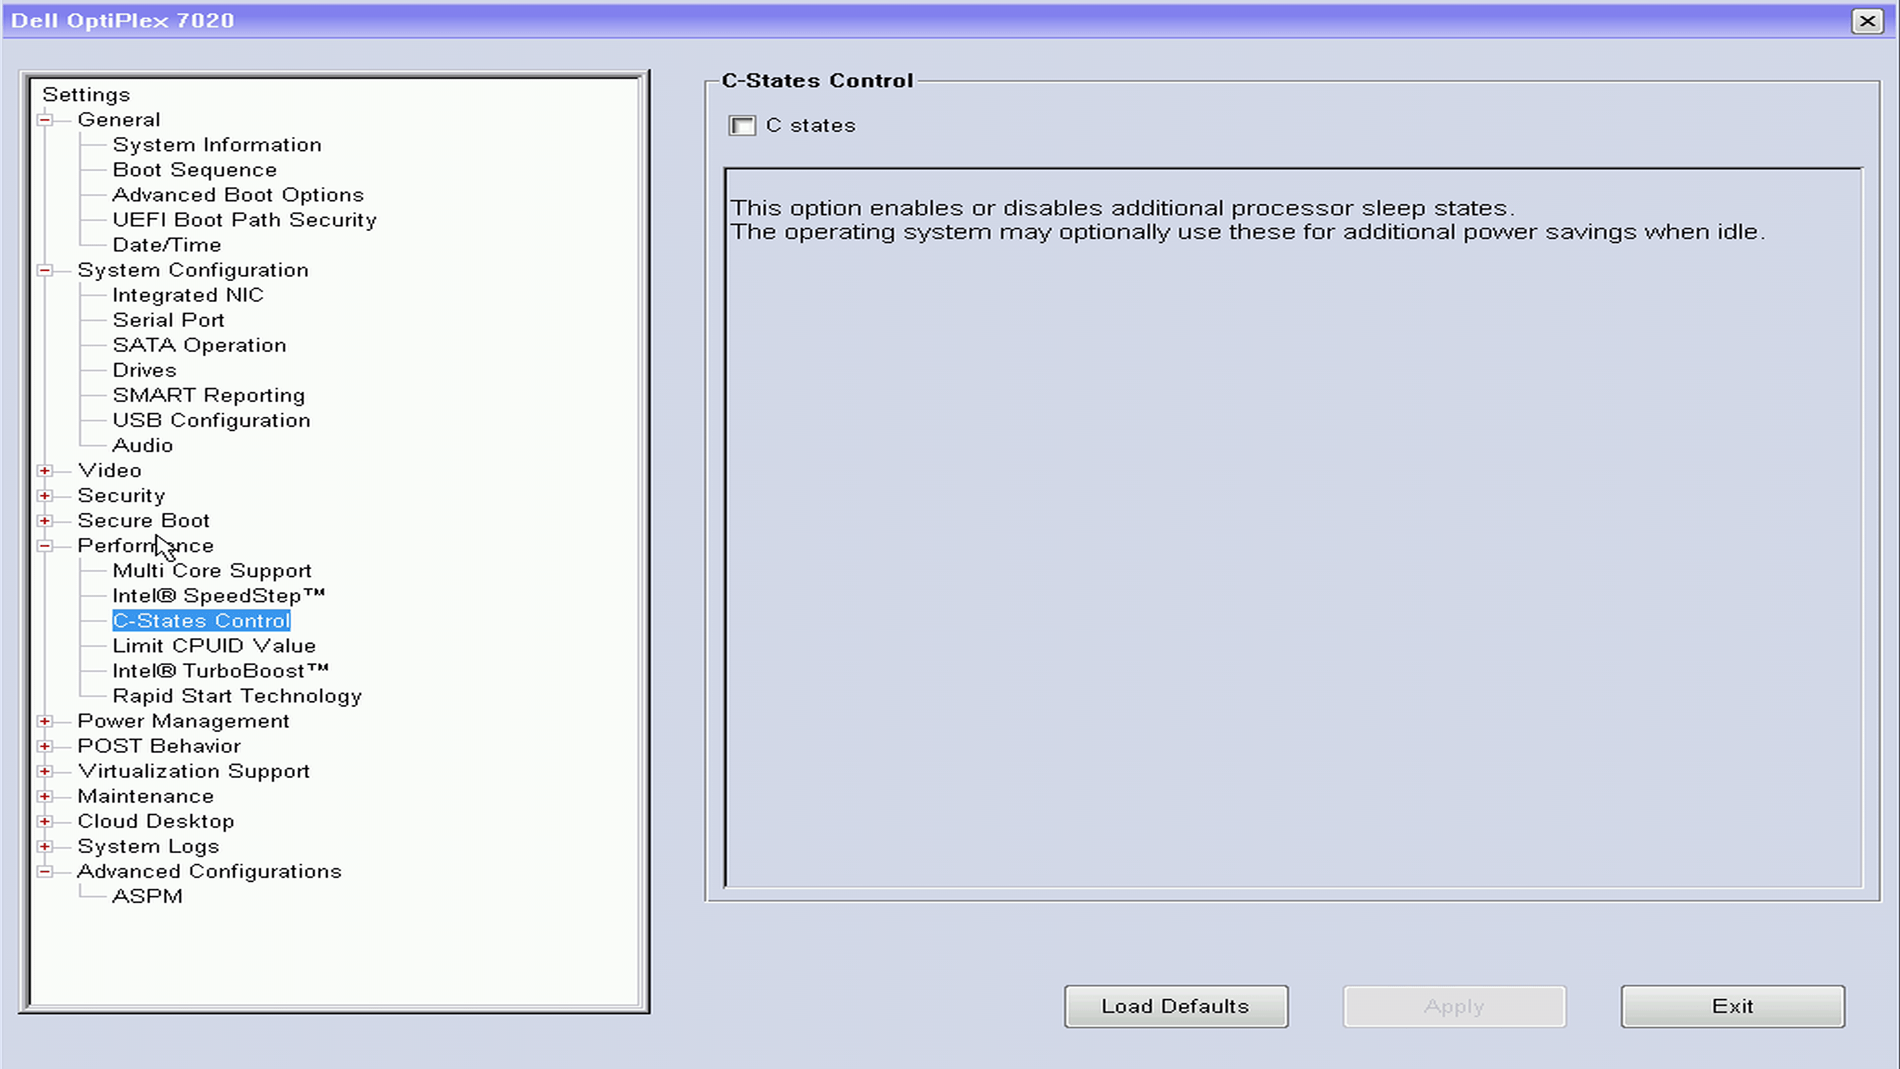
Finally, if you want the maximum possible speed from your new bulldoze, consider disabling C-States in the BIOS. This makes it marginally faster, simply I doubt y’all would notice much difference:
Conclusion
Upgrading a Dell Optiplex 9020, 7020 or 3020 with PCI NVMe Solid State drive is a brilliant upgrade, and completely transforms the machine. Especially if you are upgrading from a hard drive.
Again, here is the PCI adapter that I used:

- 512Gb Samsung 970 EVOPlus
-
NVMe to PCI Adapter
(The adapter comes with a heatsink likewise)
If yous try it, I would dearest to know how you got on and what your results were.
