

Cara Install Printer Hp Laserjet 1010 Di Windows 7
Z7_3054ICK0KGTE30AQO5O3KA30N0
hp-concentra-wrapper-portlet
![]()
Actions
Setting Upwardly the Printer Hardware for HP Deskjet 1010 and HP Deskjet Ink Advantage 1010 Printer Series
Introduction
This document explains how to set up your printer hardware.

Important: You must follow these steps in the order presented to set up your printer correctly. Do non connect the USB cablevision until instructed to do so.
Video of setting up the printer
The following video demonstrates how to gear up the physical parts of the printer.
notation:
This video shows the HP Deskjet 1010 printer, just the steps are the same for your printer.

Stride one: Unpack the printer
-
Remove the tape and packing material from the outside of the printer.
-
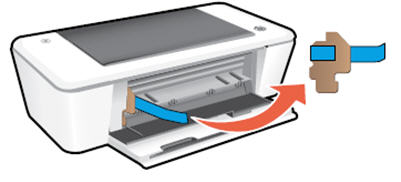
Open the output tray, and then open the cartridge admission door.
Figure
: Open the output tray and cartridge access door

-
Remove the tape and cardboard from inside the printer
Figure
: Remove the packing materials from within the printer
-
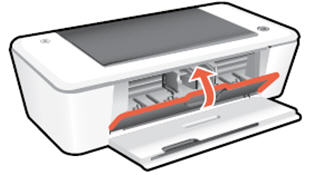
Close the cartridge access door.
Effigy
: Close the cartridge access door
Pace 2: Check the contents of the box
The contents might vary by land/region. Meet the packaging for a listing of items shipped in the box.
Footstep three: Connect the power cord and adapter
-
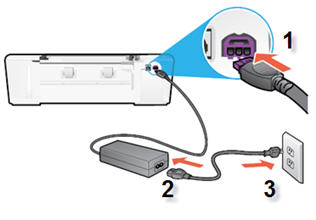
Connect the adapter cord to the rear of the printer.
-
Connect the power string to the ability adapter, and and so plug the power cord into an electrical outlet.
-
Connect the cord from the adapter to the rear of the printer
-
Connect the power cord to the adapter
-
Plug the power cord into the electrical outlet
Figure
: Connect the power string
-
Stride four: Plough on the ability
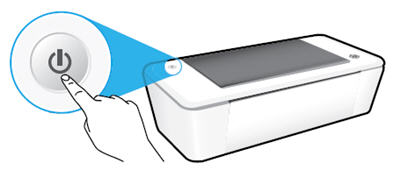
Press the Power button to plow on the printer.
Effigy
: Turn on the printer
Step five: Install the cartridges
-
Lower the output tray, and and then open the cartridge admission door. The carriage moves to the heart of the printer. Expect until the carriage is idle and silent before you proceed.
Figure
: Open the output tray and the cartridge access door

-
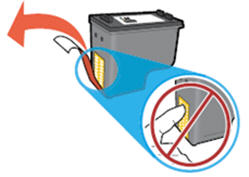
Remove the new cartridge from its package, and then carefully pull on the orange tab to remove the protective plastic tape.
caution:Practice non touch the copper-colored contacts or ink nozzles. As well, practice non re-tape the cartridges. Doing so tin can result in clogs, ink failure, and bad electric connections.
Figure
: Remove the protective record
-
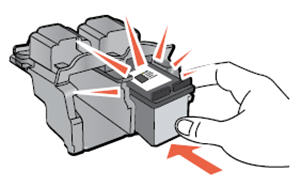
Concord the cartridge by its sides with the nozzles toward the printer, and then insert the cartridge into its slot. Make sure that the icon on the cartridge matches the icon on the slot.
-
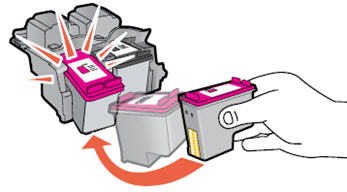
The tri-colour cartridge (
 ) goes in the slot on the left
 -
The black cartridge (
 ) goes in the slot on the right
Figure
: Insert the cartridge into its slot

-
-
Push the cartridge forward into its slot until it snaps into identify.
Effigy
: Push the cartridge forward
-
Echo these steps to install the other cartridge.
Figure
: Install the second cartridge
-
Close the cartridge access door.
Figure
: Shut the cartridge access door
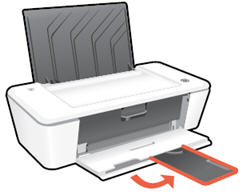
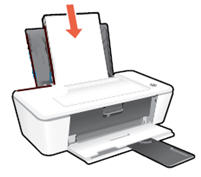
Step vi: Load plain newspaper
Follow these steps to load evidently paper into the printer.
-
Lift the paper tray.
Figure
: Elevator the newspaper tray

-
Lower the output tray, and then pull out the output tray extender.
Figure
: Pull out the tray extender
-
Slide the paper width guide to its outermost position.
-
Load make clean, white paper in the input tray with the short edge forward and the print side up.
Figure
: Load the paper
-
Slide the paper width guide to the correct until it stops at the edge of the paper but does not bend the paper.
Effigy
: Slide the paper width guide against the paper

Pace seven: Align the cartridges
After you install the cartridges, follow the steps for your operating system to align the cartridges. If you do non align the cartridges now, the printer prompts yous to do and then the next fourth dimension you endeavor to print.
Windows
-
Press the Ability button to turn on the printer, if it is not turned on already.
-
Open the HP printer software:
-
Windows XP
Click
Start
( ), click
All Programs, click
HP, click the folder for your HP printer, and then click the icon for your HP printer ( ).
).note:
You can also open the HP software past clicking the printer’due south desktop icon (
 ).
). -
Windows Vista
Click the Windows icon (
 ), click
Programs, click
HP, click the binder for your HP printer, and so click the icon for your HP printer ().
notation:
You can besides open the HP software by clicking the printer’s desktop icon (
). -
Windows 7
Click the Windows icon (
), click
All Programs, click
HP, click the folder for your HP printer, and so click the icon for your HP printer ().
note:
You lot can also open the HP software by clicking the printer’s desktop icon (
). -
Windows 8
On the
Offset
screen, click or tap the printer’s tile. The software opens.annotation:
You can likewise open the HP software by clicking or tapping the printer’due south icon on the desktop (
).
-
-
Click
Maintain Your Printer, and so click the
Device Services
tab. -
Click
Align Ink Cartridges. The printer aligns the cartridges and then prints an alignment page. -
Review the alignment folio, follow the on-screen instructions to complete the alignment, and then click
Done.
Mac OS Ten
-
Open up the HP folder.
-
From the Dock: Click the HP Utility icon (
 ), click
Devices, and then click your printer’s name. -
From Finder: In the Finder navigation bar, click
Become, and then click
Applications.
-
-
Under
Devices, select your printer, and so click the
Align
icon ( ).
). -
Click the
Marshal
push. The printer aligns the cartridges and so prints an alignment page. -
Review the alignment page, follow the on-screen instructions to consummate the alignment, and then click
Washed.
