

Cara Instal Printer Canon E410 Tanpa Cd
Install the Printer From the Setup CD-ROM
If the driver was not installed correctly, uninstall the printer driver, restart your estimator, then reinstall the commuter. If you reinstall the printer driver, perform Custom Install on the Setup CD-ROM, then select IJ Printer Driver.
Notation:
If the installer was forced to be terminated due to a Windows mistake, the system may exist in an unstable condition and you may not exist able to install the driver. Restart your calculator before reinstalling.

Attending:
Do non connect the USB cable nevertheless.
- To employ the printer by connecting it to a computer, software including the drivers needs to be copied (installed) to the figurer’southward hd. The installation process takes near 20 minutes. (The installation time varies depending on the computer environment or the number of application software to be installed.)
- Screens are based on Windows Vista Ultimate and Mac OS X v.ten.five.ten.
Important:
- Quit all running applications before installation.
- Log on as the administrator (or a member of the Administrators group).
- Exercise non switch users during the installation process.
- Cyberspace connectedness may exist required during the installation. Connection fees may use. Consult the isp.
- It may be necessary to restart your computer during the installation process. Follow the on-screen instructions and do not remove the Setup CD-ROM during restarting. The installation resumes one time your calculator has restarted.
- Mac OS 9, Mac Os X Classic environments, or Mac Bone X v.x.iv.10 or before are not supported.
Click hither for Windows instructions
Click here for Mac Os X instructions
- If yous connect the printer via USB cablevision before installing the software:
For Windows 7:
(ane) Remove the USB cable connected to your computer.
(2) Continue to 1 beneath.
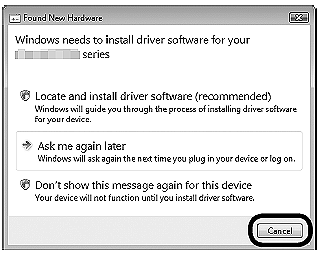
For Windows Vista/Windows XP/Windows 2000:
The higher up dialog box may appear.
(1) Remove the USB cable continued to your computer.
If the dialog box closes, continue to i below.
(2) Click Cancel.
(3) Proceed to 1 below.
- Easy-WebPrint EX: If you are using Internet Explorer 7 or later, yous can utilize the Web impress software Easy-WebPrint EX. An cyberspace connectedness is required for installation.
one. Printing the ON button (A) to Turn OFF THE PRINTER.
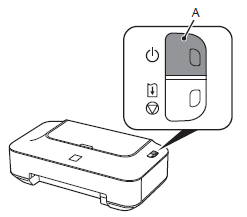
Operating noise may go along for up to 25 seconds until the printer turns off.
Of import: Do NOT connect the USB cablevision to the computer and the printer nonetheless. If you take already continued the cable, disconnect information technology now.
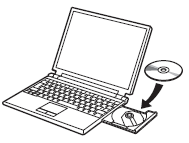
two. Turn on the computer, then insert the Setup CD-ROM into the CD-ROM drive.
The setup programme starts automatically.
Note:
If the program does not first automatically, double-click the CD-ROM icon in Computer or My Calculator. When the CD-ROM contents appear, double-click MSETUP4.EXE.
iii. Windows 7/Windows Vista (Windows XP/Windows 2000 go to iv. below ):
Click Run Msetup4.exe on the AutoPlay screen, so click Keep or Yes on the User Business relationship Command dialog box.

If the User Business relationship Control dialog box reappears in following steps, click Proceed or Yes.
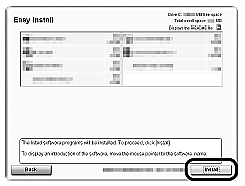
iv. Click Like shooting fish in a barrel Install.
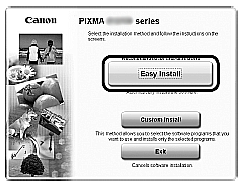
The drivers, application software, and on-screen manuals are installed all together.
Reference:
If you only desire to select specific items to install, click Custom Install.
For Windows 7/Windows Vista SP1 or later
- Y’all can install the XPS Printer Driver from Custom Install. When installing the XPS Printer Driver, select the IJ Printer Driver at the aforementioned time.
five. Click Install.
Follow any on-screen instructions to proceed with the software installation.
Of import:
To install Easy-WebPrint EX, you lot demand to connect your reckoner to the Internet at this stage. (Net Explorer 7 or later is required.) If an Internet connection is not available, it is also possible to install this software later.
Important Information for the Installation
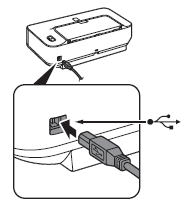
- USB Port
When the Printer Connection screen appears, connect the printer to the estimator with a USB cablevision. The USB Port is located on the right side at the dorsum of the printer.
- Necessary Information for the User Registration
The product serial number is required when registering the product. The serial number is located inside the printer (every bit shown in the illustration).

Important:
If the power is on, the FINE Cartridge Holder volition move when the Front Cover (B) is opened.
- If the Extended Survey Program screen appears

If you tin can agree to Extended Survey Plan, click Agree.
If you lot click Exercise not agree, the Extended Survey Plan will not exist installed. (This has no effect on the printer’south functionality.)
half-dozen. Click Exit to consummate the installation.
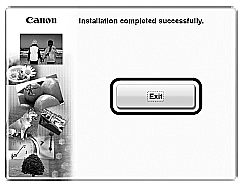
If Restart is displayed, follow the didactics to restart the computer.
vii. Solution Menu starts automatically.
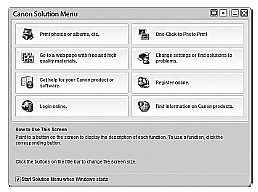
Reference:
- Remove the Setup CD-ROM and continue it in a rubber place.
- The buttons displayed on Solution Carte may vary depending on the land or region of buy.
1. Press the ON button (A) to TURN OFF THE PRINTER.
Operating noise may continue for up to 25 seconds until the printer turns off.
Of import:
Do Non connect the USB cable to the computer and the printer yet. If you have already connected the cable, disconnect it at present.
2. Turn on the computer, then insert the Setup CD-ROM into the CD-ROM drive.
3.
 Double-click the Setup icon of the CD-ROM folder to proceed to the post-obit screen. Enter your ambassador proper name and password, then click OK.

 If the CD-ROM folder does not open automatically, double-click the CD-ROM icon on the desktop.
 If yous practise not know your administrator name or password, click the assistance button, then follow the on-screen instructions.
4. Click Piece of cake Install.
The drivers, awarding software, and on-screen manuals are installed all together.
Reference:
If you desire to select particular items to install, click Custom Install.
5. Click Install.
Follow any on-screen instructions to proceed with the software installation.
Important Information for the Installation
- USB Port
When the Printer Connection screen appears, connect the printer to the computer with a USB cable.
The USB Port is located on the correct side at the back of the printer.
- Necessary Information for the User Registration
The production serial number is required when registering the product. The serial number is located within the printer (as shown in the illustration).
Important:
If the ability is on, the FINE Cartridge Holder will move when the Forepart Embrace (B) is opened.
- If the Extended Survey Program screen appears
If you hold to Extended Survey Program, click Agree.
If you click Do not hold, the Extended Survey Program will not be installed. (This has no event on the printer’s functionality.)
6. Click Exit to complete the installation.
If Restart is displayed, follow the instruction to restart the reckoner.
7.
 Click the icon on the Dock to kickoff Solution Menu.

Reference:
- Remove the Setup CD-ROM and go along it in a safe place.
- The buttons displayed on Solution Menu may vary depending on the state or region of buy.
