Can’t Find Uefi Firmware Settings Windows 10
The UEFI BIOS is a special software plan that connects your computer’s firmware to its operating system (Os). It’s the outset plan that runs when yous turn on your PC. Information technology checks to see what hardware components your PC has, wakes the components up, and hands them over to the Os.
When opening the UEFI BIOS carte, you might find that you’re unable to access the UEFI Firmware Settings. This could hinder y’all from fixing several system issues. If these settings are missing from your PC, we’ll prove you how you can bring them back.
Why Are the UEFI Firmware Settings Missing?
Depending on your PC’s manufacturer, you tin
access the UEFI BIOS settings
in various ways. If you lot can’t detect the UEFI Firmware Settings in the BIOS carte, so here are some common reasons for this result:
- Your PC’s motherboard doesn’t support UEFI.
- The Fast Startup role is disabling access to the UEFI Firmware Settings card.
- Windows 10 was installed in Legacy Mode.
Here are some solutions yous can try.
one. Verify That Your PC Is Equipped With UEFI
Before attempting whatever other potential gear up, you need to verify that your PC’s motherboard is equipped to support UEFI. If your PC is an older model, the chances are that the UEFI Firmware Settings are unavailable.
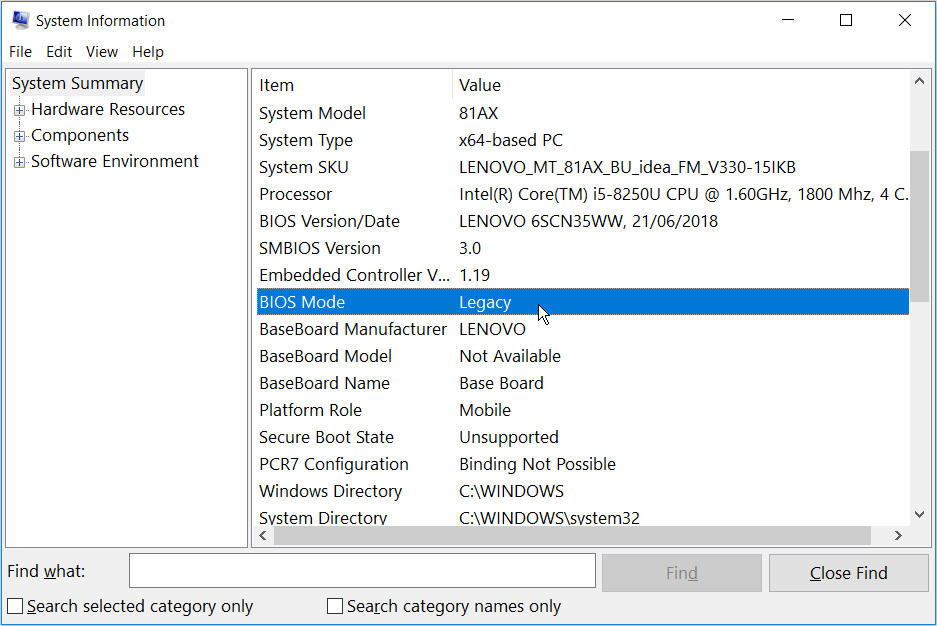
Hither’due south how you can check your PC’s BIOS Mode:
-
Press the
Windows Key + R
to open the Run control dialog box. -
Blazon
msinfo32
and printing
Enter
to open the Organization Information screen. -
Select
System Summary
on the left-hand side pane. -
Curlicue down on the right-hand side pane and look for the
BIOS Mode
choice. Its value should either be
UEFI
or
Legacy. If information technology’s
Legacy, then your PC tin’t access the UEFI Firmware Settings.
2. Featherbed the Fast Startup Function
The Fast Startup part allows you to boot up your PC quickly. When enabled, the feature could cut off the filibuster in loading some UEFI BIOS menu options. For this reason, it could prevent you from accessing the UEFI Firmware Settings. Bypassing this part could help resolve your issue.
-
To get started, open the
Windows First Carte du jour
and select the
Power
icon. -
Concur the
Shift
fundamental and then selectClose down
from the power options. This will featherbed Windows 10 fast startup and shut down your PC completely. - Ability on your computer again and get-go pressing the defended BIOS Setup key.
If this resolves your outcome, you can
disable the Fast Startup feature
to make the UEFI Firmware Settings attainable at all times. But, bear in mind that this volition mean slightly longer boot-up times.
three. Create a Boot-to-UEFI Firmware Settings Desktop Shortcut
Another way to resolve this upshot is to create a Desktop shortcut that forces your PC to boot directly into the UEFI Firmware Settings carte.
Hither’s how you can do this:
-
Right-click on a blank space on your Desktop, select
New, and and then select
Shortcut. -
On the next screen, type
shutdown /r /fw
and click the
Next
push button. -
Option a suitable proper noun for the shortcut and and so click
End. -
Correct-click the shortcut, select the
Backdrop
option, and and then select the
Advanced
button. -
On the next screen, bank check the
Run every bit administrator
box and hitOK. -
SelectUtilise >OK
to apply these changes. - To use the shortcut, double-click on information technology. Your PC should restart directly into the UEFI Firmware Settings bill of fare.
4. Change the BIOS From Legacy to UEFI past Converting MBR Disk to GPT Disk
Depending on your PC’s age and specifications, it either uses a
Master Boot Record (MBR) or a GUID Sectionalisation Table (GPT) disk. Even if your motherboard is equipped with UEFI capabilities, UEFI Firmware Settings won’t be accessible if your drive is equipped with the MBR disk. In this case, you lot’ll need to switch the BIOS from Legacy to UEFI by
converting the MBR disk to a GPT deejay.
Considering that yous are converting a system disk, it’s best to
create a system paradigm
to back upwards your system. We
strongly suggest
taking a arrangement backup every bit there is the potential for data loss during this procedure.
If y’all already know that your partition is the MBR-type and your system is capable of booting from UEFI, you’re ready. You tin go ahead with converting your drive to GPT format.
Otherwise, here’s how y’all can bank check whether your PC is equipped with the MBR or GPT disk.
-
Press the
Windows cardinal + R
to open the Run control dialog box. -
Type
diskmgmt.msc
and click
Enter
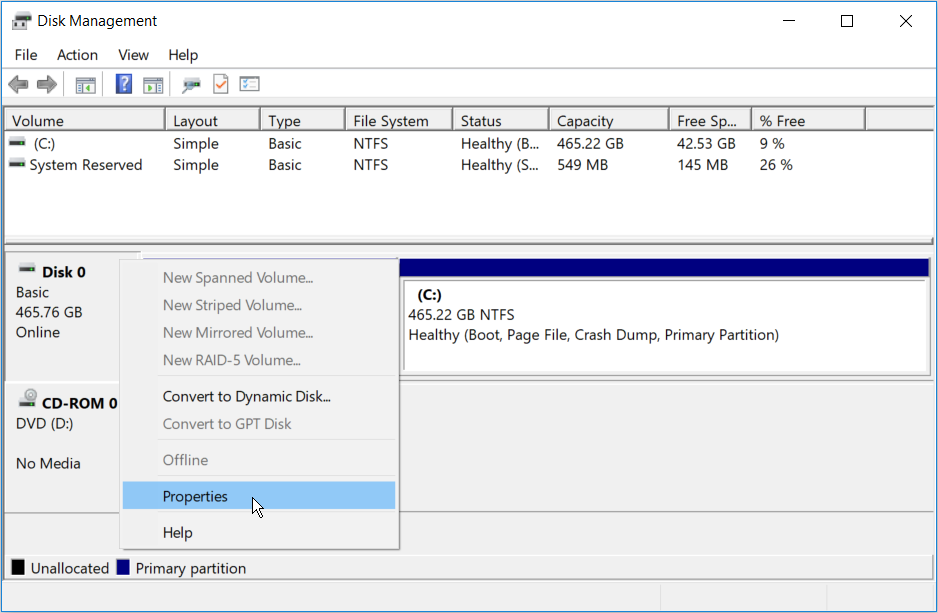
to open the Disk Management window. -
Right-click on
Disk 0
(or the disk that contains the Windows installation) and select
Properties.
In the
Properties
screen, click the
Volumes
tab. Expect for the
Partition manner selection nether
Deejay Information.
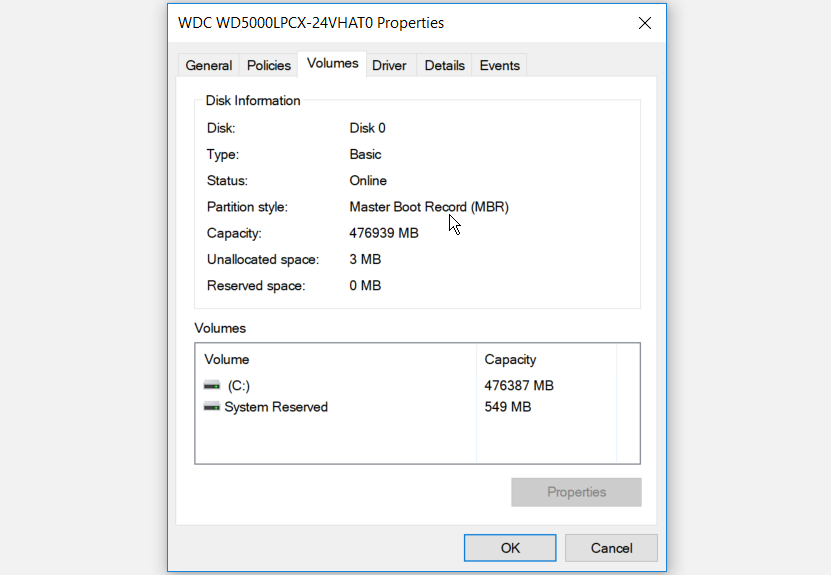
If the partition style is
GUID Partition Tabular array (GPT), and then there’s no demand to continue with the conversion.
5. Clear the CMOS Settings to Restore Default BIOS Settings
Equally a last resort, you lot tin can reset the CMOS settings from your PC’s motherboard. This will help restore your computer to its default BIOS settings.
Here’s how you lot can become started with this.
- Turn off your computer and unplug it from the power source.
- Remove the bottom comprehend of your PC. From here, look for the CMOS battery and jumpers on the motherboard.
- To easily locate the CMOS jumpers, look for a “CLR CMOS” reading on the motherboard.
- Usually, y’all’ll find three pins where the CMOS jumpers are located. The jumpers will be located on only two of those pins. If they’re on the beginning and 2nd pins, shift them to the second and third pins. If your motherboard only has two pins, the jumpers will likely be plugged into i pin. In this case, plug them on both pins.
- Next, remove the CMOS bombardment from its slot. Wait for most 15 seconds, then put information technology back on.
- Move the CMOS jumpers dorsum to their original pins.
- Put the computer cover dorsum on, plug in your reckoner, and power it on.
On more advanced motherboards, you’ll find a designated button for resetting the CMOS settings. This will be labeled “CMOS,” “CMOS_SW,” or something like. You tin reset the CMOS settings by pressing this push button and holding information technology downwards for a few seconds.
If you struggle to detect whatever hardware components on your PC, check your motherboard manual for assistance. Alternatively, you can
check your motherboard blazon
and find out more most it online.
Missing UEFI Firmware Settings? Not Anymore
At present y’all know how to fix the missing UEFI Firmware Settings in Windows x. You’ll find these settings handy when it comes to troubleshooting various Windows 10 system problems. If your motherboard doesn’t support these settings, and then it’southward time to consider an upgrade.
Nigh The Author