

Add Tcp Ip Printer in Server 2008
For Network Connectedness (Web Service Print)
In Windows Vista/Server 2008/seven/Server 2008 R2, printers supporting the Web service impress function on the network can be located and installed.

-
To install a different printer driver in the estimator where one has already been installed, you must uninstall the whole package of the currently installed printer driver. For details, refer to
Windows.
Settings of this machine
To apply the Web service impress, you must configure the network settings for the car in advance.
|
Items to be configured |
Description |
|---|---|
|
IP Address |
In |
|
Web Service Setting |
In |
-
For details on the network settings for this motorcar, refer to
NIC Setting: Setting the Machine Network Information.
Making the printer commuter known from the Network window
To use Web service print in Windows Vista/Server 2008/7/Server 2008 R2, install the printer driver earlier making information technology known to the computer with plug and play.
-
Installing the commuter requires the administrator privilege.
-
Install the printer driver for this car.
-
Install the printer driver using the installer or Add Printer Magician.
The printer driver can exist installed in any port.
For details, refer to
Installing the PS Plug-in Driver
or
For Network Connection (LPR/Port 9100/SMB).
-
-
Plough on the power of this machine while it is connected to the network.
Since the printer is searched for, be sure to connect this automobile to the network. -
To use the Web service print, check that
[Network discovery] is enabled in
[Network and Sharing Middle] –
[Modify advanced sharing settings]
on the reckoner. -
Open the
[Network]
window.-
In Windows Vista/Server 2008, click
[Start], and
[Network].
-
In Windows seven, open up
[Computer]
and click
[Network].
If
[Network]
is not displayed in
[Computer], click the
[Network and Cyberspace]
category on the
[control console], and also click
[View network computers and devices].
Connected computers and devices are detected.
-
-
Right click the device name and select
[Install].-
To cheque the device name, select
[Network Setting]
–
[Controller NIC Setting]
–
[Web Service Setting]
–
[Print Setting]
in
[Administrator Settings]
of this machine. In the default setting, the last 6 characters of
[printer name]
correspond to the low-lodge three bytes of the MAC accost.
To check the MAC address, select
[Configuration Folio]. For details about how to print
[Configuration Page], refer to
Study Type: Outputting a Report.
The printer driver for this machine is detected and this machine is ready to print.
-
-
Subsequently finishing the installation, brand sure that the icon for the installed printer is displayed in the
[Devices and Printers]
or
[Printers]
window.

-
If the printer driver is not correctly installed, the commuter must be updated using
[Update Commuter]. For details, refer to
For local (USB) connection. -
In Windows Vista/Server 2008, you lot tin go on the task and specify the printer driver installation disk to install the printer commuter if information technology is not installed in advance. When the
[Found New Hardware]
window is displayed, follow the displayed messages to perform the procedure. For details, refer to procedures 11 to 20 in “Installing the printer driver by specifying the IP address using the Add Printer Wizard.” -
In Windows vii/Server 2008 R2, yous cannot specify the installation disk after the machine is connected to the computer. Install the printer commuter in advance (Step 1).
Installing the printer driver by specifying the IP accost using the Add together Printer Wizard
In Windows Vista/Server 2008, you can add a Web service device using the addition part of the printer after connecting this auto.
-
In Windows vii/Server 2008 R2, y’all cannot install the printer driver by the following procedures.
-
Installing the driver requires the administrator privilege.
-
Turn on the power of this machine while information technology is connected to the network.
Since the printer is searched for during the installation, be sure to connect this motorcar to the network. -
To utilize the Web service print, check that
[Network discovery]
is enabled in
[Network and Sharing Middle]
on the computer. -
Insert the Driver CD-ROM into the CD-ROM drive.
-
Click
[Commencement], and and then select
[Command Panel].-
In Windows Vista/Server 2008, click
[Printers]
under
[Control Panel]
–
[Hardware and Sound]. When
[Control Panel]
is displayed in Archetype View, double-click
[Printers].
-
-
Click
[Printers]
under
[Hardware and Audio].-
When
[Control Panel]
is displayed in Classic View, double-click
[Printers].
-
-
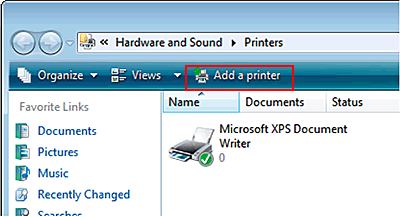
Click
[Add a printer]
on the toolbar.-
In Windows Vista:
-
In Windows Server 2008:

[Add together Printer Wizard]
appears. -
-
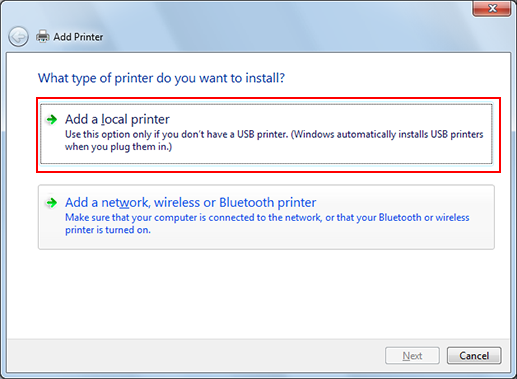
Click
[Add a local printer].
-
Click
[Create a new port:], and so select the port type.-
Select
[Standard TCP/IP Port].
-
-
Click
[Next]. -
Select
[Spider web Services Device], enter the IP address, and click
[Adjacent].
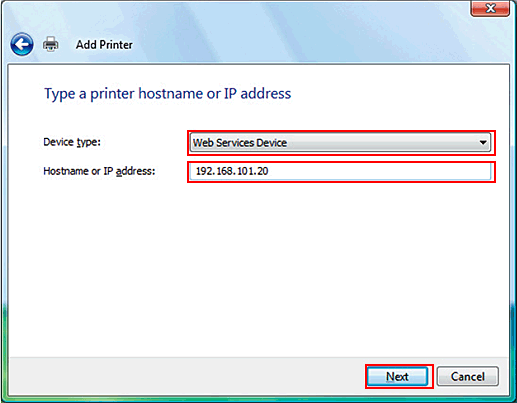
A printer of the entered IP address that is uniform with the Web service print part is located, and so the
[Constitute New Hardware]
dialog box is displayed. -
Click
[Locate and install commuter software (recommended)]. -
If a dialog box to confirm whether to search online is displayed, click
[Don’t search online]. -
Click
[Browse my figurer for commuter software (advanced)]. -
Click
[Scan]. -
Select a desired printer driver in the CD-ROM, and then click
[Open].-
Select a folder according to the printer driver, operating arrangement, and language to be used. The available printer drivers are the PS Plug-in driver and PPD commuter.
-
-
Click
[Next]. -
Follow the instructions on the windows that follow.
-
If the
[User Account Control]
window appears, click
[Keep].
-
If the
[Windows Security]
window for verifying the publisher appears, click
[Install this driver software anyway].
-
-
Click
[Shut] -
Afterwards finishing the installation, make sure that the icon for the installed printer is displayed in the
[Printers]
window. -
Remove the CD-ROM from the CD-ROM drive.
This completes the printer commuter installation.
