

Adb Driver Windows 8.1 X64 Download
Google USB Drivers
are required to connect Google Pixel or Nexus devices to Windows PC using a USB cablevision. You will need these drivers to transfer files or sync information on your Pixel/Nexus device, and particularly when working with the Android ADB and Fastboot tools.
You can download the latest Google USB Drivers from here and follow the instructions on how to manually install them on your Windows PC. Furthermore, we accept as well provided instructions on how to modify the ‘android_winusb.inf‘ file included in the drivers to support other Android devices.
Commonly, the said USB drivers come bundled with SDK Manager in the
Android Studio IDE, which IS constantly updated with the latest available drivers. But if y’all’re an average Android user, chances are that you might not have the IDE fix on your PC. That’s because it is used mostly by experienced developers and enthusiasts. In that case, you can use the standalone USB drivers, which equally provided direct by Google for users who might face up issues of Windows not recognizing their phone over a USB connection.
Google USB drivers as well act as ‘Android ADB and Fastboot Drivers‘. And so you tin can install them on your PC to use ADB (Android Debug Bridge) for debugging apps and ROMs, or
use Fastboot to unlock the bootloader
or
wink manufacturing plant images on your Pixel/Nexus device.
To sum upwardly, the drivers are useful in various situations. With that in listen, go alee to download the latest version of the USB Drivers from below and follow the instructions on how to install them on your Windows PC.
Table of Contents
Download Google USB Drivers
At present, there are 2 different ways/methods to download the USB driver on Windows. You can either download the Google USB Commuter Zip file manually. Or, you tin utilise the SDK Director in the Android Studio to download it.
The latter gives an added benefit, that is the SDK Manager will automatically notify y’all when a newer version is bachelor. The former method, on the opposite, will crave y’all to manually bank check if a newer driver version is available and download information technology again.
In our personal experience, downloading the ZIP packet directly is easier than using the Android Studio. But the choice is solely up to you. Nosotros accept covered both the methods below.
Note:
If you’re using macOS or Linux, you would non need these drivers.
Directly Download
Just click on the link below to download the Google USB Driver Nada file to your PC.
- Latest version:
usb_driver_r13-windows.nil - Previous versions:
Once downloaded, extract the ZIP file to a suitable location on your calculator. The extracted ‘usb_drivers’ folder should comprise the required ‘android_winusb.inf’ commuter file.
Download via Android Studio
Commencement of all, make sure that you lot have downloaded and installed the
latest version of Android Studio
on your Windows PC. Once yous accept it installed, follow the instructions beneath:
Android Studio will now download the Google USB drivers to ‘
android_sdk\extras\google\usb_driver\
‘ on your PC. Here ‘android_sdk’ is the folder where the Android SDK is installed on your PC.
How to Install Google USB Drivers
The Google USB Drivers come in the form of an ‘android_winusb.inf’ setup data file, rather than a Windows executable. So, you will need to manually install information technology on your Windows PC. The aforementioned steps can also be used to upgrade the existing drivers installed on your PC to the latest version available.
Now follow the installation guide below co-ordinate to the Windows OS version yous’re using. It’s quite like shooting fish in a barrel and wouldn’t take more than a infinitesimal to install them.
On Windows 10
To install Google Android USB Drivers on Windows 10, follow the instructions below.
- Beginning, connect your Android device to the PC’due south USB port.
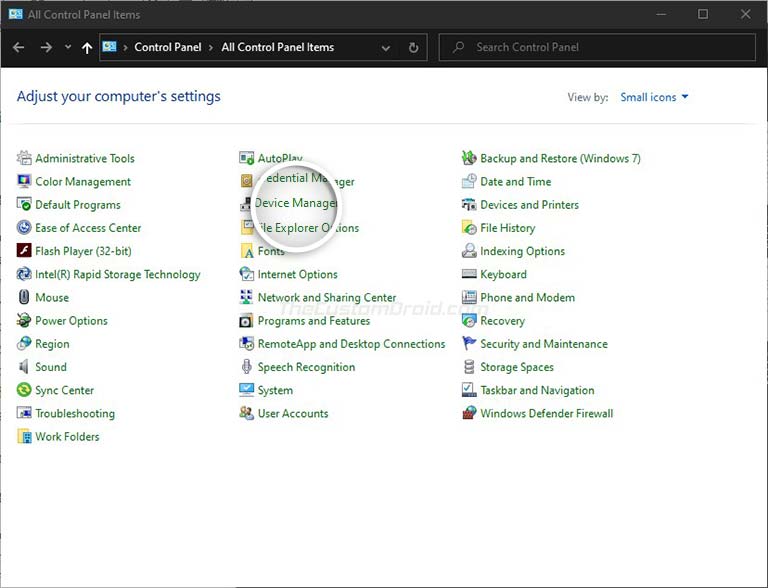
- Get to the ‘Control Panel‘ and click on ‘Device Manager‘.
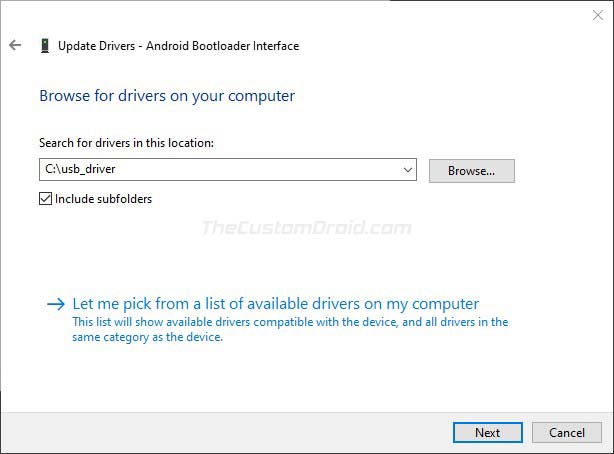
- Click on ‘Scan my estimator for driver software‘ in the Hardware Update wizard.
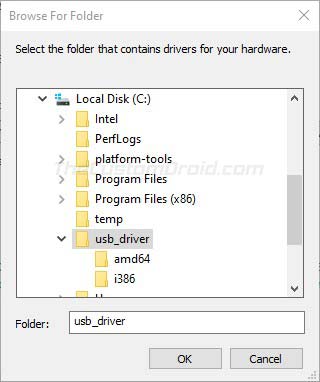
- Click ‘Browse‘ and select the ‘usb_driver‘ folder.
- For example: If y’all downloaded the drivers using Android Studio, the folder should be located in ‘android_sdk\extras\google\’ on the PC. Or, if you downloaded the Aught file, then just locate the extracted ‘usb_driver’ folder.
- For example: If y’all downloaded the drivers using Android Studio, the folder should be located in ‘android_sdk\extras\google\’ on the PC. Or, if you downloaded the Aught file, then just locate the extracted ‘usb_driver’ folder.
- Finally, click ‘Next‘ to install the drivers.
On Windows 7 and Windows 8/8.1
To install Google Android USB drivers on Windows seven, Windows 8, and Windows 8.ane PC, follow the instructions below.
- First, connect your Android device to the Windows PC’due south USB port.
- Then right-click on ‘Computer‘ and select ‘Manage‘.
- SelectDevices in the left pane.
- Double-click on ‘Other device‘ in the correct pane to aggrandize it.
- Right-click on the device proper name (east.g. Google Pixel) and select the ‘Update Driver‘ option.
- Click on ‘Browse my estimator for driver software‘ in the Hardware Update sorcerer.
- Click ‘Browse‘ and locate the ‘usb_driver’ folder.
- Finally, click on ‘Adjacent‘ to install the USB drivers.
You should now accept the Google USB Drivers installed. Your Windows PC should now notice and recognize your Android device over the USB connection.
Of import Notation
If the drivers fail to install even after following the steps, OR the ADB/Fastboot commands do no work even if the drivers are installed, then it could be because y’all’re using a USB 3.0/three.one/iii.2 port or an AMD based PC. This is an issue faced by a lot of users recently.
To fix information technology, simply effort using a USB 2.0 port (If information technology’s non available, you can likewise use a USB ii.0 hub) on your PC. Also, try using an Intel-based PC for especially when using ADB/Fastboot tools.
How to Change Google USB Drivers to Support Other Android Devices
Like we mentioned above, Google USB Drivers likewise work as ‘ADB Drivers’. Merely by default, they only back up the Google Pixel and Nexus devices.
While Android OEMs do provide their ain drivers, but information technology’s more than oftentimes than they miss to include the required ADB USB drivers in them. In such cases, y’all can easily change the ‘android_winusb.inf’ file in Google USB Drivers to support any other Android device to apply the ADB and Fastboot tools.
In gild for the drivers to support your non-Pixel/Nexus device, you will first need to acquire the Vendor ID (VID) and Product ID (PID) of your device. Once you have them, the second footstep is to edit the ‘android_winusb.inf’ file and add a new device section with the VID and PID of your own device. And finally, the tertiary and final step is to install the modified drivers.
Sounds confusing? It’due south quite elementary actually. Just follow the footstep-past-step instructions below.
Step 1: Become the VID and PID of your Android Device
- First, connect your Android device to the PC using the USB cable.
- Go to ‘Control Console‘ > ‘Device Manager‘ on the PC.
- Locate your unrecognized Android device. An unrecognized device can normally be located under the ‘Universal Serial Motorcoach controllers‘ OR ‘Other devices‘ sections in Device Managing director. You would see a
yellow-colored triangle warning icon
beside the continued device.
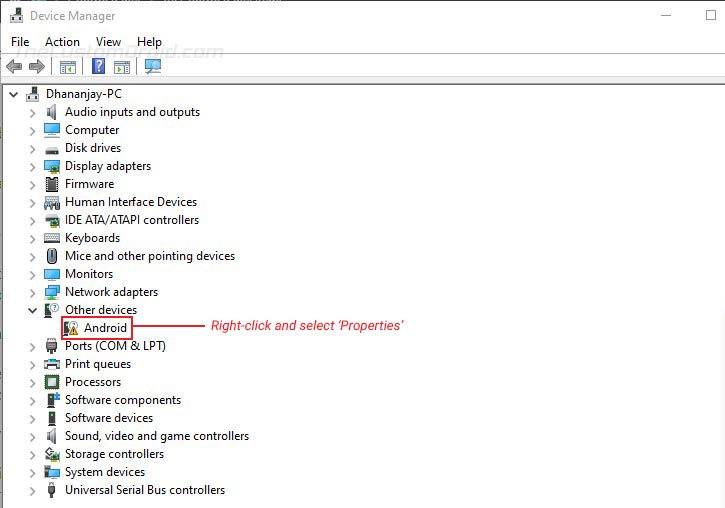
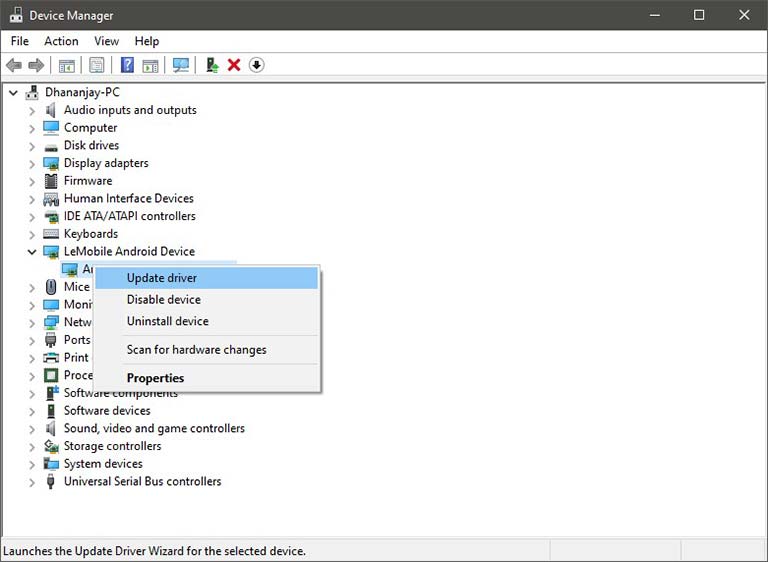
- Right-click on the device proper name and click on ‘Properties‘.
- Get to the ‘Details‘ tab and select ‘Hardware Ids‘ from the dropdown menu.
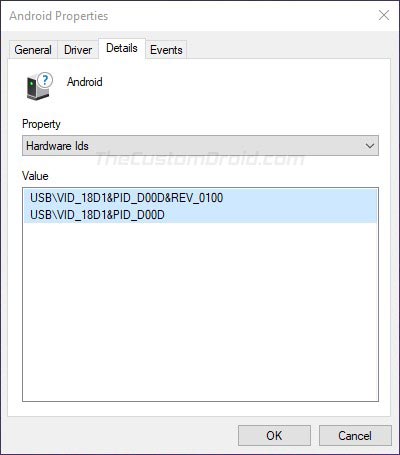
- You should now see the Vendor and Product IDs of your Android device.
Pace ii: Modify ‘android_winusb.inf’ file
Now that you take the required IDs, you lot tin can modify/edit the ‘android_winusb.inf’ file to add your device to the supported list.
- Kickoff, locate the ‘usb_driver‘ folder on your PC. Inside the binder, y’all should take the ‘android_winusb.inf‘ file.
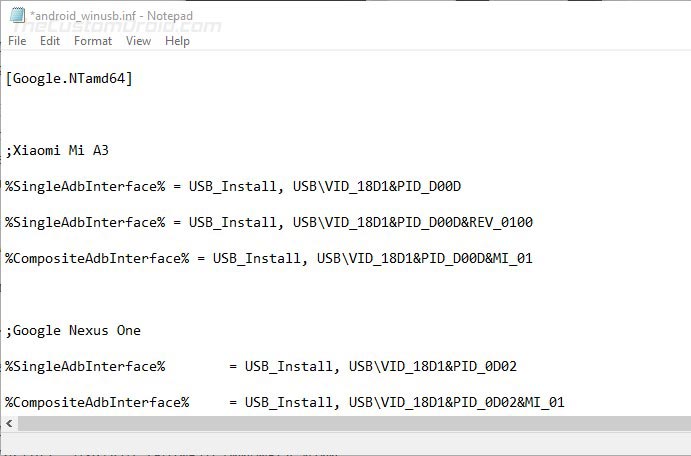
- Open the file using a text editor and locate the ‘[Google.NTx86]‘ section if your Windows PC is 32-bit (x86) or the ‘[Google.NTamd64]‘ section if your Windows PC is 64-flake (x64).
- In the said department, you volition see a number of items with the following format:
;[device name] %SingleAdbInterface% = USB_Install, USB\VID_xxxx&PID_xxxx %CompositeAdbInterface% = USB_Install, USB\VID_xxxx&PID_xxxx&MI_xx - You can copy the above lines into the respective section and edit it accordingly.
- The starting time thing to do is to replace the ‘[device name]‘ item with your actual device proper noun (Cypher specific, information technology could exist anything).
- Next, yous accept to add your device’s VID and PID values to the
%SingleAdbInterface%
and
%CompositeAdbInterface%
items.- In instance your device besides has a
REV_xxxx ID, you volition need to add two lines for the %SingleAdbInterface% item. One without and another with the REV ID. The line with the REV ID should await like:USB\VID_xxxx&PID_xxxx&REV_xxxx - For the %CompositeAdbInterface% item, yous will further demand to add ‘MI_01‘ ID towards the end. With the MI_01 ID, the line should look like:
USB\VID_xxxx&PID_xxxx&MI_01
- In instance your device besides has a
- For instance, my Xiaomi Mi A3 has a VID and PID as ‘USB\VID_18D1&PID_D00D’ & ‘USB\VID_18D1&PID_D00D&REV_0100’. In that case, the lines should look like the post-obit:
                  ;Xiaomi Mi A3
                  %SingleAdbInterface% = USB_Install, USB\VID_18D1&PID_D00D
                  %SingleAdbInterface% = USB_Install, USB\VID_18D1&PID_D00D&REV_0100
                  %CompositeAdbInterface% = USB_Install, USB\VID_18D1&PID_D00D&MI_01
One time you have added the lines under the proper department (depending on your PC’s architecture), salvage the file and get out.
Footstep 3: Install the Modified USB Drivers
You have now successfully modified the Google USB Drivers to support your Android device. The last stride is to install these modified drivers for your device.
To do then, go to ‘Command Panel’ > ‘Device Director’ and right-click on your device’s name. Then select ‘Update drivers’ to launch the Hardware Update wizard. Only click on ‘Browse my figurer for commuter software’ and select ‘Browse’. Now locate the ‘usb_driver’ binder that contains the modified android_winusb.inf file and select it.
Finally, click on ‘Next’ to install the modified drivers for your device. That’s it! Your Windows PC should at present recognize your Android device over ADB or Fastboot.
Installing the Google USB Drivers is the easiest solution to make your Windows PC successfully recognize your Android device. And while information technology should work for most other Android devices likewise, it’s not a hundred percent guaranteed. And if this happens, you may desire to install your device’southward OEM specific drivers from
this page
or by clicking your device manufacturer link below.
For depression-level firmware flashing, yous could also use
MediaTek
or
Qualcomm USB drivers.
If you lot face up any problems installing the drivers on your PC, feel gratuitous to ask us through the comments.
Drivers source:
Google
