

A Computer With a Usb Printer Is It Called Network
In Windows 10, y’all can share your printer with many PCs on your network. To share a printer from the PC that the printer is connected to (the master PC) with secondary PCs that the printer is non connected to, you must ready sharing settings for the printer, connect the printer to the master PC (either wirelessly or by using a USB cable), and then turn on the printer. Also make sure the principal PC is turned on, connected to the printer, and continued to the network.
Note:When sharing a printer, make sure that sharing settings are prepare up on the primary and secondary PCs. Besides, make sure you know the name of the principal PC. For more info, encounter the Set up Sharing settings and Find your PC proper name sections at the end of this topic.
Share the printer on the primary PC
In that location are two ways to share your printer: using Settings or Command Console.
Share your printer using Settings
-
Select the
Start button, then select
Settings
>
Devices
>
Printers & scanners. -
Cull the printer you want to share, and so select
Manage. -
Select
Printer Properties, so cull the
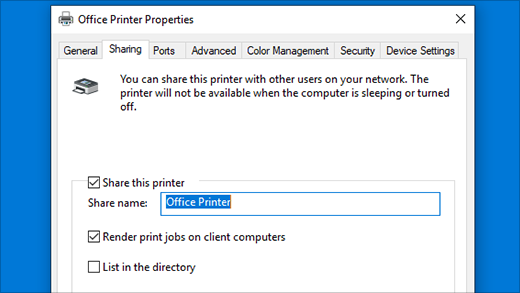
Sharing
tab. -
On the Sharing tab, select
Share this printer. -
If yous want, edit the share name of the printer. You lot’ll use this name to connect to the printer from a secondary PC.
Share your printer using Command Console
-
In the search box on the taskbar, type
control console
and and so select
Control Panel. -
Under Hardware and Sound, select
View devices and printers. -
Select and concord (or correct-click) the printer y’all desire to share, select
Printer backdrop, and then choose the
Sharing
tab. -
On the Sharing tab, select
Share this printer. -
If you want, edit the share name of the printer. You’ll use this name to connect to the printer from a secondary PC.
-
Select the
Start push, so select
Settings
>
Devices
>
Printers & scanners. -
Choose the printer y’all want to share, and then select
Manage. -
Select
Printer Backdrop, then choose the
Sharing
tab. -
On the Sharing tab, select
Share this printer. -
If you desire, edit the Share name of the printer. Yous’ll use this name to connect to the printer from a secondary PC.
-
In the search box on the taskbar, blazon
control panel
and then select
Control Panel. -
Under Hardware and Sound, select
View devices and printers. -
Select and agree (or correct-click) the printer you want to share, select
Printer properties, and so cull the
Sharing
tab. -
On the Sharing tab, select
Share this printer. -
If you desire, edit the share proper noun of the printer. You’ll utilise this name to connect to the printer from a secondary PC.
Connect the shared printer to another PC
At that place are ii ways to connect a shared printer to another PC: using Settings or Command Panel.
-
Select the
Showtime
button, then select
Settings
>
Devices
>
Printers & scanners. -
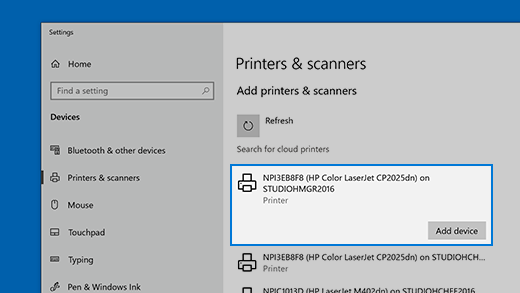
Nether
Add printers & scanners, select
Add a printer or scanner. -
Choose the printer y’all desire, so select
Add Device.
-
If y’all don’t encounter the printer you desire, select
The printer that I want isn’t listed. -
In the Add together printer dialog box, select
Select a shared printer by proper noun, and then enter the computer or device name of the primary PC and the share name of the printer using one of these formats:-
\\computername\printername
-
http://computername/printername/.printer
-
-
When prompted to install the printer driver, select
Next
to complete the installation.
For more than info about the figurer or device name, meet the Find your PC proper noun section in this topic. Past default, yous need the user name and password of the primary PC to access the printer.
-
In the search box on the taskbar, blazon
control panel
and so select
Control Console. -
Under Hardware and Audio, select
View devices and printers, and then select
Add a printer. -
Select the printer you want, select
Next. When prompted, install the printer commuter. -
If you don’t see the printer you want, select
The printer that I want isn’t listed. -
In the Add a device dialog box, select
Select a shared printer past name, so enter the estimator or device name of the primary PC and the share name of the printer using ane of these formats:-
\\computername\printername
-
http://computername/printername/.printer
-
-
When prompted to install the printer driver, select
Adjacent
to complete the installation.
For more info well-nigh the computer or device name, see the Notice your PC name section in this topic. Past default, you need the user name and countersign of the master PC to access the printer.
Set up Sharing settings
The settings you use to share devices is oftentimes turned on past default. If not, follow the steps in this section to plough settings on using settings or Control Console.
-
Select the
Kickoff
button, then select
Settings
>
Network & Internet
>
Wi-Fi. -
Under Related settings, select
Change advanced sharing options. -
In the Advanced sharing settings dialog box, aggrandize the
Private
section. Adjacent, nether Network discovery, select
Turn on network discovery. -
Under File and printer sharing, select
Plough on file and printer sharing.
-
In the search box on the taskbar, type
control panel
and then select
Control Panel. -
Select
Network and Cyberspace
>
Network and Sharing Center
>
Change advanced sharing settings. -
In the Advanced sharing settings dialog box, expand the
Private
department. Side by side, under Network discovery, select
Turn on network discovery. -
Under File and printer sharing, select Turn on file and printer sharing.
Find your PC name
You’ll need the proper name of your primary PC, also chosen the reckoner name or device proper noun, to connect the secondary PC to the printer.
-
In the search box on the taskbar, blazon
computer name. -
Select
View your PC name. -
Nether Device name, you’ll see the PC (calculator) name.
-
In the search box on the taskbar, type
command panel
and and so select
Control Panel. -
Select
Organization and Security
>
System
>
Encounter the proper noun of this computer. -
Under Calculator name, you’ll meet the PC (reckoner) name.
