

5820 Hp Printer Does It Support Ios
Z7_3054ICK0KGTE30AQO5O3KA30N0
HP DeskJet GT 5810, 5820 Printers – Replacing Printheads
This document is for HP DeskJet GT 5810, 5811, 5820, 5821, and 5822 All-in-1 printers.
Video of replacing the printheads
The following video demonstrates how to replace the printheads.

Step i: Supplant the printheads
Replace the black and tri-color printheads.
note:
Priming cannot brainstorm until new tri-color and blackness printheads are installed at the same time into the printer. An
Due east-eight
mistake occurs if just one new printhead is installed in the printer.
-
Plow on the printer.
-
Make sure newspaper is loaded in the printer.
-
Make sure that all ink levels are above the minimum make full line.
Figure
: Example of ink at minimum fill line

-
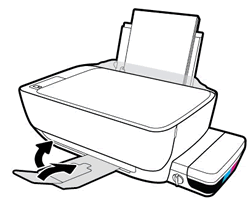
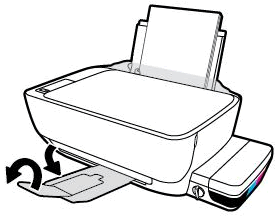
Shut the output tray extender, and and then rotate the output tray left to stow it in the printer.
Effigy
: Closing the output tray
-
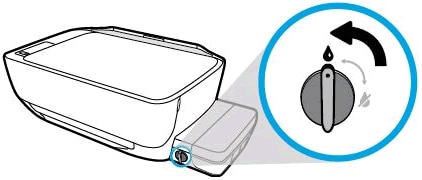
Make sure the ink valve is unlocked. Locking the ink valve might crusade ink to drip while replacing the printheads.
Effigy
: Unlocking the ink valve
-
Open the exterior door, and so open up the printhead access door.
If the carriage does not move to the eye of the printer, reach inside and manually move it to the centre.
Figure
: Accessing the carriage
-
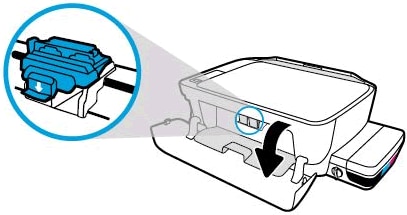
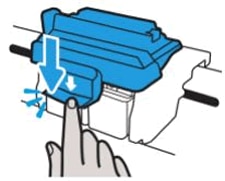
Gently push down on the blue carriage latch.
The blue railroad vehicle latch opens.
Figure
: Pushing down on the blue printhead railroad vehicle latch

-
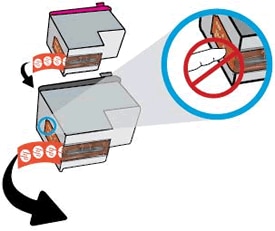
Lightly printing down on the tri-color printhead to release information technology, and then pull the printhead out of its slot. If a printhead is hard to remove, push button up on the blue latch to aid in removal.
Echo these steps for the black printhead.
caution:Keep the printhead upright during removal to prevent ink from leaking. Do not touch the printhead towers (the nozzles on top of the printhead), as they might comprise residual ink.
Effigy
: Removing the printheads

-
Open the packages, and then remove the new printheads.
Figure
: Removing the printheads from the package

-
Pull the orangish plugs directly up from the tops of the printheads.
Figure
: Pulling out the orange plugs

-
Remove the tape from the printhead contacts using the pull tabs.
circumspection:Do non touch the copper-colored contacts or the ink nozzles.Do not replace the protective record on the contacts. Treatment these parts tin event in clogs, ink failure, and bad electricalconnections.
Figure
: Removing the tape from the printhead contacts
-
Slide the printhead at a slight upward angle into the empty slot, and then gently push up on the printhead until it snaps into identify.
-
Insert the black printhead into the right slot.
-
Insert the tri-color printhead into the left slot.
Figure
: Inserting the black and color printheads

-
-
Close the blueish carriage latch by pushing downwards firmly until the latch snaps into place.
Figure
: Closing the blue carriage latch
caution:Very Of import!
Do non open up the blue carriage latch after printhead installation. Opening the latch might result in severe ink system errors.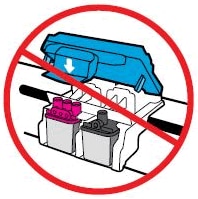
-
Close the printhead access door.
A blinking
P
displays on the control console. -
Close the outside door.
-
Pull out the output tray, and so enhance the tray extender.
Figure
: Pulling out the output tray, and then raising the tray extender
Step 2: Marshal the printheads and so prime number the ink organisation
Aligning the printheads is necessary to achieve the all-time print quality. After the alignment, the printer begins the procedure of priming the ink organisation.
caution:Do not move or disconnect power from the printer during the priming process.
-
On the printer command panel, press and hold the Resume button

for 3 seconds.The alignment starts when the blinking
P
becomes a blinking
A.The printer prints an alignment page.
Figure
: Pressing and belongings the Resume button

-
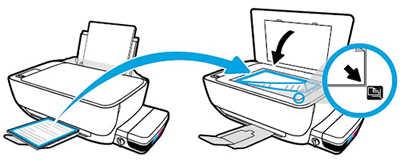
Elevator the scanner lid.
-
Identify the alignment page with the print side down on the right-front corner of the scanner drinking glass, and so close the scanner lid. Position information technology according to the engraved guides around the scanner glass.
Figure
: Placing the alignment page on the scanner drinking glass
-
Close the scanner lid.
-
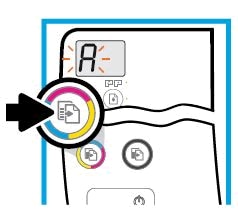
On the control panel, press the Start Copy Colour button
 .
.Figure
: Pressing the Start Re-create Color button
The printer aligns the printheads.
-
The printer starts the priming process. You lot can all the same impress, scan, and make copies while the printer is priming.
notation:
The priming process can final upwardly to 45 minutes.
Priming is complete when the rotating lines stop and a
0
displays on the command panel.Effigy
: Example of the control console during the priming process

Frequently asked questions (FAQs)
Review the list of oftentimes asked questions about replacing the printheads.
